Saw Blade Steel Embrittlement
Ripped and Torn Shoulders on Saw Blades
Rarely, but occasionally, there are problems with tip loss on saw blades. This occurs one of four ways. 1. If the tip is not properly prepared or if the brazing was done properly then the saw tip may come off whole. 2. If the saw blade hit something hard enough then the saw tip may break and a chunk may come off. 3. If the saw blade is very, very soft and impact something hard enough the steel may actually tear and the steel shoulder will come off with the tip attached. This is extremely rare. 4. The last reason for tip loss is a shoulder that is too hard and thus brittle. In this case the steel will actually snap and the steel shoulder will come off with the tip attached.
It is the last reason that we are going to address here.
Saw steel, as with most steels, can be hardened or softened according to how it is heated and cooled. Both the temperatures used and the cycle times can influence these greatly.
If saw steel is overheated during brazing it can be taken from a tough level with a Rockwell C in the mid-40s to a very brittle level with a Rockwell C value in the low 60s.
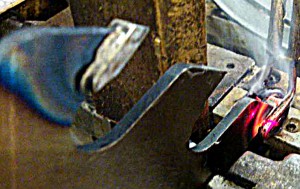
Above is a picture of the saw blade being run through an automatic brazer. On the upper left of the picture you can see a brazed saw tip and you can see a great deal of color behind the saw tip. This rainbow colored area is the heat affected zone. The steel got hot enough to change color.
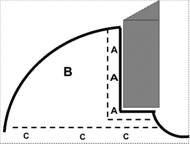
Right is a drawing showing the three areas behind the saw tip. To create a successful braze joint you need to have the steel in area ‘A’ as hot the full flow point (liquidus) of the braze alloy. If it is not as hot as the braze alloy the braze alloy will not bond to it well and you will have a cold joint.
Area ‘B’ is a marginal area. If you have a wee bit of color in it next to area ‘A’ then you are probably okay. The closer you get to area ‘C’ the more likely you are to have trouble.
If you get into area ‘C’ then you’re brazing technique needs work and you are heading for trouble.
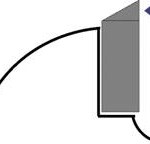
In the picture right the blue arrow indicates the direction of force in most typical cutting operations. This helps explain why the chill line immediately behind the tip is not a problem while a chill line all the way down the shoulder is a great problem. A chill line immediately behind the tip still leaves the great majority of the shoulder soft and strong. The soft, strong shoulder readily handles any and all impact forces from cutting. When you have a transition point all the way down at the bottom of the shoulder you have created an extremely weak zone precisely at the point where the stress from cutting impact is the greatest.
If you’re interested in looking at excellent brazing techniques I can strongly recommend our brazing videos on YouTube.
We cannot take any credit for these videos. All we did is pay to have the first one done and the Hartleys did all the work on the second one.
These are two very different techniques by both people have zero tip loss and zero problems with ripped or snapped shoulders. The Hartleys use a somewhat larger flame but they balance that beautifully with the way they position the flame and the amount of flux they use back onto the shoulders.
You can get an excellent idea the condition of the steel after brazing by the color of the steel as we explained above. There are two other ways of easily and simply telling the condition of the steel.
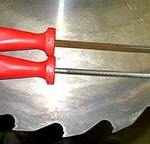
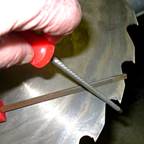
The far right picture above shows the steel saw plate with two ordinary files on it. One of them is a triangular file and the other one is a round file. The right picture above shows the use of a round file.
To test the hardness of the steel you simply rub the file over it and see whether it cuts or just slides. If you’re reading this you should be more than skilled enough to tell the difference. If you’ve never used a file on steel then try this and the difference will become readily apparent.
I show a triangular file and a round file. The advantage to the triangular file is that it is much more likely to cut and many feel it gives you a more sensitive test of the hardness. The great disadvantage to the triangular file is that it leaves a notch on the edge of the saw plate. It leaves a sharp, V-shaped notch which is an excellent place for a crack or a tear to start. The round notch does not create a unique stress concentration point as the triangular one does.
If you’re going to run the saw blade after testing you are far and away better off using a round file and the triangular file should be avoided.
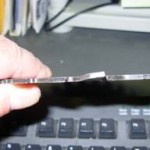
There is another way of testing the condition of the steel on the saw shoulder. In this test you grab the steel saw shoulder with a pair of vise grips or similar and you bend it. If the steel bends without breaking it tells you a great deal about how hard and how brittle it is.
The most extreme case of this I have seen was at Cascade Southern Saw Company in Milwaukee, Oregon. As part of the demonstration they took a saw blade with about a two foot diameter and repeatedly bent the shoulder back and forth from side to side. They could flex the steel out about 60° to either side rapidly and repeatedly without snapping or tearing the steel.
The pictures above are of a 10 inch saw blank which is an entirely different situation.
The Cascade Southern test was done on a large saw blade that was meant to be used in a ‘Curve Sawing’ application. In this application the saw blades are placed in a box that moves from side to side to follow the curves of the log being sawn. In order to do this the saws must be more flexible than is common with something like a 10 inch saw blade.
However, even with the 10 inch saw blade, you should be able to bend the shoulder out without snapping the steel. I do not recommend that you undertake this test lightly as it takes a real expert to get the shoulder back in alignment properly.
Preventing Steel Embrittlement
The most important part in preventing steel embrittlement is control of the heat. The most important part in controlling the heat is to control how the heat is applied.
Roughly speaking, steel will respond to heat at least five and probably closer to 10 times as much as the carbide will particularly in an induction brazing application. In any case and in all cases you want to direct the heat to the carbide and let the heat go into the carbide through the braze alloy and then heat the steel as much as possible.
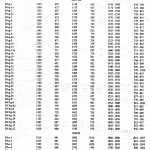
You need to make sure that you are using the correct temperatures. At the end of this article is a chart showing the official temperatures for various braze alloys. These are the American Welding Society designations. It is pretty easy to cross match most suppliers designations with this chart and the supplier should be able to give you the AWS number anyway.
When brazing you want to get about 50°F above the liquidus temperature and hold it there very briefly. Whereas the braze alloy really does melt fully at the liquidus temperature, it still takes a bit more energy to make the transformation from a solid to a liquid.
Make sure you know what temperature you are actually getting. I just helped solve a problem with snapped shoulders by suggesting that the machine was getting the parts too hot. It was an automatic brazing machine that had been around for a while and the glass cover over the thermal sensor had clouded. Replacing the rather inexpensive glass cover and recalibrating the machine eliminated the problem.
If you are torch brazing I strongly recommend the use of the Tempil Stick. They should be available from any welding supply store or online. They come in a huge variety of temperature ranges. They are sort of like a large crayon in a metal case. You color the area to be heated and, when you hit the designated temperature, the mark you made with the Tempil stick melts. It is extremely easy to use and gives very clear results.
Another consideration is the amount of flux you use. Flux is primarily designed to trap oxygen. It does have some cleaning properties but best practice recommends you not rely on it to clean. You should start with clean parts. You will see really good brazers flux well back from the area to be brazed. This helps control the heat as the flux serves somewhat as a thermal barrier.
800 346-8274
Tags: brazed tools, circular saws, saw blade, saw blades, sawblades
Leave a Reply


