How to Make Carbide Brazing Faster
Increasing Carbide Brazing Throughput
How To Braze More Carbide Parts Faster
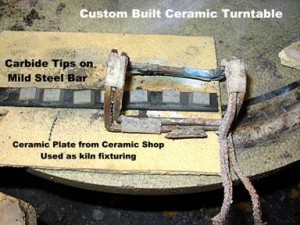
The picture illustrates two of our favorite techniques for increasing the number of carbide parts we can produce in a given time period.
The underlying plates are ceramic and thus do not react to the influence of the induction coil. (Note: this is not the best shape coil for this application but it does work very well for photography.)
1. Tungsten carbide has a cobalt binder so it is magnetically responsive and does heat up under an induction coil. However steel is roughly 10 times to 20 times as responsive as tungsten carbide. In the picture above we have tungsten carbide saw tips sitting on a mild steel bar. The mild steel bar gets hotter much faster than the saw tips do and helps to heat up the saw tips.
This is a setup to pretin saw tips. If we are going to pretin in this example we would put a piece of braze alloy wire with some black flux in the middle of the tips.
2. The tungsten carbide saw tips are arranged on a long, narrow piece of mild steel. The part of the mild steel underneath the coil heats up fastest. As the part under the coil heats the rest of the bar is also heating up. As the parts come to full temperature we move the bar in from the left to the right and the preheated carbide parts on the preheated steel bar braze even faster than the first parts did.
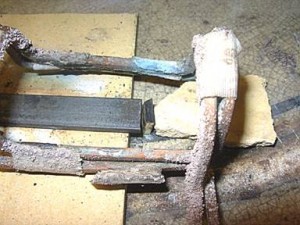
3. To get the fastest heating possible all parts of the coil should be as close to the actual braze joint as possible. As with light, the electromagnetic energy falls off with the square of the distance. If you double the distance between the coil and the part then you reduce the effectiveness by 75%. You want the coil as close to the work as possible. The only consideration is that you do not want the coil grounded out or shorted out.
Here is a very simple fixture. In this case we are brazing the carbide tip in the middle to the steel bar coming from the left. The carbide tip is wider than the steel bar. We want the carbide tip centered on the steel bar. You do a little math and figure out how far on each side the carbide will be wider than the steel. Then you lay the piece of steel on a ceramic plate so that the steel is raised up that amount above the ceramic plate on which the carbide sits.
On the right is just a broken piece of ceramic plate. This is to hold carbide saw tip in place during heating.
You can see another version of this technique in our Saw Blade brazing video.
The steel will heat up before the carbide. Once the steel, carbide and braze alloy are all up to temperature the braze alloy will flow onto the steel. You then turn the heat off and you will have a good part. Due to capillary attraction the carbide will tend to move towards the steel. This is a very minor effect. What is important is that the carbide will not move away from the steel.
Once the temperature has dropped enough that the braze alloy has hardened you may remove the assembly and let it finish cooling. Be very careful because the assembly can contain a great deal of residual heat and flesh burns can occur in this part of the operation.
The entire assembly should be allowed to cool until it is all room temperature. Accelerating the cooling process with cold water, for example, will seriously weaken the braze joint.
Torches
The above techniques are demonstrated with pictures from an induction brazing set up. The same techniques can also be used with a torch. In the case of a torch you would preheat by holding the torch on the right side of the picture and having the flames wash down the parts to the left.
Contact us to buy carbide and braze alloy
1 800 346-8274
Tags: Braze alloy, brazed tools, Brazing
Leave a Reply


