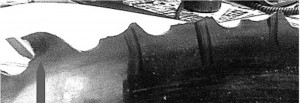
Ripped and Torn Shoulders on Saw Blades- part 1
Solving problems with Ripped and Torn Shoulders on saw blades.
Note: the information presented here is all presented in good faith by people with a great deal of experience in their area. However sawmills and sawing situations vary widely. Do not take this information as gospel. Instead look at it as a starting point and a list of things to try.
We received great feedback from very knowledgable sawfiles, and therefore, received a great deal of information. We will be posting different responses and information targeting different possiblilites for the ripped and torn shoulders over several blogs in this blog series.
Differences In How Shoulder Fail
There is a difference between ripped and torn shoulders on a saw blade. A more accurate term might be snapped and torn shoulders. If the steel saw plate becomes brittle through the brazing process the shoulder will snap off leaving a clean break. If the steel shoulder is ripped off then it is more likely to have a ragged edge caused by machinery problems.
The Saw Filer View
Some extremely good filers went out of their way to help another filer they have never met.
Emily, here at Carbide Processors, got a call from a filer in Canada who had a problem with ripped shoulders. I talked about brazing which is about all I know. He thought there were other factors involved so I sent an email to some filers I had met and they passed it on. That is how I got the incredibly good answers below.
Burl Swigart
Retired Filer and Owner of Triple S (grinder repair, rebuild and sales)
Any time you work a carbon steel it will harden how much depends on the amount and heat the steel has. Gullets on bands always micro harden while being bent around the wheel I have seen micro Rockwells showing spots as high as 57Rc. On circle saws it will only be very shallow from the sawdust rubbing.
Warren Bird to Mike West
Warren Bird called me about the gullet hardening issue and asked what prompted the question. He said that fatigue is usually the cause of cracking and not the fact that the gullets were hard. He told me that extensive studies had been done on bandsaw steel mostly, but that trim saws were a likely target as well.
Preventing Steel Embrittlement
The most important part in preventing steel embrittlement is control of the heat. The most important part in controlling the heat is to control how the heat is applied.
Roughly speaking, steel will respond to heat at least five and probably closer to 10 times as much as the carbide will particularly in an induction brazing application. In any case and in all cases you want to direct the heat to the carbide and let the heat go into the carbide through the braze alloy and then heat the steel as much as possible. You need to make sure that you are using the correct temperatures.
When brazing you want to get about 50°F above the liquidus temperature and hold it there very briefly. Whereas the braze alloy really does melt fully at the liquidus temperature, it still takes a bit more energy to
make the transformation from a solid to a liquid.
Make sure you know what temperature you are actually getting. I just helped solve a problem with snapped shoulders by suggesting that the machine was getting the parts too hot. It was an automatic brazing machine that had been around for a while and the glass cover over the thermal sensor had clouded. Replacing the rather inexpensive glass cover and recalibrating the machine eliminated the problem.
If you are torch brazing I strongly recommend the use of the Tempil Stick. They should be available from any welding supply store or online. They come in a huge variety of temperature ranges. They are sort of like a large crayon in a metal case. You color the area to be heated and, when you hit the designated temperature, the mark you made with the Tempil stick melts. It is extremely easy to use and gives very clear results.
Another consideration is the amount of brazing flux you use. Brazing flux is primarily designed to trap oxygen. It does have some cleaning properties but best practice recommends you not rely on it to clean. You should start with clean parts. You will see really good brazers flux well back from the area to be brazed. This helps control the heat as the flux serves somewhat as a thermal barrier.
Tags: Brazing, ripped shoulders, saw blades, saw plate
Leave a Reply


