


3 Easy Ways to Cut Mortises
Mortise and tenon joints are regarded as one of the toughest types of joinery you can use for your woodworking projects. These joints are often associated with fine furniture making due the critical strength and stress resistance as well as quality.
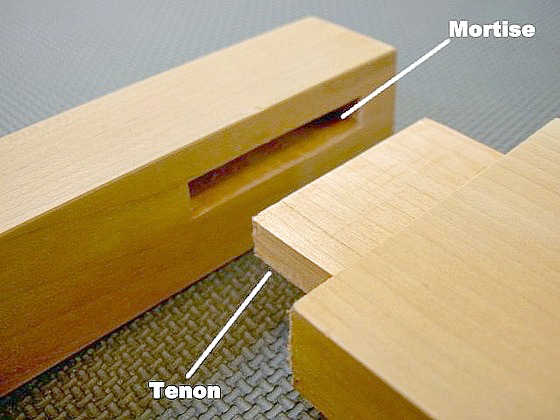
There are several types of mortise and tenon joints, here are a few of them: stopped/blind, through, angled and wedged. All of these different joints are made up of the same parts: a mortise (a recess cut into a piece of wood that accepts a tenon) and a tenon (a tongue at the end of a board that fits into a mortise).
As a rule of thumb, tenons are generally 1/3 the thickness of the work-piece and up to 3″ long. This proportion will help to maximize the shear strength of the tenon without compromising the strength mortise walls. Mortise and tenon joints should interlock snugly without binding. It should be just loose enough to permit a thin, even glue bond along the full joint.
Make sure to cut the mortise first, before the tenon. It is always easier to cut the tenon to match the existing mortise then trying to cut a mortise to fit a tenon. Here are 3 easy ways to make a clean, precise mortise cut.
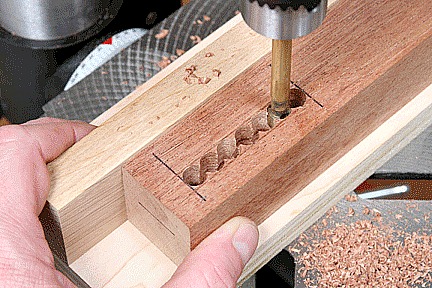
Cutting a Mortise Using a Drill Press and Chisel
Install a brad point or Forstner drill bit into your drill press with a diameter equal to the planned thickness of the mortise. Make sure to set the depth stop to equal the depth of the mortise. Align the bit with the layout lines at one end of the mortise. Boring on hole at a time, move the work-piece so the holes will be next to or overlapping each other. Continue using this method until you reach the end of the outline.
Using a sharp wood chisel, remove the wood waste to clean and square up the mortise walls. You may need to use several chisels of different sizes to effectively clean out the waste. Using your chisel at an angle will help you control the cut, paring away the waste as you work.

Cutting a Mortise with a Router Table
Choose a straight bit the same diameter as the planned thickness of the mortise. Set the depth and mark the start and end points for the mortise on the face of your work-piece. Holding the work-piece against the fence adjust the stock so one end is resting on the table and the other end is tipped over the bit. Position your work-piece so when it is lowered, the bit will make contact in the mortise area.
Once the router is turned on, lower the stock onto the bit until it is flat on the table. Start to feed it through the bit until the reference line on the board face closer to you lines up with the bit alignment mark closest to you. Feed the work-piece in the opposite direction until you are finished with the cut.
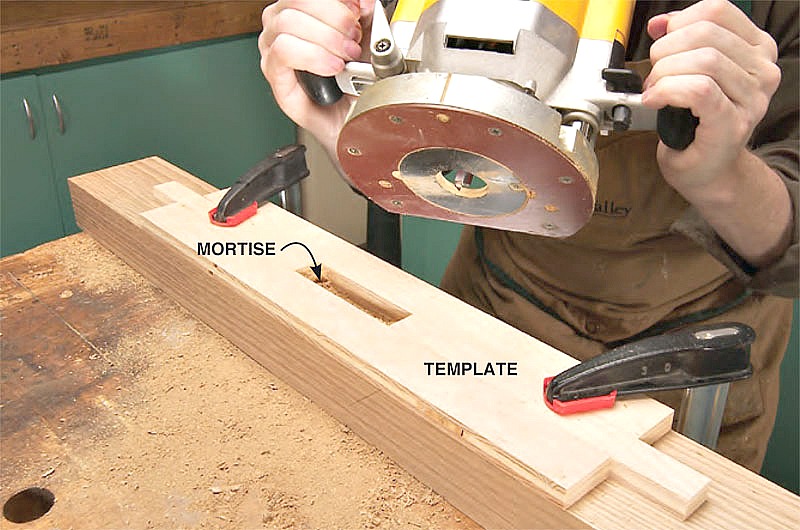
Cutting a Mortise with a Plunge Router
First lay out an outline for the mortise on your work-piece. Fit a straight bit into your plunge router, then attach a guide block to the router base to assure the bit will be centered over the mortise.
Make sure to clamp stop blocks at each end of the cut. Set the depth on the router so the bit will plunge to the mortise depth. With the work-piece secured, plunge the bit into the wood to make the mortise cut. Use a chisel to square the ends of the cut if needed.
Making a mortise cut can be an easy and clean process. The most important rule of thumb is to use quality stock and superior tools for your fine woodworking needs.
Tags: fine woodworking, mortise joints, tenon joints, woodworking
One Response to “3 Easy Ways to Cut Mortises”
Leave a Reply to Michael Smith

Great article! You have very well explained the methods for cutting mortise. Thanks for sharing this information.