


Rip Cutting Using a Table Saw
The process of rip-cutting is often referred to as cutting parallel to or parallel with the grain. This is true when it comes to solid wood but when ripping plywood you’ll find yourself ripping across the surface grain. Perhaps a better way to describe rip-cutting is- the process of cutting stock to width.
Rip-Cutting Using a Table Saw
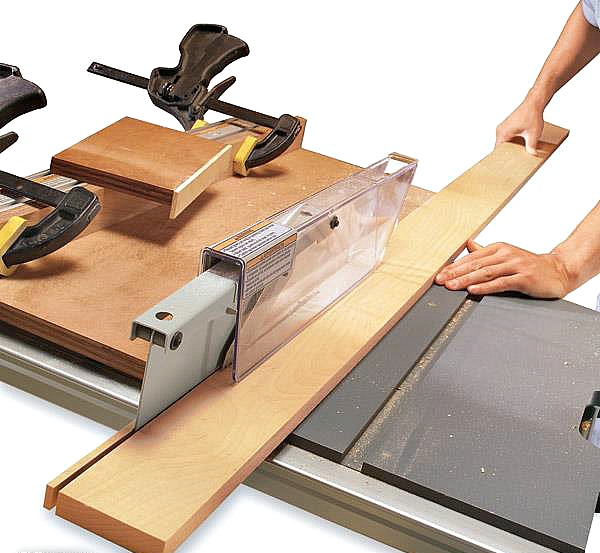
The most convenient and accurate way to rip lumber and sheet goods is by using a table saw with a good quality ripping blade. We stock several high quality ripping blades with different tooth configurations for the best cut on your application. Also make sure the rip fence you’re using is parallel to the blade and at a right angle to the table. Squaring up the fence can be tricky due to the poorly made fences that usually come with some table saws that you buy. You might want to strongly consider purchasing a calibrated fence that is more sturdy, adjustable & accurate like the Incra LS-Positioner or the Incra WONDERFENCE. Incra also offers complete joinery systems that include a base mount, rip fence, shop stop, right angle & 51 templates.
Making Rip Cuts
It is a good idea to always make a test cut on a piece of scrap before cutting your stock. Begin by setting the rip fence so the distance between its inner face and the teeth of your saw blade is equal to the width you’re after for your work-piece. Use a rule to set the distance rather than relying on calibration marks on the front of the table. Once the blade is positioned correctly, lock the fence in using the locking handle. Set the blade height so it extends no more than about 1/2 inch above the surface of your work-piece. Make sure you stand to the side of the blade, not directly behind it. This will prevent you from getting hurt if the board gets kicked back when ripping.
Push the board with your right hand while guiding it firmly against the fence with your left. Keep firm control of the work-piece while cutting until it is well past the blade. Once you have finished your pass, turn your saw off to retrieve the board to check the cut you made. Measure the scrap piece to verify it is exactly the right width you need.
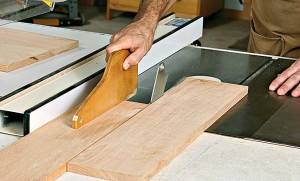
*One important point to remember is to never let your fingers get closer than about 6 inches from the blade. Also, never let your hands get directly behind the blade or they could get pulled into it in the event of kickback.*
*Another safety option is to purchase a Micro Jig pushblock. It works somewhat like a feather board plate, holding the cut-off piece in its original position through the entire cutting process.*
To rip a narrow board, use a push stick rather than your hand to feed the board. A featherboard, like Woodpeckers VPFB, clamped to the saw table will press the stock against the fence & allow you to keep your left hand away from the blade. Hold downs like Woodpeckers Knuckleclamp, can be clamped to the rip fence to prevent the stock from bouncing or chattering as you feed it. Make sure featherboards and hold downs are not pressed too tightly against the stock.
Tips & Tricks
- Long boards- Tip the back edge of the board up so it is slightly higher than the saw table. Doing this will press the leading edge of the board down on the saw table. Lower the back edge of the board as the cut progresses.
- Ripping Sheet goods- Full sheets of particle board, plywood or other sheet goods can be ripped effectively using a table saw if you position a sturdy table on the out-feed side of the saw at, or just below the table surface. Some wooodworkers prefer to cut the sheets down to size using a circular or panel cutting saw first.
Not quite sure what the difference is between ripping & crosscutting? For more information read our blog here.
Leave a Reply
