Saw Blade Failure Analysis
Saw Blade Failure Analysis
Note: this is a small picture version to make it easier to load. I can supply larger, clearer pictures if you wish.
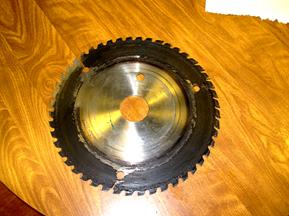
Analysis of saw blade failure. The problem is that all the tips came off while the saw was being run.
These pictures show the saw blade. The black is dried pitch and similar. On the upper left, about 10 o’clock in the left photograph, you can see a clear patch. This is an area that I repeatedly treated with easy off oven cleaner and scrubbed with a steel brush.
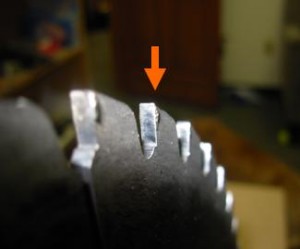
The second problem is illustrated by the big bulge of braze alloy above the top arrow. It looks as though the saw tip was seated with some pressure behind it. The saw tips should just be guided into the notch during the brazing process. You should not push on them to seat them.
We have an excellent brazing video on YouTube at the following address:
Why you need to gum out the notch
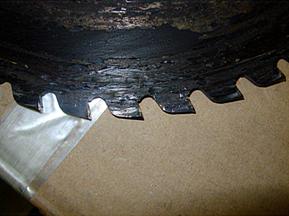
This is laser cut steel as is obvious by the horizontal lines running from left to right or right to left across the steel notch. The laser doesn’t really cut. It melts a hole and the molten metal is blown out with a gas. So a laser cut is actually a series of very small holes which show up on the saw blade as a series of fine lines.
Melting the steel causes the migration of carbon to the surface which is an issue that affects successful brazing. No matter what gas is used to blow out the molten metal, you still have hot metal exposed to the atmosphere and thus you have oxidation. Finally you have a metal slag which the blacksmiths call upset.
This leaves you with a surface that brazes kind of well. Carbide saw tips braze to this surface stay on fairly well for a fair amount of time.
The real problem is that this looks like a good braze but it isn’t. Usually brazing is a “It works or it doesn’t work” proposition. This is one of the few cases where it sort of works and then fails in use.
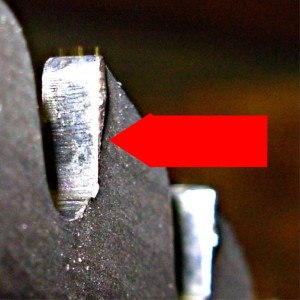
This is another saw tip and it again shows the horizontal lines as well as the bulge of braze alloy.
It appears that all the tips on the saw show braze alloy bulge to a certain extent and that all the tips also show the horizontal lines indicating little or no gumming.
Here are more pictures of braze alloy bulges. These look like the saw was run quite a while after the tips came off. In addition there was a pretty heavy pitch build up in the notches also indicating that the saw was run a fair amount of time after the tips came off.
sales@carbideprocessors.com
800 346-8274
Tags: brazed tools, circular saws, saw blade, saw blades, sawblades
3 Responses to “Saw Blade Failure Analysis”
Leave a Reply


Tom,
Thank you for the informative video and remarks.
John M.
One particular failure can cause a different failure if it isn’t tracked down promptly. With failure analysis, it includes sectioning that can usually uncover defects that have been fully overlooked.
Excellent point. Thank you.
Tom Walz