


Welcome to the Carbide Processors Blog
Ipe Wood Cutting Tools
Posted on Wednesday, September 14th, 2016 at 1:12 pm.

What is Ipe
Ipe, pronounced (ee-pay) is an extremely dense hardwood from Brazil that is flame and water resistant. Often referred to as super-hardwood or ironwood, Ipe is similar to mahogany because it has few knots and is tightly grained. This type of wood is perfect for outside woodworking projects such as decks.
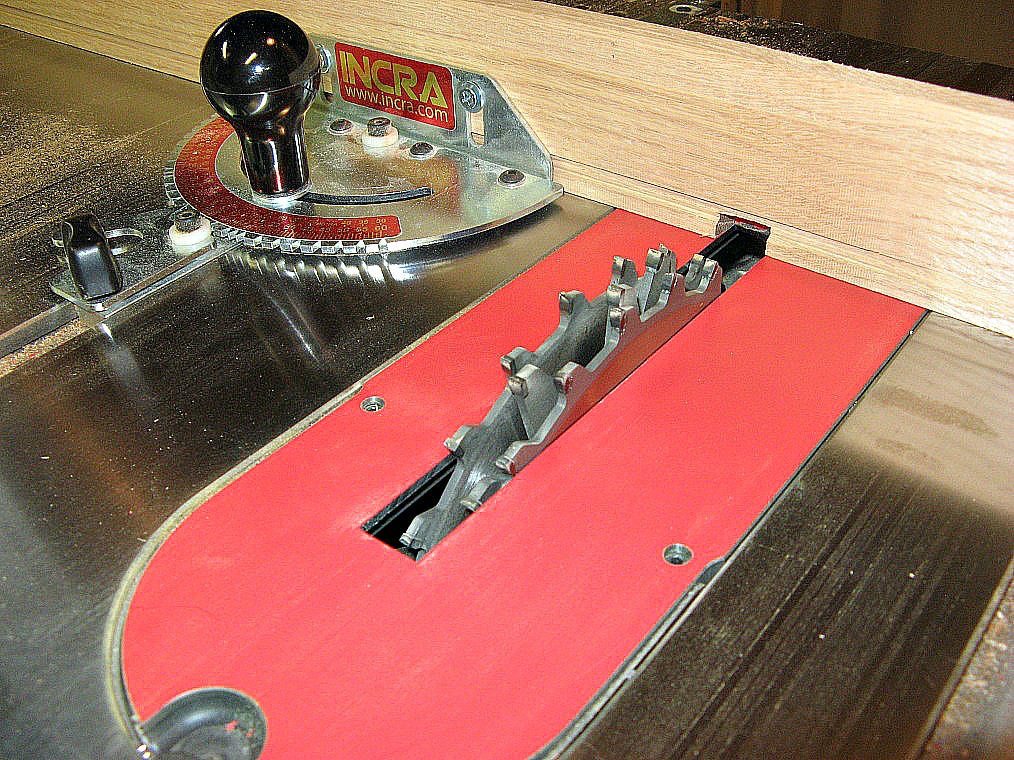
Ipe Cutting Challenges
Ipe is very strong and dense making it very hard to make clean cuts. Most cutting tools, such as saw blades and router bits will dull very quickly. Using carbide saw blades and bits will help to pro-long sharpening. Please call us for all your sharpening needs: 1-800-346-8274.
Recommended Router Bits and Saw Blades
The Vortex 3400XP series router bits will work best for you Ipe applications. Created for hard-woods, the 3400XP series offers a better finish and superior chip-out while keeping the heat temperature down.
Tenryu’s Rapid Cut series is considered a “work horse” for heavy-duty jobs. The Rapid Cut saw blades feature a modern mircograin long-life carbide tips and aggressive grind angles for superior performance.
Recommended Fastening
Driving screws and pneumatic nailers cannot be used on Ipe due to its brittleness. The wood will split and in some cases the driving screw heads will break off. It is best to use stainless steel screws on pre-drilled holes to fasten boards together.
Finishes
Finishes do not adhere well due to Ipe’s density. Depending on your preferences you might want to experiment with different options. If you like the teak look simply leave your woodworking project unfinished and exposed to the weather. Try to maintain Ipe’s rich color by applying a protective finish. Other finishes such as oil-based my take several weeks to dry.
Some deck builders have used tung oil successfully to maintain the color over a long period of time. Others have used finishes for wooden boats that contain a combination of tung oil, resins and mineral spirits.
In any case, before even attempting to finish your Ipe project make sure it has had time to thoroughly dry and acclimatize before applying a finish.
Tightening Stand for ISO, HSK63 and BT30 Tool Holders
Posted on Wednesday, August 24th, 2016 at 10:58 am.

Southeast Tools’ side mount tightening stand has a new innovative design that allows studs to be pulled from the bottom of the fixture. It is compatible with CAT, BT, HSK and ISO tool holders. The tightening stand secures the tool holder for changing cutting tools such as collets and pull studs. Made of precision machined anodized alloy, the tightening stand provides outstanding strength, speed and durability.
The fixture can be bolted to the side of a workbench or tool cart. Easy to use, simply place your tool holder in the side mount fixture and tighten the locking set-screw knob to engage the wrench flats or drive slot to securely hold the tool. Access to the pull studs is conveniently located underneath the fixture.
Southeast Tool recommends using the correct wrench & torque on the collet to reduce wear and improve cutting tool life. See the following chart for the best performance.
| Collet Nut Size | Wrench Type | Recommended Torque |
|---|---|---|
| ER11 | Mini | 12ft/lbs |
| ER16 | Mini | 20ft/lbs |
| ER20 | Mini | 22ft/lbs |
| ER25 | Mini | 26ft/lbs |
| ER16 | Slotted | 42ft/lbs |
| ER16 | Hex | 42ft/lbs |
| ER20 | Slotted | 59ft/lbs |
| ER20 | Hex | 59ft/lbs |
| ER25 | Slotted | 77ft/lbs |
| ER32 | Slotted | 100ft/lbs |
| ER40 | Slotted | 130ft/lbs |
| SYOZ25 | Hook | 90ft/lbs |
| TG75 | Hook | 90ft/lbs |
| DNA11 | Slotted | 12ft/lbs |
| DNA16 | Slotted | 42ft/lbs |
| DNA20 | Slotted | 59ft/lbs |
| DNA32 | Slotted | 100ft/lbs |
| ER32 | Slotted | 100ft/lbs |
| SYOZ | Hook | 40ft/lbs |
Southeast Tool is rated Excellent and a best value by FineWoodworking Magazine. With competitive pricing and proven performance, Southeast Tool router bits, drill bits, boring bits and tool holders are a great buy. With an extensive line boasting over 3,500 tools, Southeast Tool has been getting great reviews, and has even received special awards like the Best Covery award for best value. We carry the entire line of Southeast Tool products. Shop by category or use our virtual Southeast Tool Catalog to find the right tool for your job.
Calculating Wood Shrinkage and Expansion
Posted on Wednesday, August 10th, 2016 at 9:05 am.
You’ve spent great time in picking out the right wood, hours laying out each piece and measuring twice to make 1 perfect cut. It’s finally time to begin constructing your masterpiece. Everything is coming together beautifully. Then, shrinkage! Wood movement can ruin what would have been a beautiful and well-constructed project. So, how do you prevent it? There is a way to calculate wood shrinkage and expansion so that you can plan for it and make all your future projects come together perfectly.
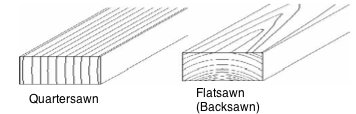
To calculate wood shrinkage, all you need to know is the species of wood, Board width, average annual change in moisture, and type of lumber cut (flatsawn, quartersawn).
Measuring the board’s width
Keep in mind that wider boards expand and contract more than narrower ones. Wood expands and contracts the most across the width. You’ll want to measure the width in inches for this calculation.
Finding moisture change
The moisture in the air can cause quite a bit of expansion or shrinkage in the wood. Wet Air will expand the wood and dry air will shrink it. You can use a moisture meter to note the highest moisture content in your wet season and the lowest in your dry season. Simply subtract the smaller number from the larger number to get your annual change. Most climate controlled homes will change 3-4 percent in a year.
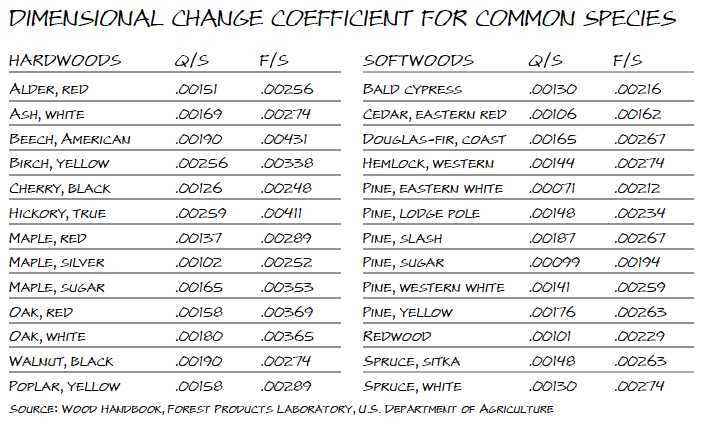
Check the dimensional change coefficient of the species (don’t worry, we have a chart for that)
The dimensional change coefficient reflects how much a specific species of wood will change in width. The chart works for wood that is between 6 percent and 14 percent moisture. First, you’ll need to know whether your wood is flatsawn or quartersawn. If it’s not entirely flatsawn or quartersawn, just use your best guess. You can typically tell which type of cut it is by looking at the end grain. Use the chart below to get the dimensional change coefficient for the wood species you are using.
Time to crunch some numbers
To get the projected shrinkage/expansion you’ll want to multiply board width (in inches) by the annual change in Moisture. Then multiply by the dimensional change coefficient number from the chart. Voila!
Shortcut
If you feel like letting someone else do the math for you, we have also found this handy wood shrinkage calculator on WoodWeb Forum. Click here for the Wood Shrinkage / Expansion Calculator.
Information for calculating wood shrinkage and expansion and Species Coefficient chart was taken from Popular Woodworking.
Choosing the Right Type of Wood for Your Project- Hardwoods & Softwoods
Posted on Wednesday, August 3rd, 2016 at 2:32 pm.
Most woodworkers spend a lot of time and money purchasing wood for their next masterpiece. The type of wood that is chosen determines the beauty and strength of the finished piece.

Common Softwoods:
Some woodworkers enjoy using softwoods exclusively due to abundance, ease of cutting, shape and weather resistance. Utilizing softwoods is much more economical then hardwoods too! The downside to softwoods to consider is the uneven staining ability as well as more prone to breaking.
Cedar– The most commonly used type of ceder is the western red variety. It has a reddish color, a straight grain and a slightly aromatic smell. This type of wood is relatively soft, and can be used for outdoor projects such as furniture, decks, and building exteriors because it can handle moist environments without rotting.
Fir– Known most often as Douglas Fir, this wood has reddish-brown color and a straight, pronounced grain. Fir is most often used for building and some furniture-making. However it doesn’t stain very well, perhaps it would be best used for a painted finished product. Douglas fir is moderately strong and hard for a softwood.
Pine– Pine comes in several varieties- Yellow, White, Ponderosa and Sugar. Pine is very easy to work with. Most pine varieties are relatively soft, making it easy to carve and make furniture with. In some parts of the country, pine is considered the wood to use.
Common Hardwoods:
Most woodworkers love to work with hardwoods. The variety of colors, textures, and grain patterns create very beautiful and interesting-looking furniture. The downside to hardwoods is their price. Some of the more exotic species can be too expensive to use for anything more than an accent.
Maple– Maple comes in hard and soft varies. Both types are harder than most other woods. Hard maple is so hard that it’s very difficult to work with. Soft maple however can be relatively easy to work with. Maple tends to be less expensive than other hardwoods.
Oak– Oak is one of the most popular used woods for furniture. Oak is easy to work with and can be found in two colors- red and white. White oak is preferred for furniture-making because it has a more attractive figure than red. White oak is also resistant to moisture and can be used on outdoor furniture.
Mahogany– One of the great furniture woods, mahogany (also called Honduran mahogany) has a reddish-brown to deep-red tint. It has a medium texture and is easy to stain. Mahogany must be purchased from a lumberyard because your local home center does not sell it.
3 Easy Ways to Cut Mortises
Posted on Tuesday, July 12th, 2016 at 8:52 am.
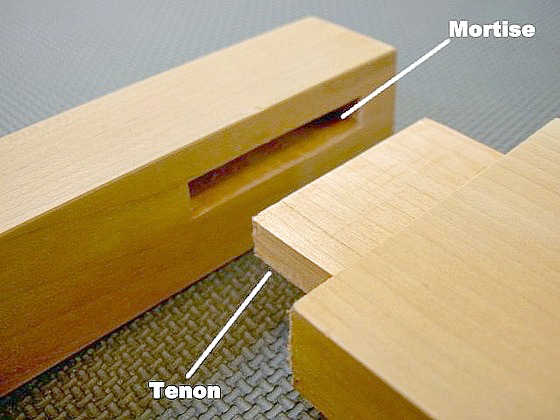
Mortise and tenon joints are regarded as one of the toughest types of joinery you can use for your woodworking projects. These joints are often associated with fine furniture making due the critical strength and stress resistance as well as quality.
There are several types of mortise and tenon joints, here are a few of them: stopped/blind, through, angled and wedged. All of these different joints are made up of the same parts: a mortise (a recess cut into a piece of wood that accepts a tenon) and a tenon (a tongue at the end of a board that fits into a mortise).
As a rule of thumb, tenons are generally 1/3 the thickness of the work-piece and up to 3″ long. This proportion will help to maximize the shear strength of the tenon without compromising the strength mortise walls. Mortise and tenon joints should interlock snugly without binding. It should be just loose enough to permit a thin, even glue bond along the full joint.
Make sure to cut the mortise first, before the tenon. It is always easier to cut the tenon to match the existing mortise then trying to cut a mortise to fit a tenon. Here are 3 easy ways to make a clean, precise mortise cut.
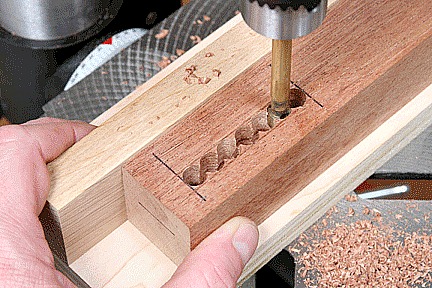
Cutting a Mortise Using a Drill Press and Chisel
Install a brad point or Forstner drill bit into your drill press with a diameter equal to the planned thickness of the mortise. Make sure to set the depth stop to equal the depth of the mortise. Align the bit with the layout lines at one end of the mortise. Boring on hole at a time, move the work-piece so the holes will be next to or overlapping each other. Continue using this method until you reach the end of the outline.
Using a sharp wood chisel, remove the wood waste to clean and square up the mortise walls. You may need to use several chisels of different sizes to effectively clean out the waste. Using your chisel at an angle will help you control the cut, paring away the waste as you work.

Cutting a Mortise with a Router Table
Choose a straight bit the same diameter as the planned thickness of the mortise. Set the depth and mark the start and end points for the mortise on the face of your work-piece. Holding the work-piece against the fence adjust the stock so one end is resting on the table and the other end is tipped over the bit. Position your work-piece so when it is lowered, the bit will make contact in the mortise area.
Once the router is turned on, lower the stock onto the bit until it is flat on the table. Start to feed it through the bit until the reference line on the board face closer to you lines up with the bit alignment mark closest to you. Feed the work-piece in the opposite direction until you are finished with the cut.
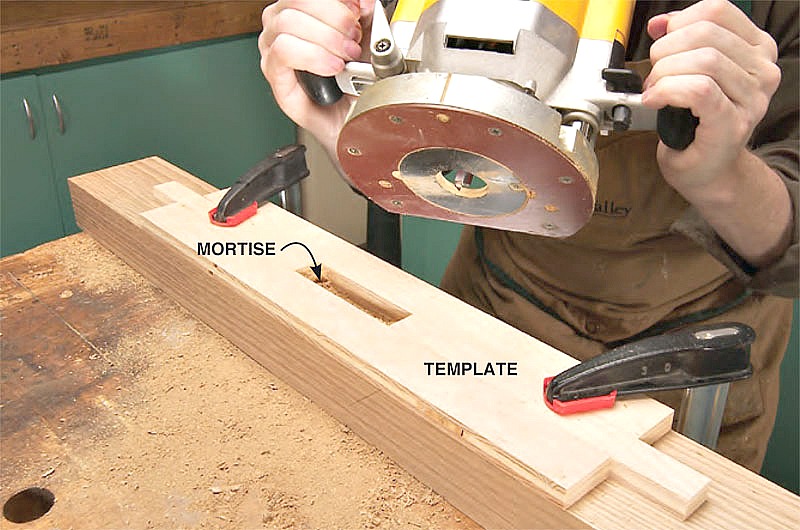
Cutting a Mortise with a Plunge Router
First lay out an outline for the mortise on your work-piece. Fit a straight bit into your plunge router, then attach a guide block to the router base to assure the bit will be centered over the mortise.
Make sure to clamp stop blocks at each end of the cut. Set the depth on the router so the bit will plunge to the mortise depth. With the work-piece secured, plunge the bit into the wood to make the mortise cut. Use a chisel to square the ends of the cut if needed.
Making a mortise cut can be an easy and clean process. The most important rule of thumb is to use quality stock and superior tools for your fine woodworking needs.
Is your machine really worthless?
Posted on Tuesday, June 21st, 2016 at 1:07 pm.
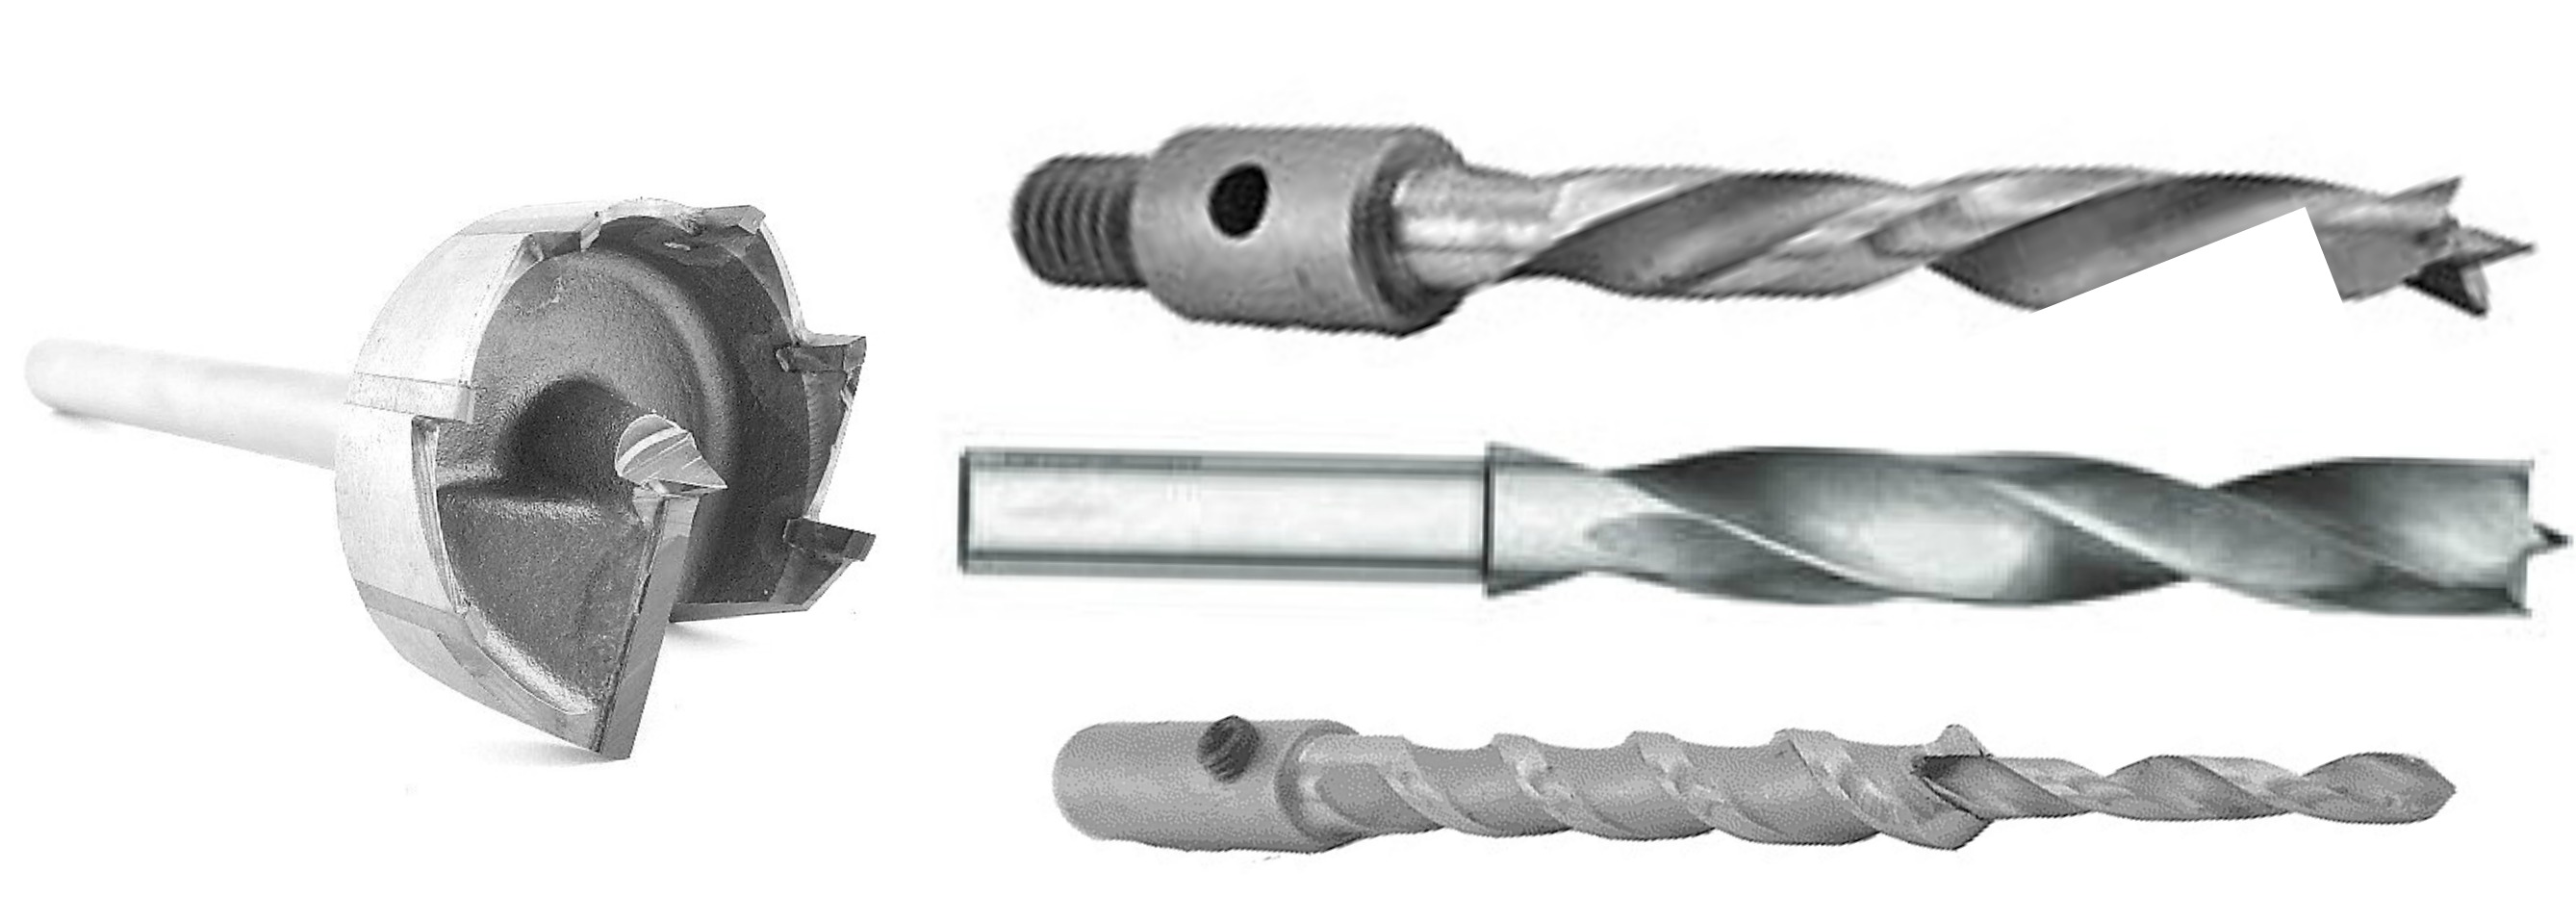
I don’t know how many times a day I am on the phone with a customer who is looking for a brad point drill bit (threaded & straight shank) adjustable countersink, clamp-on counterbore or mulit-spur forstner drill bit. Always the same basic story- I have this machine, it’s 10 – 30 years old and they don’t make the bits anymore. Can you help me?
One of the requirements of my business degree was to complete Accounting 101 & 102. I can remember the day the professor talked about depreciation. I remember sitting there at my desk thinking how crazy the system of depreciation is! The example used was a meat grinder for a local butcher shop. Although still working and in excellent condition, due to its age, the accounting world deemed it worthless. This particular machine was used daily and very valuable to the store owner and it’s employees.
These bits are still needed and being used by shops, companies and hobbyists. However, the original manufacture went out of business over 3 years ago. To quickly meet the demand for these parts we started offering our custom tooling services. These services include router bits, carbide parts, band-saw blades and custom saw blades. We have outstanding technicians that do their best on making quality, affordable parts. But, custom tooling doesn’t always work for every customer.
We continued our diligent search for a supplier that produced these brad points, forstner bits & counterbores that so many suppliers had stopped making. The hardest part was finding a supplier that could make quality parts consistently. A little over a year ago we were able to find a company that met our expectations and reflected our own “customer is first” moto. This manufacturer focuses on producing the most popular sizes and keeps a full inventory at all times. It has been a positive experience for us and a blessing for those who bought a boring machine at a discount not realizing the parts were no longer being made.
Keeping your toolholders safe and secure
Posted on Tuesday, May 31st, 2016 at 2:43 pm.
You’ve invested a lot in your CNC tooling and cutting tools. You have taken the time and spent the money to ensure that you will have precise tooling you can count on for your production. When it comes to precision tooling, even the slightest deviation in the tools integrity can really make a difference on the end project or the life of your cutting tools. The last thing you would ever want is for your quality toolholders to get damaged, or even worse, lost or stolen. So how do you ensure that your investment of precision CNC toolholders stay safe? Carbide Processors has you covered with a wide range of Huot CNC Tool scoots to keep your CNC holders and cutting tools safe and secure. Whether you have 30, 40 or 50 taper toolholders, HSK 63A or 100A Toolholders or BT Style Toolholders, Huot’s Tool Scoots have tool-holding shelves to fit a large range of toolholder styles.
With so many options, it may be hard to decide which tool scoot is the right one for you. Here is a quick guide to finding the right tool scoot to keep your CNC Tool Holders safe and secure.
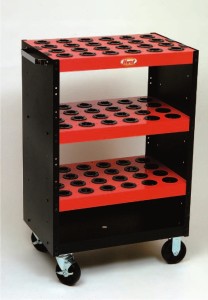
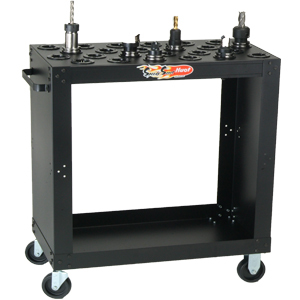
The Original Huot Tool Scoot:

This Huot Tool Scoot holds up to 48 toolholders and is built from 16 and 18 gauge cold rolled steel. This tool scoot has 5″ casters that can hold up to 1,000 pound load. And at 75 lbs, it’s light enough to scoot around you shop keeping your toolholders just where you need them. The Huot Tool Scoot has a flat top shelf with lower angled shelf for easy tool access. The shelves feature solid, interlocking side panel construction for maximum strength and stability. This Huot Tool Scoot also features two end storage trays with universal mounting holes for a toolholder vise.
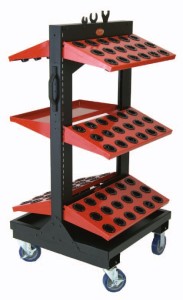
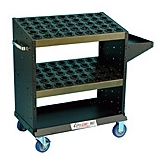
The Huot TriScoot:
The Huot TriScoot holds up to 72 toolholders and is the perfect upgrade if you are looking for just a little more storage. Built with the same 16 and 18 Gauge Cold Rolled Steel as the Tool Scoot, the Huot TriScoot offers the same stability with more Toolholder storage. The TriScoot is built sturdy and tough with 5″ casters that have a load rate of 1,000 pounds. Along with more toolholding power, the TriScoot has 3 flat shelves that can be configured in 8 different positions allowing you to customize the shelf heights to your own personal liking.
The Huot ToolScoot Tree:
The Huot ToolScoot Tree offers even more toolholder storage and more flexibility. Get storage for up to 90 Toolholders and up to 1,600 pounds of load rate on rugged 5″ casters. The ToolScoot Tree has 5 toolholder shelves plus one utility shelf that can be positioned flat or at 20 degree angles. The shelves can also be positioned at various height levels, giving you up to 70 possible options to customize the configuration of your tool scoot. Just like the other Huot Tool Scoots, the ToolScoot Tree is made ruggedly tough from 16 and 18 guage cold rolled steel and weighs 160 pounds.
The Huot SecurityScoot:
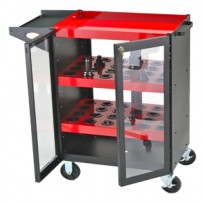
For ultimate toolholder safety and security, check out the Huot SecurityScoot. Now you can store, organize, and lock-up your toolholders all in one unit. It is much like the original Huot ToolScoot, but has locking clear poly-carbonate doors on both sides to secure your toolholders. The Huot SecurityScoot holds up to 48 toolholders and has 2 toolholding shelves that can be adjusted to 7 different mounting positions. On top of the SecurityScoot is a utility tray. The SecurityScoot is made from sturdy 16 and 18 gauge steel construction and has 5″ locking casters. Huot Security Doors can be ordered separately and added to any Huot ToolScoot for added security.
The Huot SpeedScoot:
For more easy maneuvering of your toolholders, try Huot’s SpeedyScoot. This lightweight and very mobile Toolholding scoot can hold up to 24 toolholders. It comes with 1 flat top shelf, but has the ability to add more shelves if needed. It’s sturdy and narrow build allows you to move it quickly and easily around your shop. The Huot Speedy Scoot is 15″ wide, built from 18 gauge cold rolled steel, and has 4″ casters that can hold up to 1,000 pound weight load.
For Ultimate heavy duty construction and Maximum toolholding capability, Huot offers the SuperScoot and Ultra Scoot.
The Huot SuperScoot:
The Huot SuperScoot holds up to 90 toolholders on the ruggedly built structure made from 12 gauge cold rolled steel. The 5″ casters can take up to a 1,600 load. The SuperScoot has 2 toolholding shelves that are mounted at 13 degree angles for easier toolholder access and can be configured in up to 8 positions. It’s outrigger design give it improved stability and easier maneuverability.

The Huot UltraScoot:
The Huot UltraScoot is the grand-daddy of tool scoots. Offering storage for up to 176 toolholders, and built from 12 gauge cold rolled steel, you really are getting the ultimate toolholding storage. The UltraScoot features 4 flat shelves that can be configured in 22 possible positions. It also features an extra large side tray. The four swivel and two ridged 6″ x 2″ Casters keep this rugged unit mobile and can hold up to 7,200 pound weight load. For the absolute maximum stability and toolholder storage, the UltraScoot is just the scoot for you.
*Exclusive* 3pc Vortex Spiral Bit Set
Posted on Monday, May 23rd, 2016 at 2:40 pm.

Check out our new exclusive 3pc Vortex Spiral Bit Set, #314. You will not find this set anywhere else! This 3pc set includes the top selling, most requested 1/4 shank, spiral upcut, downcut and compression router bits that Vortex makes. Save an additional 10% when you purchase the Vortex 314 versus each router bit individually.
Set Includes the Following:
1230- 1/4″ Cutting Diameter, Cutting Edge Length 7/8″, Shank Diameter 1/4″, Overall Length 2-1/2″
1330-1/4″ Cutting Diameter, Cutting Edge Length 7/8″, Shank Diameter 1/4″, Overall Length 2-1/2″
3112- 1/4″ Cutting Diameter, Cutting Edge Length 7/8″, Shank Diameter 1/4″, Overall Length 3″
Router Bit Information
Vortex 1230 upcut spiral bit will provide a smooth bottom finish, while augering the chips upward. Due to the upcut design and the included angle of the cutting edge, these tools are razor sharp!
Vortex 1330 downcut spiral bit will produce a clean top edge cut of dado type, groove type, or a simple thru-cut. Down-shear bits direct chip flow downward and help hold the part onto the table or pods.
Vortex 3112 compression spiral bit is designed for mortise cuts or cutting 5/8 or thinner material. The 1/4 upcut prevents chipping & fuzzing on top & bottom of the material being cut. Mortise Cuts are grooves cut in the material usually at a depth equal to or slightly less than the diameter of the tool.
*These two flute finishing tools are used when a smooth edge cut is required and is a popular tool design for most routing applications. The helical cutting edge reduces material contact while in the cut. This is why spiral tool designs cut faster, quieter, and cleaner than straight edge tools.
Cutting Dado Joints
Posted on Monday, May 16th, 2016 at 3:07 pm.

A dado is a square groove that is cut across the grain of a work-piece. Dado joints are used mainly to joint horizontal panels or boards (usually shelves) to vertical panels or boards (usually cabinet sides). The interlocking fit, coupled with the enhanced gluing surface makes the dado joint exceptionally strong. You can make a dado joint using two different methods: router, straight bit & cutting guide or on a table saw using a dado set.
Options for Cutting Dadoes with a Router
The Triton router, M. Power Edge Guide Kit and a Whiteside straight bit are all you need for a straight, smooth dado cuts.
-The award-winning Triton dual mode precision router is avaible in two sizes, MOF001 and TRA001. Easy to handle, runs quietly and is simple to adjust.
-Using the M. Power Edge Guide Kit you can make parallel Dadoes up to 7-1/2 from the board edge. Receive better depth range and control when making your dado cuts.
–Whiteside ranks #1 year after year by Fine Woodworking Magazine for their American made precision router bits. Whiteside is a name trusted by hobbyist and professional woodworker around the world.
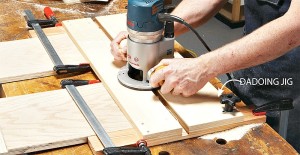
Straight Bit & Cutting Guide
A router guide like is needed to make a dado or plow with a straight router bit.
Router Edge Guide
For rough work, sliding attachments that fit onto the router base my be used as a guide. Select a bit with a diameter equal to the desired width of the dado. Make the cut in multiple passes of increasing depth, moving the router left to right.
Cutting Dadoes with a Dado Set
Using a quality dado set made by Popular Tools or Oshlun will provide consistent quality cuts all the time.
-Popular Tools uses the best quality materials and precise manufacturing to produce high-quality saw blades. Their advanced carbide teeth last longer, stay sharper allowing for the longest life possible for their blades.
-Oshlun offers the best quality for the price in the industry. Fully hardened and surface ground, Oshlun provides quality blades without leaving you wallet empty.
Set the cutting width of your dado blade by adding chippers & spacers between two blades. Mount the set on your table saw arbor. When mounted in a table saw, dado-blade sets require a saw throat plate with and extra-wide opening.
Set the cutting height to the desired depth, then adjust the fence so the blade set will start cutting at the shoulder of the planned dado. Make a test cut first, feeding the stock through the blade slowly, with plenty of downward pressure. For your safety, use a push-block when you near the blade. Measure the dado on the scrap & adjust your set-up as needed.
Use Quality Tools
For the best cuts, longest life and consistency, always use quality tools. Even if your first instinct is to buy what-ever is the cheapest, you will save yourself a lot of time and money buying the best, first.
Backyard Hero- Assembly Tools for Backyard Play-sets
Posted on Monday, April 18th, 2016 at 12:30 pm.

Now that Spring is finally upon us most of us our looking at our ever growing to-do-lists! We can finally start to tackle those out-door projects we have been neglecting for so long. And, if you have children or grandchildren, chances are a backyard play-set might be on the top of that list.
Even the mention of “backyard play-set” can strike fear into the most experienced of engineers. Think long hot hours of hunting missing parts, quick trips to the hardware store/neighbors/friends for tools, screws etc., reading an encyclopedia sized “booklet” of directions and organizing all 500+ pieces that will ultimately complete your expensive contribution to the children you love.
Well don’t worry anymore! Here are some tips & tricks that will help you put together your shrine of love in the least amount of time possible.
Tools, Tools, Tools
Make sure you have quality tools that will get the job done quickly and make your life easier. An impact driver will come in handy for all the 100’s of screws that are needed to put the play-set together not to mention some play-sets do not come with pre-drilled pieces! The Triton T20ID has a long battery life & delivers up to 2400 RPMS of driving speed. Fitted with 1/4″ hex quick release bit holder allows you to make rapid single-handed bit changes effortlessly.
Impact drivers should be used with good impact bits. The Wiha 7pc Bit Buddy Set will come in handy for all jobs, large and small. Well known for their German quality, Wiha terminator impact bits will deliver 30x the life span of regular screwdriver bits. The Wiha 76892 includes seven of the most wanted sizes: phillips #2, #3, square #2, #3 & torx T20, T25 & T30 impact bits.
Be ready with good drill bits that won’t break! Save time and money with our made in the USA Triumph drill bits. Available in a wide range of applications, you can find the right size for wood, glass, masonry and tile. Buy one or be cautious and have a few on hand ready to go by purchasing a Triumph drill bit set.
Locate, Organize, Proceed
Keep it simple, keep it organized and get done faster. Spending hours in the back yard looking for screw #23 for piece # A is frustrating at best. The best advice I have to alleviate the “treasure hunt” is to put everything in order. Put all the hardware, boards & rails in numerical order in one particular place that is easy to see, and easy to reach. Make sure the impact driver is charged & ready to go as well as any other hand tools required. More importantly, when the inevitable frustration hits, think of all the laughter & hours of fun the children will have from all your hard work. You will be the hero that will get warm, sweaty hugs and lots of sloppy kisses.
