Welcome to the Carbide Processors Blog
Carbide Tip Wear
Posted on Tuesday, September 25th, 2012 at 2:02 pm.
Traditionally a machining operation ran the hardest carbide grade it could in order to get the longest tool life. If the grade started chipping or breaking then the operation backed off into a tougher grade. A tougher grade meant larger grains, more cobalt or both.
Today’s advanced metrics and more sophisticated materials means that there are many more options for carbide saw tips. A shop can now save money on sharpenings and chipped carbide tips by trying an advanced grade of carbide.
Instead of just examining the cutting tool tip for wear or breakage the modern cutting tool engineer uses a much longer list. An example of some things to be examined might include: Wear, Macrofracture, Microfracture, Crack Initiation, Crack propagation, Individual grains breaking, Individual grains being pulled out, Chemical leaching, Rubbing affecting electrical potential, Part deformation, Friction Welding, Physical Adhesion, Chemical adhesion, Metal fatigue, Heat, Compression / Tension Cycling, and Tribology.
Advanced options to solve tool problems include micron and submicron grades, advanced alloy binders, various manufacturing operations and various coatings.
The first step in problem solving is still defining the problem accurately. Fortunately the development of inexpensive digital microscopes working off of laptops has greatly aided the process.
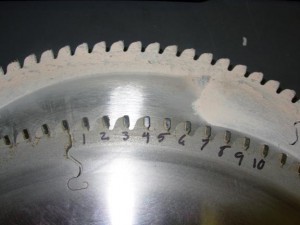
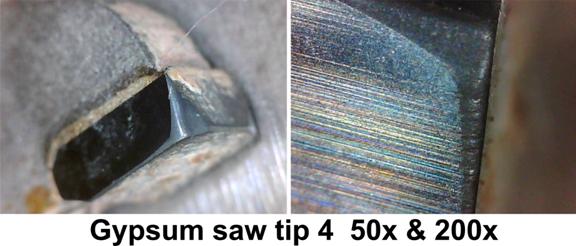
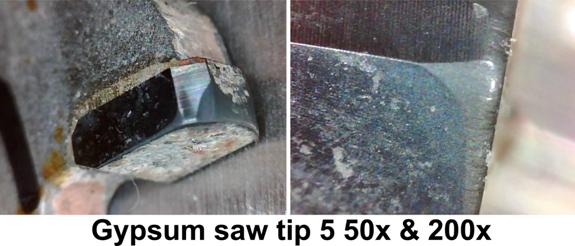
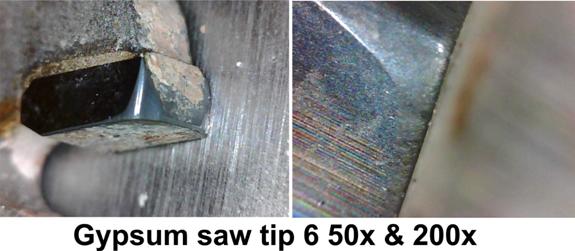
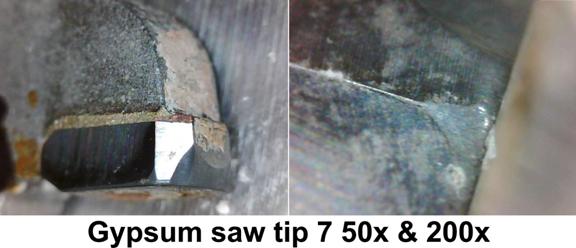
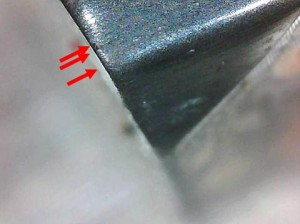
One recent example concerns saw blades trimming the edge of gypsum panels. Upon visual inspection the edges of the saw teeth showed very significant rounding clearly indicative of straight wear. Since gypsum is an extremely soft material this seemed to make sense. However the classical solution of using harder and harder carbide grades did nothing to solve the problem.

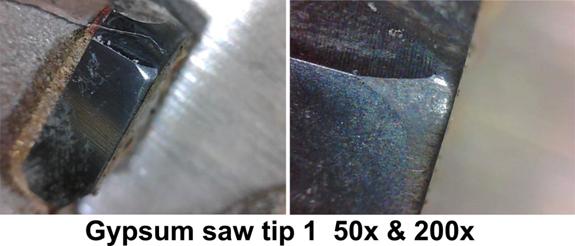
This is a photograph of one of the affected saw tips at 50 X magnification taken with a handheld scope costing about $150. The rounded area outlined in red was originally a sharp edge. It was at the end of a land which had been introduced as a design feature to help reduce wear. The rounding does look like classic, straightforward wear. 
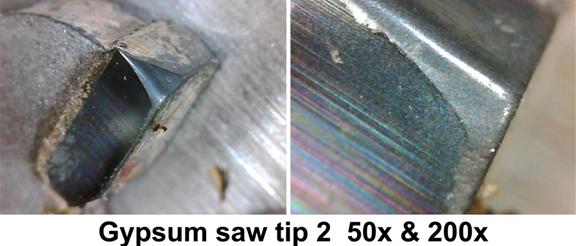
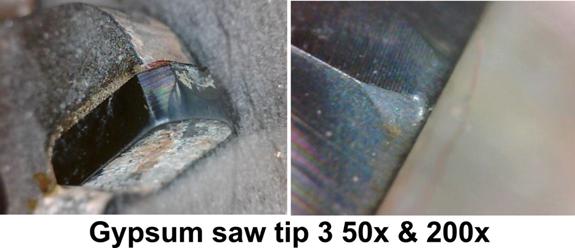
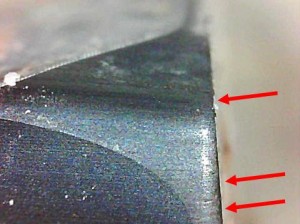
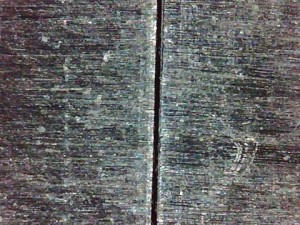
When the saw tips were examined at 200 X magnification it became obvious that there was an extreme amount of scoring and chipping on the cutting edges.
Analysis of the gypsum being cut showed that the “gypsum” contained between 2% and 10% anhydrite and quartz. This information, combined, with the photographic evidence prompted the selection of a much more advanced grade that resisted scratching and gouging thus greatly increasing service life. Increase the service life of your blades by using advanced grades of Carbide. Call us for a quote at 800-346-8274 or visit the Saw Tip section of our store.
Thomas J. Walz
President
Carbide Processors, Inc.
3847 S. Union Ave.
Tacoma,WA98409
253 476-1338
president@carbideprocessors.com
www.carbideprocessors.com
Cleaning saw blades
Posted on Monday, September 24th, 2012 at 4:07 pm.
There are thousands of grades of carbide, so discussing the properties of carbide is like discussing the properties of wood. Some grades of carbide may have certain properties that are not present in other grades of carbide. This is why there is sometimes such debate over what the properties of carbide are. To make this a little easier, let’s just assume that everybody is right, and that the differences in carbide properties is due to the varience in carbide grades.
Freud is an excellent organization with a fine reputation. If they say that caustic solutions damage their saw blades then I believe them. However, that is not what my research has shown on other grades of carbide. It is not what my research has shown of Freud blades either. I think there may be a bit of an effect but too small to be of practical concern.
I first got involved in testing the effects of caustic solution on carbide during my research. I have two patents (5,624,626 and 6,322,871) where we use a caustic solution to change etch the surface of tungsten carbide and related materials so we can braze them. This gets changed on the Internet over and over.
The caustic solution has little or no effect on the carbide by itself. When you run an electric current through the material, as in EDM or in electro etching, the caustic solution serves as a medium to carry the current, and the current acts on the difference in electrical susceptibility of the tungsten carbide and the cobalt to remove material. In order to make any practical difference in the surface of the carbide you need an extremely strong caustic solution and a lot of current for a long period of time.
The whole point of our research was to develop saw tips that stayed sharper much longer than carbide. Some of the wear to the carbide tips is actually from acids that are present in the wood that the saw blades are cutting. To reduce the wear on the carbide tips we wanted materials that resisted chemical attack of any kind. (See (University of British Columbia)Forintek report). We finally succeeded in finding a material that would resist wear from acids and abrasion, and therefore stay sharper longer. These are our Cermet II saw tips that we use to tip our World’s Best Saw Blades. We tested these tips by using Our World’s Best Saw Blades to cut green cedar, MDF, OSB and everything else you can think of.
Chemical attack is one of twelve factors we assess in building superior saw blades. Email me for a complete list. We are working on getting it on the web. It is in my book Building Superior Brazed Tools.
The handbook of Physics and Chemistry shows Cobalt as being soluble only in acid. Even then, an acid attack will create an inert surface on the cobalt that will slow or prevent any further attack.
I do not know what braze alloy Freud uses. Common braze alloys are about half silver and about a quarter copper and zinc with maybe a little nickel or tin or manganese. (AWS Bag-3, 7, 22, 24, etc.) Chemical attack on copper or cobalt as a pure metal is different than a chemical attack on a metal alloy. Iron corrodes differently than steel which corrodes differently than stainless steel.
Much of this argument is similar to arguing about whether you can lose weight by getting your hair cut. Technically, you can but it is not practically important.
Again I do not know about Freud blades but most blades are not significantly affected by any commercial chemical cleaner. In our test we found that BBG grill cleaner from a janitorial supply store was cheapest and worked best. Simple Green was also good.
Anyway, that’s what my research shows. If you are interested I have primary sources for this.
Can cleaners hurt braze alloy?
When we want to remove braze alloy we use a combination of acids such as 1/3 hydrochloric acid, 1/3 Sulfuric acid and1/3 water. This works but is horribly strong.
We have soaked braze alloy in oven cleaner for a week with no discernible damage to the braze alloy.
How to Choose a Saw
Posted on Thursday, September 20th, 2012 at 1:41 pm.
While adding a new line of hand saws to our online store, I ran across an article about how to choose a saw. It had some handy little tips, and some good information about what to look for when choosing a hand saw and how different components of the saw affect the cut.
The article was written mostly in reference to Silky Saws, but there is still a lot of great information in it. Enjoy!
How to choose a saw:
First decide what type of hand saw will best suite your application wether it be a folding saw, pistol saw, Pole saw, woodworking saw, or choppers.
Folding Saw: Folding saws take up the least amount of storage for given cutting capacity and are ideal for storing in a toolbox, glove box, with camping gear, etc. They are often used by professionals for occasional use throughout the day as opposed to continuous use.
Pistol Saw: Pistol saws need to be stored in a scabbard. They are typically more durable than a folding saw becasue of the shaft of the blade runs all the way through the handle.
Pole Saw: Great for use if you need to reach elevated limbs or reach through dense vegitation growth. Heavier poles will be more sturdy and hold up better through any inadvertant bumps, but may be more tiring to use on longer jobs.
Woodworking saws: woodworking saws are specially designed for the woodworking or construction market and typicallyhave finer teeth for dry wood and smoother finish cuts.
Choppers: Choppers are not really intended for sawing, but can wedge their way into most wood and are great for clearing away green surface vegitation.
Select the type of blade you will need. Longer blades, straight blades, and curved blades each have specific benefits for specific applications.
Blade type and length:
Longer blades will give you additional reach, have a larger cutting capacity, and are less likely to pull out of a cut. Longer blades also allow for a longer stroke which can make for smoother cutting and is also more ergonomically friendly.
Short blades are typically a little less expensive, take up less room, and offer better control during the cut.
Curved blades cut on the pull stroke, therefore the curved blade slopes down and away from the user. Curved blades are faster and more aggressive than a straight blade.
Straight blades are best suited for detail pruning and often used by aroborists.
Selecting teeth size:
Large teeth will cut faster and more aggressively, but will sometimes create vibration when cutting smaller limbs or dead, dry wood. Finer teeth will not cut as fast, but give a smoother cut. Finer teeth are better for woodworking applications where a smoother cut is more desirable. Medium teeth offer a great compromise for speed and smooth cuts.
Silky Saws are here!
Posted on Thursday, September 20th, 2012 at 1:12 pm.
We are happy to announce that we have just added a new line of hand saws… Silky Saws!
We pride ourselves on the fact that we only sell tools on our site that the boss himself either owns or really wants to own. Silky Saw is no exception. Silky Saw manufactures hand saws for pruning, clearing vegitation and even woodworking. They have a great line of folding hand saws and are unmatched in quality for this line of products. If you have never heard of Silky Saws before, then allow me to give you a little background.
Silky Saws are a world leader in the manufacturing of hand saws. They use only premium quality Japanese Steel, and are the #1 prefered hand saw in the world. Silky combines top quality raw materials, superior craftsmanship, and close to 100 years of hand saw technology to create a truly superior product.
How are Silky Saws different?
Silky Saws have a taper ground blade to minimize friction while maintaining maximum rigidity and uses 4-Retsume and Mirai-Me technology to maximize cutting speed.
Silky uses impluse hardening technology to give their hand saws the longest blade life without sacrificing blade flexability. This ensures that the saws are never brittle. They also feature chrome hardened blades to minimize corrosion, resist resins, and reduce friction so that every Silky blade produces the smoothest cuts.
Silky saws offer a variety of hand saws for many different applications. The Silky Pocket boy is great for camping or keeping in the toolbox. Thier most popular saw, the Gomboy, is perfect for many different applications from camping, building, woodworking, and yardwork. They also offer a selection of pruning saws and pole saws.
How do you get your hands on a Silky Saw? We are now very happy to say that we can help you with that. visit our store at:
http://www.carbideprocessors.com/Silky-Saw/
Or give us a call: 800-346-8274
Popcorn Carbide
Posted on Tuesday, September 18th, 2012 at 11:04 am.
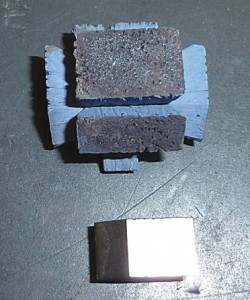
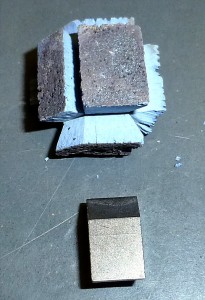
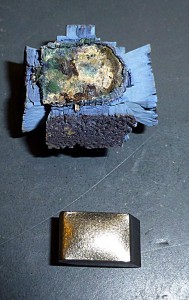
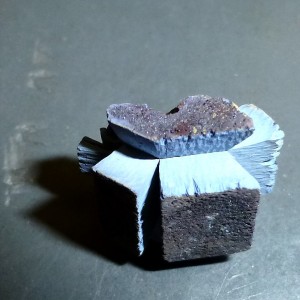
Popcorn carbide- this was a really neat affect caused by a great amount of heat over an unknown period of time (but I’d guess it to be a fairly long time). This piece of carbide was actually once a carbide tip that fell of the belt in our brazing oven. This little carbide tip spent quite a bit of time next to the heating element. The carbide tip was laying on the bottom next to the tubular heater. The oven runs at about 1500 F. We are not sure how long it was there, or how hot the tip acutally got. It could have been there for days.
The “popcorn carbide tip” originally looked like the carbide tip pictured below it.
There maybe something educational to take from this, or it might just be a really cool picture. Personally, I find it really interesting how the carbide tip comes apart. It really demonstrates how much the carbide tip was pressed and shrunk during the sintering.
I would guess that the blue is cobalt oxide. You can see various oxides from the silver/copper, zinc / nickel braze alloy. The surface is pretty rough, but the weight seems to be about the same. The overheating has made the tip pretty brittle.
Carbide Grades
Posted on Thursday, September 13th, 2012 at 1:30 pm.
The C designations for grades of Carbide was developed by the US Army and Buick during WWII. The original concept was to rate tungsten carbide according to the job it could do. If you had a specific job or application you could specify a “C” grade of tungsten Carbide and be able to buy from any manufacturer. Unfortunately this has led to a situation where the actual material the Tungsten carbide part is made up varies amongst manufacturers. For example, C-7 carbide can be made up of varying amounts of material as long as it does C7 classified work. According to the machinery handbook C7 carbide can range from 0-75% tungsten carbide, 8-80% titanium tungsten carbide, 0-10% Cobalt, and 0-15% Nickel.
Because of this we have come up with a set of specifications for our suppliers that has become sort of an industry standard. We are very fussy about our carbide tips and will not accept anything but the best. We only sell saw Tips that are true to their application and extremely high quality.
A common misconception in the industry is that there is a straight progression from C-1 carbide to C-14 carbide. It is commonly believed that a higher grade of carbide tip has less cobalt in the binder and is therefore harder or more brittle and more likely to break. Following this line of thought, it is also commonly beleived that the higer the C number is the harder and better for wear resistance the carbide tip will be. To compare, this would be like classifying automobiles by size from a moped to an eighteen-wheel semi. It is clear and handy to structure it this way, but not always completely true.
Below are some C Grade Classifications:
C Grades Classification
C-1 to C-4 are general grades for cast iron, non-ferrous and non-metallic materials
C-1 Roughing
C-2 General Purpose
C-3 Finishing
C-4 Precision
Steel and steel alloys – these grades resist pitting and deformation
C-5 Roughing
C-6 General Purpose
C-7 Finishing
C-8 Precision
Wear Surface
C-9 No shock
C-10 Light shock
C-11 Heavy shock
Impact
C-12 Light
C-13 Medium
C-14 heavy
Miscellaneous
C-15 Light cut, hot flash weld removal
C-15A Heavy cut, hot flash weld removal
C-16 Rock bits
C-17 Cold header dies
C-18 Wear at elevated temperatures and/or resistance to chemical reactions
C-19 Radioactive shielding, counter balances and kinetic applications
Every task using tungsten carbide is different. Northern sawmills know that the cutting varies with the temperature. Identical knotty pine cuts differently frozen in December than it does warm in July and therefore requires a different type of carbide saw tip to make the cuts. Boeing machinists can often tell the difference in different lots of Aluminum that are supposedly identical. Each and every cutting job needs a different set of factors to be successful.
C-1 to C-4 are general grades for cast iron, non-ferrous and non-metallic materials
C-1 Roughing
C-2 General Purpose
C-3 Finishing
C-4 Precision
These tips are used for specific applications and compare to standard C1 – C4 the following ways:
Nail Cutting – Pallet Cutting – super, super tough (tougher than C1 and Super Sawmill grade)
Super Sawmill Grade – Tougher than C 1 with longer life (tougher than C1)
Super “C” Sawmill Grade app. C 1-1/2 to C 3-1/2 ( can be used for applications where C1, C2, and C3 would be used. Usually tougher than a C2 or C3, but has better wear than a C1, C2 and a C3)
Cermet 2 – App. C 4 ++ Tougher and longer life (Can be used for applications that reccommend a C4, but is tougher than a C4 and has better wear resistance)
Cermet 3 – More life and less tough than a Cermet 2 (can be used for applications where a C4 is recommended, is tougher than a C4, but not as tough as a Cermet 2 and has much longer wear.)
We have several Cermet grades. They are excellent for man made materials. They have the strength of a C-3 and last 5 to 10 times as long as C-4 grades. They braze and grind just like C-4 grades. No special wheels required.
Shop for special and standard grades of carbide saw tips
How To Remove a Splinter
Posted on Wednesday, September 12th, 2012 at 1:21 pm.
First I would like to stress the importance of wearing gloves, safety glasses and proper safety equipment at all times. This will greatly reduce your exposure to injuries, and splinters. But even with proper safety precausions, everyone from my 5 year old son to my grandfather working in his shop will probably have to remove a splinter.
Tom has compiled some great tips on how to remove a splinter. Feel free to leave your own suggestion in the comments field if there are any great techniques for splinter removal that we didn’t mention.
*First, Wash your hands before trying to remove the splinter. This will not only make it easier to see and remove the splinter, but probably help prevent any infection.
Soak it in hot water. Fully submerge the body part with the splinter in as hot of water as you can stand and soak it. Repeat this until the skin is softens enough to massage the splinter out with a needle, razor, or tweezers. Sometimes, after doing this the splinter will work its way out on its own. If you cannot soak the splintered area try using a few drops of antiseptic cream or spray. This will also soften the skin and will help prevent infection.
If the sliver is on the surface you may be able to remove it by using a little Elmers Glue or Duct Tape. You can put a little Elmers glue on the splintered area and wait for Glue to Dry. Once dry, pull the glue off. You can try this same method with Duct Tape, Electral tape, or anything else that may stick to the splinter.
Here are a few methods for removing splinters that are in a little deeper.
1. Try using a lancet sold in drug stores in the diabetic testing supply department. They are better than sewing needles because the tip is faceted so it will cut sideways to get under the chip and tease it out. You will want a good magnifier. A stereo microscope with LED ringlight is the ultimate, but you must use something that leaves your hand free to work the lancet.
2. A 10A scalpel blade and good magnification.
3. Get some small insulin needles at the pharmacy, pennies each and they’re awesome to get splinters out, nice fine razor blade works great too.
4. A pair of 3C tweezers are handy to dig in and pluck out slivers Wiha makes some Fine Tipped Tweezers that are tapered at the end and can keep a good grip.
5. A sharp razor
6. Side cutters that rated for smd type electronics. The jaws have very sharp edges. As long as the splinter is above the surface the side cutters grip it and remove it. They have a grip superior to tweezers.
7. A pair of nail clippers. You can use them to pick away the top layer of skin at the sliver. If that doesn’t pull it out, you can use them as tweezers to pull out the shard. The great thing is that nail clippers don’t have enough cutting power to cut the shard, so you can squeeze as hard as you like.
Here are some suggestions on how to prevent getting a splinter:
What you need to do is make your chips as big and thick as possible so you don’t have to worry about getting stabbed with them. The right amount of feed and depth of cut will prevent you from making slivers that will stab your fingers. Sometimes you can’t avoid it though. For those times you cannot prevent making sharp little shears of wood that may potentially work their way in to a finger, try using a small paint brush to brush them away from your work space. You can get a dozen or so “chip brushes” that look like small paint brushes, and are very cheap. They are great for clearing chips away from the work area until you can vaccuum them up.
Saw Blade for Cutting Plywood
Posted on Tuesday, September 11th, 2012 at 12:55 pm.
You often get better results with plywood when you use tools, such as saw blades and router bits, designed especially for plywood rather than tools deigned for wood.
In the industrial world plywood is often considered as being highly different than wood.
One of the biggest differences between plywood and standard wood is the glue used in plywood. Glue is sticky and gets very sticky as it gets warm. If you are making many cuts, or trying to feed the plywood at a faster rate then the saw blade can get warm and cuase the glue to become more tacky or sticky. This not only negatively affects the quality of the cut, but can create a more dangerous work environment for the operator as the material has an increased chance of sticking to the saw blade. Using a saw blade or router bit that is meant for cutting plywood can ensure the operators safety, and can produce higher quality cuts on the workpiece.
Plywood uses a glue that may contain materials to extend it or stretch it out. So you have the actual glue and then you have something added to it that is usually particulate and abrasive. This is added to make the glue spread further and save money. The additives are sometimes a clay material that contain tiny rocks wich will wear the saw blade more quickly. Plywood cutting Saw Blades Use a special type of carbide tip that will last longer for pylwood cutting applications.
Another difference between plywood and wood is that plywood has the grains going opposite directions. Thus you are always cutting both with the grain against the grain.
Plywood is made of very, very thin sheets of material and thus more prone to splintering than solid wood. If you have ever been in a plywood plant you will see that the plies require very careful handling or they will split apart on their own. Plywood is a very heavily processed material. The plies are made of wood that has been peeled from the log and this creates certain stresses and tears in the materials. The materials are further compressed and stressed during the assembly. Using a plywood cutting saw blade, you can greatly reduce the chances of splintering the wood and increase the quality of your cuts.
There are many Saw blades for cutting plywood that are specially designed to counter these differences. Using a saw blade that is specially designed for cutting plywood can not only create better cuts and a safer user experience, but save time and material.
Cutting Gypsum Board
Posted on Thursday, August 30th, 2012 at 3:30 pm.
Wear on Saw Blade Cutting Gypsum Board
Below is a piece of gypsum board after being cut by a saw blade. Notice the saw blade marks on the gypsum board.
The two saw blades below were used for cutting the Gypsum board. The saw blade on top is as removed, and the bottom one has been cleaned for inspection.
These saw blades were supposed to have been cutting gypsum, but further analysis shows that the saw blade were cutting other materials that were present in the gypsum.
| X-ray Diffraction Data |
Rough |
||||||
| XRD# |
101 |
102 |
103 |
104 |
Mohs |
Hardness |
|
| Sample # |
1 |
2 |
3 |
4 |
Hardness |
Comparison | |
| Gypsum |
86.70% |
91.40% |
93.80% |
93.40% |
2 |
Cadmium, Bismuth | |
| Anhydrite |
9.80% |
2.90% |
2.10% |
1.20% |
4 |
Iron, Nickel, Platinum, Steel | |
| Quartz |
0.80% |
1.70% |
0.50% |
0.70% |
7 |
Quartz, Vanadium | |
| Illite&Mica |
1.40% |
0.90% |
0.50% |
0.80% |
1 – 2 |
lead soft | |
| Kaolinite |
0.50% |
0.40% |
0.00% |
0.40% |
2 – 2.5 |
gold, silver | |
| RO M-L I/S 60S* |
0.80% |
2.70% |
3.10% |
3.50% |
|
||
| TOTAL |
100.00% |
100.00% |
100.00% |
100.00% |
|
||
Gypsum has a Mohs hardness of 2. Some of the other minerals are in the same range. There are two minerals that are much harder than Gypsum and this is a big part of the wear issue.
| Anhydrite |
9.80% |
2.90% |
2.10% |
1.20% |
4 |
| Quartz |
0.80% |
1.70% |
0.50% |
0.70% |
7 |
| Hard bits anhydrite and quartz |
10.60% |
4.60% |
2.60% |
1.90% |
|
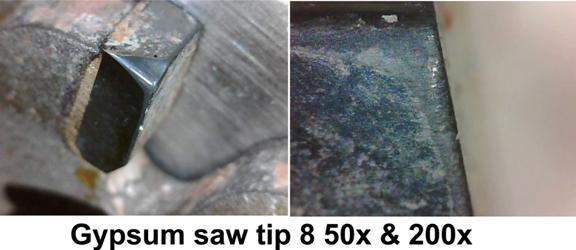
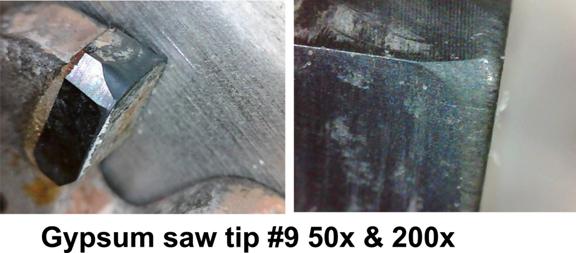
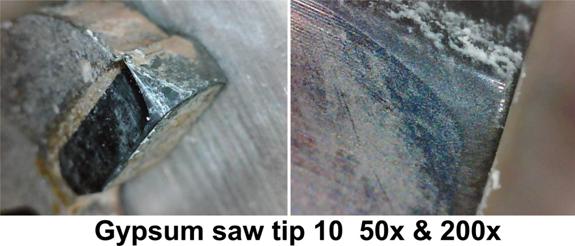
I photographed the first ten tips at 50x and 200x.
The 50x photographs show the kind of wear you would expect from cutting a highly abrasive material. It is a smooth, shiny, polished surface.
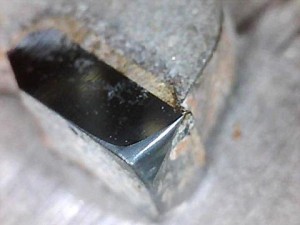
At 200x you still see the smooth, polished surface but you also see some very significant gouges in the edges of the saw tips. Plus you can see a general roughness to the cutting edge of the saw tip.
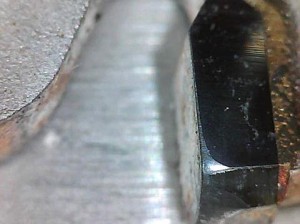
For comparison, following is a picture of the jaws of a dial caliper at 0.001”
The fine, abrasive material is wearing the carbide greatly. However the wear from the fine, abrasive gypsum is greatly aided by damage from the hard particles such as anhydrite and Quartz.
It appears that the hard minerals are actually gouging out some of the carbide in some cases. They are also causing nicks in the edge of the saw tips. There does not appear to be any spalling or chipping, at least at 200x.
Each gouge or edge nick does at least two things to exacerbate the wear. First it increases the wear surface on the saw tip. Wear is a square / cube relationship. Wear occurs along a surface area (square) of a mass (cube). One of the limiting factors in wear rate is the available surface area. If you have a surface area of 4 and a mass of 8 then the part will be worn down at a certain rate. If you increase that surface through chips, gouges, etc. then it wears faster. You might have a ratio 5 (square or surface) to 8 (mass or cube).
How Carbide Wears
Tungsten carbide is actually tungsten carbide grains cemented with a metal, usually cobalt. What follows are failure mechanisms we have seen in industry.
1. Wear – the grains and the binder just plain wear down
2. Macrofracture – big chunks break off or the whole part breaks
3. Microfracture – edge chipping
4. Crack Initiation – How hard it is to start a crack
5. Crack propagation – how fast and how far the crack runs once started
6. Individual grains breaking
7. Individual grains pulling out by mechanical means
8. Chemical leaching that will dissolve the binder and let the grains fall out
9. Rubbing can also generate an electrical potential that will accelerate grain loss
10. Part deformation – If there is too much binder the part can deform
11. Friction Welding between the carbide and the material being cut
12. Physical Adhesion – the grains get physically pulled out. Think of sharp edges of the grains getting pulled by wood fibers.
13. Chemical adhesion – think of the grains as getting glued to the material being cut such as MDF, fibreboard, etc
14. Metal fatigue – The metal binder gets bent and fatigues like bending a piece of steel or other metal
15. Heat – adds to the whole thing especially as a saw goes in and out of a cut. The outside gets hotter faster than the inside. As the outside grows rapidly with the heat the inside doesn’t grow as fast and this creates stress that tends to cause flaking (spalling) on the outside.
16. Compression / Tension Cycling – in interrupted cuts the carbide rapidly goes through this cycle. There is good evidence that most damage is done as the carbide tip leaves the cut and pressure is released.
17. Tribology – as the tip moves though the material it is an acid environment and the heat and friction of the cutting create a combination of forces.
Notes:
1. As with any chemical reaction of this sort the acids create a salt that protects underlying binder until the salt is abraded away so grain size and binder chemistry are also important.
2. Electrochemical effect – erosion compounded by the differences in electrical resistivity between carbide and cobalt
3. Heat from rubbing can affect carbide so a slicker grade can increase life.
Recommendation:
The carbide needs to be much tougher so that it doesn’t gouge and chip as readily. Plus it needs hardness for survivability from abrasive wear.
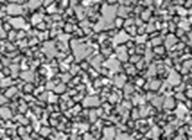
Standard Carbide (bottom) Cermet II monolithic binder (top)
Our Cermet 2 grade starts out as a hard carbide and then goes through a post sintering process by which the parts are infused with a Boron metalloid. This makes the parts behave much more like a monolithic part than a cemented part. It is sort of like adding rebar to concrete but on a molecular level.
It changes the chemistry which greatly increases its resistance to chemical attack and helps it resist electrochemical effects caused by the extreme rubbing in this application.
This material brazes and grinds like ordinary C-4 carbide. It is well proven and provides between 2 and 10 times the life of ordinary carbide depending on the application. This is an extreme application and performance towards the lower end should be expected.
Protecting Panel Boxes
Posted on Tuesday, August 21st, 2012 at 8:59 am.
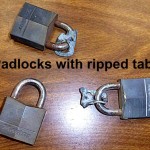
I came in Monday to find my outside electrical panel boxes open. Three of them had the padlocks ripped off. The fourth had both panels taken off and thrown on the ground.
All they took was some ground wire and the copper ground stake. Electrician estimates about $200 to repair.
I was very lucky that we were able to operate with no problems.


