


Welcome to the Carbide Processors Blog
Choosing the Right Router Bit
Posted on Thursday, March 12th, 2015 at 1:02 pm.
Choosing the Right Router Bit

When choosing a router bit, there are several things to consider to get the most value for your money. Here are some tips to choose a quality Router Bit:
Router Bit Shank Size
The shank size of the router bit has an affect on the overall value. Choosing a 1/2″ Shank over a 1/4″ Router Bit may be more beneficial because 1/2″ Router Bits are more sturdy, and less likely to break.
Router Bit Material
There are 3 different materials from which Router Bits are made: High Speed Steel, Carbide Tipped, and Solid Carbide. Choosing a carbide Router Bit over a high steel router bit is usually your best bet to get the most for your money.
*High Speed Steel Router Bits are generally the least expensive and are fine for softwood and light plastics, but tend to dull much faster than carbide.
*Carbide Tipped Router Bits are usually more expensive than the high speed steel router bits, but they stay sharper longer and work better in hardwoods and other hard materials, so they may save you money in the long run.
*Solid Carbide Router Bits are the most expensive, but are typically meant for specific applications where other router bits may not perform as well. You may want to choose a Solid Carbide Router Bit for Mortising, Laminate Trimming, and Pattern Cutting.
Use a Sharp Router Bit
Using a Sharp Router Bit is much safer, cuts better, and requires less power than a dull router bit.
Choosing the right grind
The grind of the router bit can greatly affect the performance.
Maintaining a good balance
Reducing the vibration is very important not only to safety, but to the quality of the cut. Make sure the Router Bit you are using has a good spin.
There are many Router Bit manufacturers to choose from, and it can be hard to know which company makes a quality Router bit. We have been in the industry for a while, and we really like: Whiteside and Southeast Tool. Whiteside is known for their quality, and Southeast is a great value. Both Whiteside and Southeast Tool were ranked in the top 5 and considered excellent by Fine woodworking Magazine in their head to head router bit challenge.
Fine Woodworking Magazine frequently tests many different Router Bits from a wide spectrum of manufacturers. They assess which company produces the sharpest, most durable and best value router bits. Companies with the top performing router bits receive awards.
We sell the entire line of Whiteside and Southeast Tool router bits at discounted prices. Feel free to test them out yourself without having to pay full retail. Buy Whiteside Router Bits. Buy Southeast Tool Router Bits.
Also see “Router Bit Glossary” for more helpful information on Router Bits.
Quick Change Router Chuck
Posted on Monday, March 9th, 2015 at 3:22 pm.
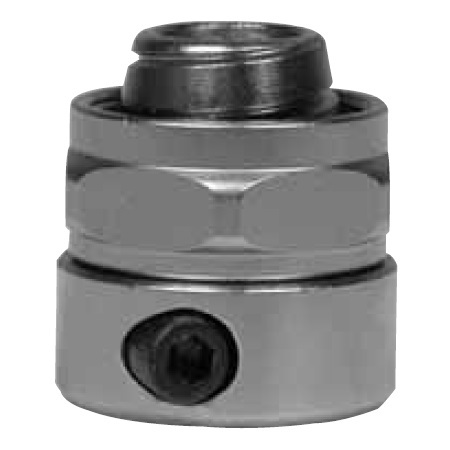
The Best and Easiest way to change out your router bits! Quick change router chucks offered by Whiteside are the way to go for pain-free, fast change out-out without using the 50+ wrenches you have!
The Quick change router chuck features a cam-lock design that clamps and loosens with a partial turn using a hex key wrench. Much simpler than the original two wrench method these quick change router chucks were recently featured on Fine Woodworking Magazine.
Made in the U.S.A : Quick Change Router Chuck
Porter Cable 9700
Bosh 9710
Dewalt/Festool/Frued 9720
Dewalt 616/618/621 9730
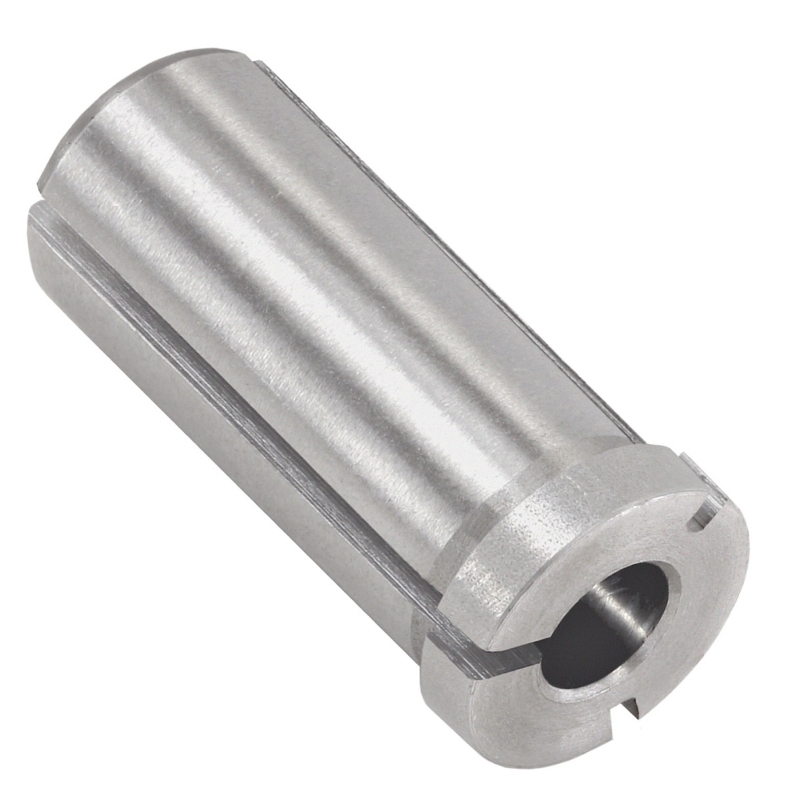
Available only in 1/2, you can purchase the adapter for the following shank size:
Made in the U.S.A: Router Collet Reducer
1/2 – 1/4 Whiteside 6400 or Southeast Tool SE6400
1/2 – 8mm Whiteside 6400×8
Watch Roland Johnson’s video to see how the quick change router chuck makes your woodworking life easier!
Inspecting a Router Bit
Posted on Wednesday, March 4th, 2015 at 2:48 pm.
Inspecting a Router Bit

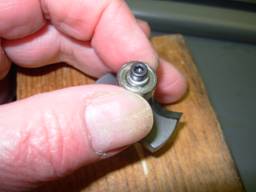
First, just pick the bit up and look at it. Does it look even and balanced? Any dings or similar?
Then spin it in your fingers to see if you notice anything. I start by inspecting the shaft

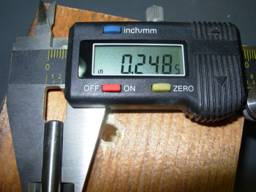
This is an ordinary digital caliper. I first put the router bit fully between the jaws and hold it up to the light. I want to see if any light comes through either side. Then I measure the diameter of the shaft in several places. This was a ¼” shaft and measured 0.248 all the way up and down. I think the shaft should be a couple thousandths under size because that was the way I was taught. In reality router chucks are very forgiving. A little oversize should be fine. I variation of a thousandth or two in shaft diameter should also be fine. I do think it is a sign of a quality part when the shaft is a bit undersized and the same diameter all the way up and down.

I want the shaft to clearly marked so that I know what it is and can buy an identical one later.
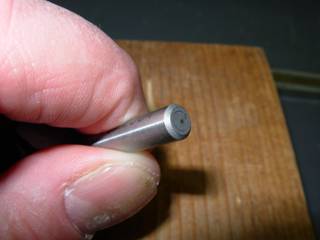
I like a nice bevel on the end of the shaft. It is probably not that important but it means the manufacturer took an extra machining step. It does make it slide in and center a bit more easily. It also means that the edge is less likely to deform if banged or dropped.
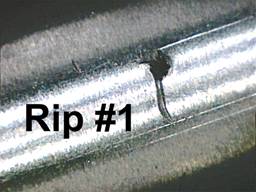

What is wrong is any sort of rip or tear (sometimes called an upset) in the shaft. These could be easily filed out and the bit would be perfectly serviceable but it is a mistake.
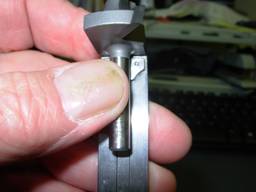

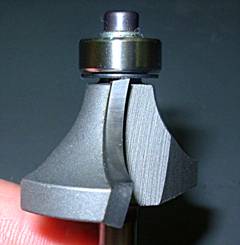
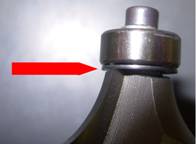
You want the shaft to be square with (perpendicular to) the body. This can be somewhat tricky. On this bit the shaft tapers into the body, which is good, and the carbide (red arrow) sticks down below the body which is also good. However that leaves a very small area for testing. Ideally you would rest the shaft against the caliper body. In this case it has to set away a bit.
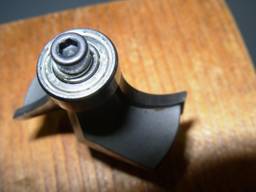
Take your bearing and turn it slowly so you can feel it. There should be just a wee bit of drag which means it is tight. It should feel uniform all the way around. It should not spin freely. Twist the bearing a bit to make sure it has some play. 0.005” to 0.010” is pretty good. You also want a sleeve or dust guard between the bearing and the router body. I like to use an inspection block for the next part. This is a piece of Fir 2 x 4 with a hole drilled in it.
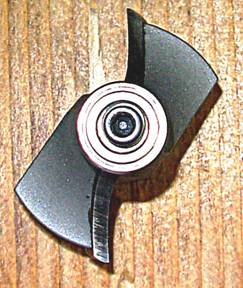
The carbide should be identical from one side to the other. This is really important for balance since carbide is 50% heavier than lead. The carbide should be the same thickness all the way down the wing (or flute). Depending on how good or bad the grinding is you can sometimes see where the carbide is thinner in the middle or at one end. This greatly increases the chances of the carbide snapping in use.
Generally thicker carbide is better because it is stronger. It also gives you the opportunity to dress or re-sharpen more times. However dressing and sharpening both remove material and thus change the type of cut the bit makes.
Carbide is graded from C 1 – C 4 typically. C 1 is tougher for rough cutting. C 4 stays sharp longer but is more likely to break in rough work.

There are advanced carbide grades that are both tougher and that give longer life. They really do work well and are still a bargain even if they cost a bit more. If it is an American, European or Japanese brand you can almost always trust the package information in this area. I have never seen one that was misleading but I haven’t seen them all. There can be excellent tools from other sources but I am not familiar enough with all of them to give an opinion.
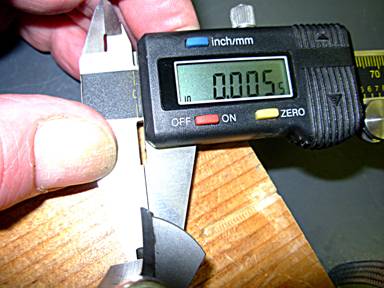
Ideally you want to see a line of braze alloy about 0.003” thick between the carbide and the steel. Here the calipers are set at 0.005”. You can see that it is a very small line. The average hair is maybe 0.007”. The bit was probably sandblasted after brazing to clean it up so you may not be able to see anything yellow. Look at the joint. You don’t want the carbide resting against the steel since it breaks easily that way. You want a nice, even line with no holes or just very few small holes in the braze alloy. If the braze alloy has a gold or yellow color that is better than a copper color. It means more Silver in the braze alloy which means it brazes at a lower temperature. In turn this means much less thermal stress and much better cushioning and protection for the carbide. This not a really big deal, however.
The Evolution of Triton Tools
Posted on Wednesday, February 25th, 2015 at 2:47 pm.
Triton Tools was founded by George Lewin in 1975 in Australia. Frustrated with tools that didn’t cut straight or square, Lewin decided to design a tool that would perform better. His first innovation was a bench with an upside down saw that he patented and successfully sold as the original Triton workstation.
As Tom would say, “the quality of a tool is what the person using the tool says it is”. It seemed to be unanimous among the Australian woodworking community that this new design for a workstation was a quality one. Woodworkers loved Lewin’s innovative Workstation design and demand for Triton Tools grew rapidly.

In 1983 the Mark Workcentre was launched in Australia and earned Lewin many awards for his innovative saw-bench. By 1986 Triton Tools began to find their way to countries all over the world and in 1994 Triton tools achieved ISO 9001 quality accreditation.
Triton Tools continued to expand and meet the demand for more quality tools. They innovated and expanded their range of tools to include routers, track saws, drills and more. In 2014 Triton Tools was acquired by Power Box and production was completely overhauled and a U.S. distribution center was created. Even more measures were taken to ensure every Triton Tool that left the factory would be guaranteed to work and last.

All new Triton Tools sold after 2014 have undergone a rigorous quality control and completed the quality management cycle. New Tools are constantly being innovated and each new design goes through a vigorous critique process before ever being distributed. New Triton Tool ideas are closely monitored for design, and manufacturing capabilities. All raw materials that are used in the manufacturing process are audited before the tools are assembled and every tool receives a pre-shipment inspection. The final step is a tool review and the Triton Tool Reviews are great! Here are a few things that people are saying about Triton tools:
“The Sander’s Strong point is in its design, which means the belt is flush to the side, allowing sanding up to a wall” -Anthony, Triton Tool user
Woodworking Plans and Projects Magazine wrote that “Triton continually push boundaries with their innovation, both for power tools and the Workcentres they fit in.”
And a very satisfied TRA001 Triton Router user and ex-furniture builder says he “uses every spare moment [he has] now knocking something up with this little treasure!”
British Woodworking Magazine boasts about the new Workstation, saying that it’s “One of the most eagerly-awaited ‘up grades’ of a workstation that reflects its original brilliance.”
Since it’s humble beginnings from a woodworker that simply wanted better tools to work with, the Triton brand has earned a reputation for quality and has continued to expand its line of innovative power tools. See for yourself the quality and ingenuity that Triton Tools have come to be known for.
Importance of Machine Coolant Management
Posted on Wednesday, February 25th, 2015 at 10:16 am.
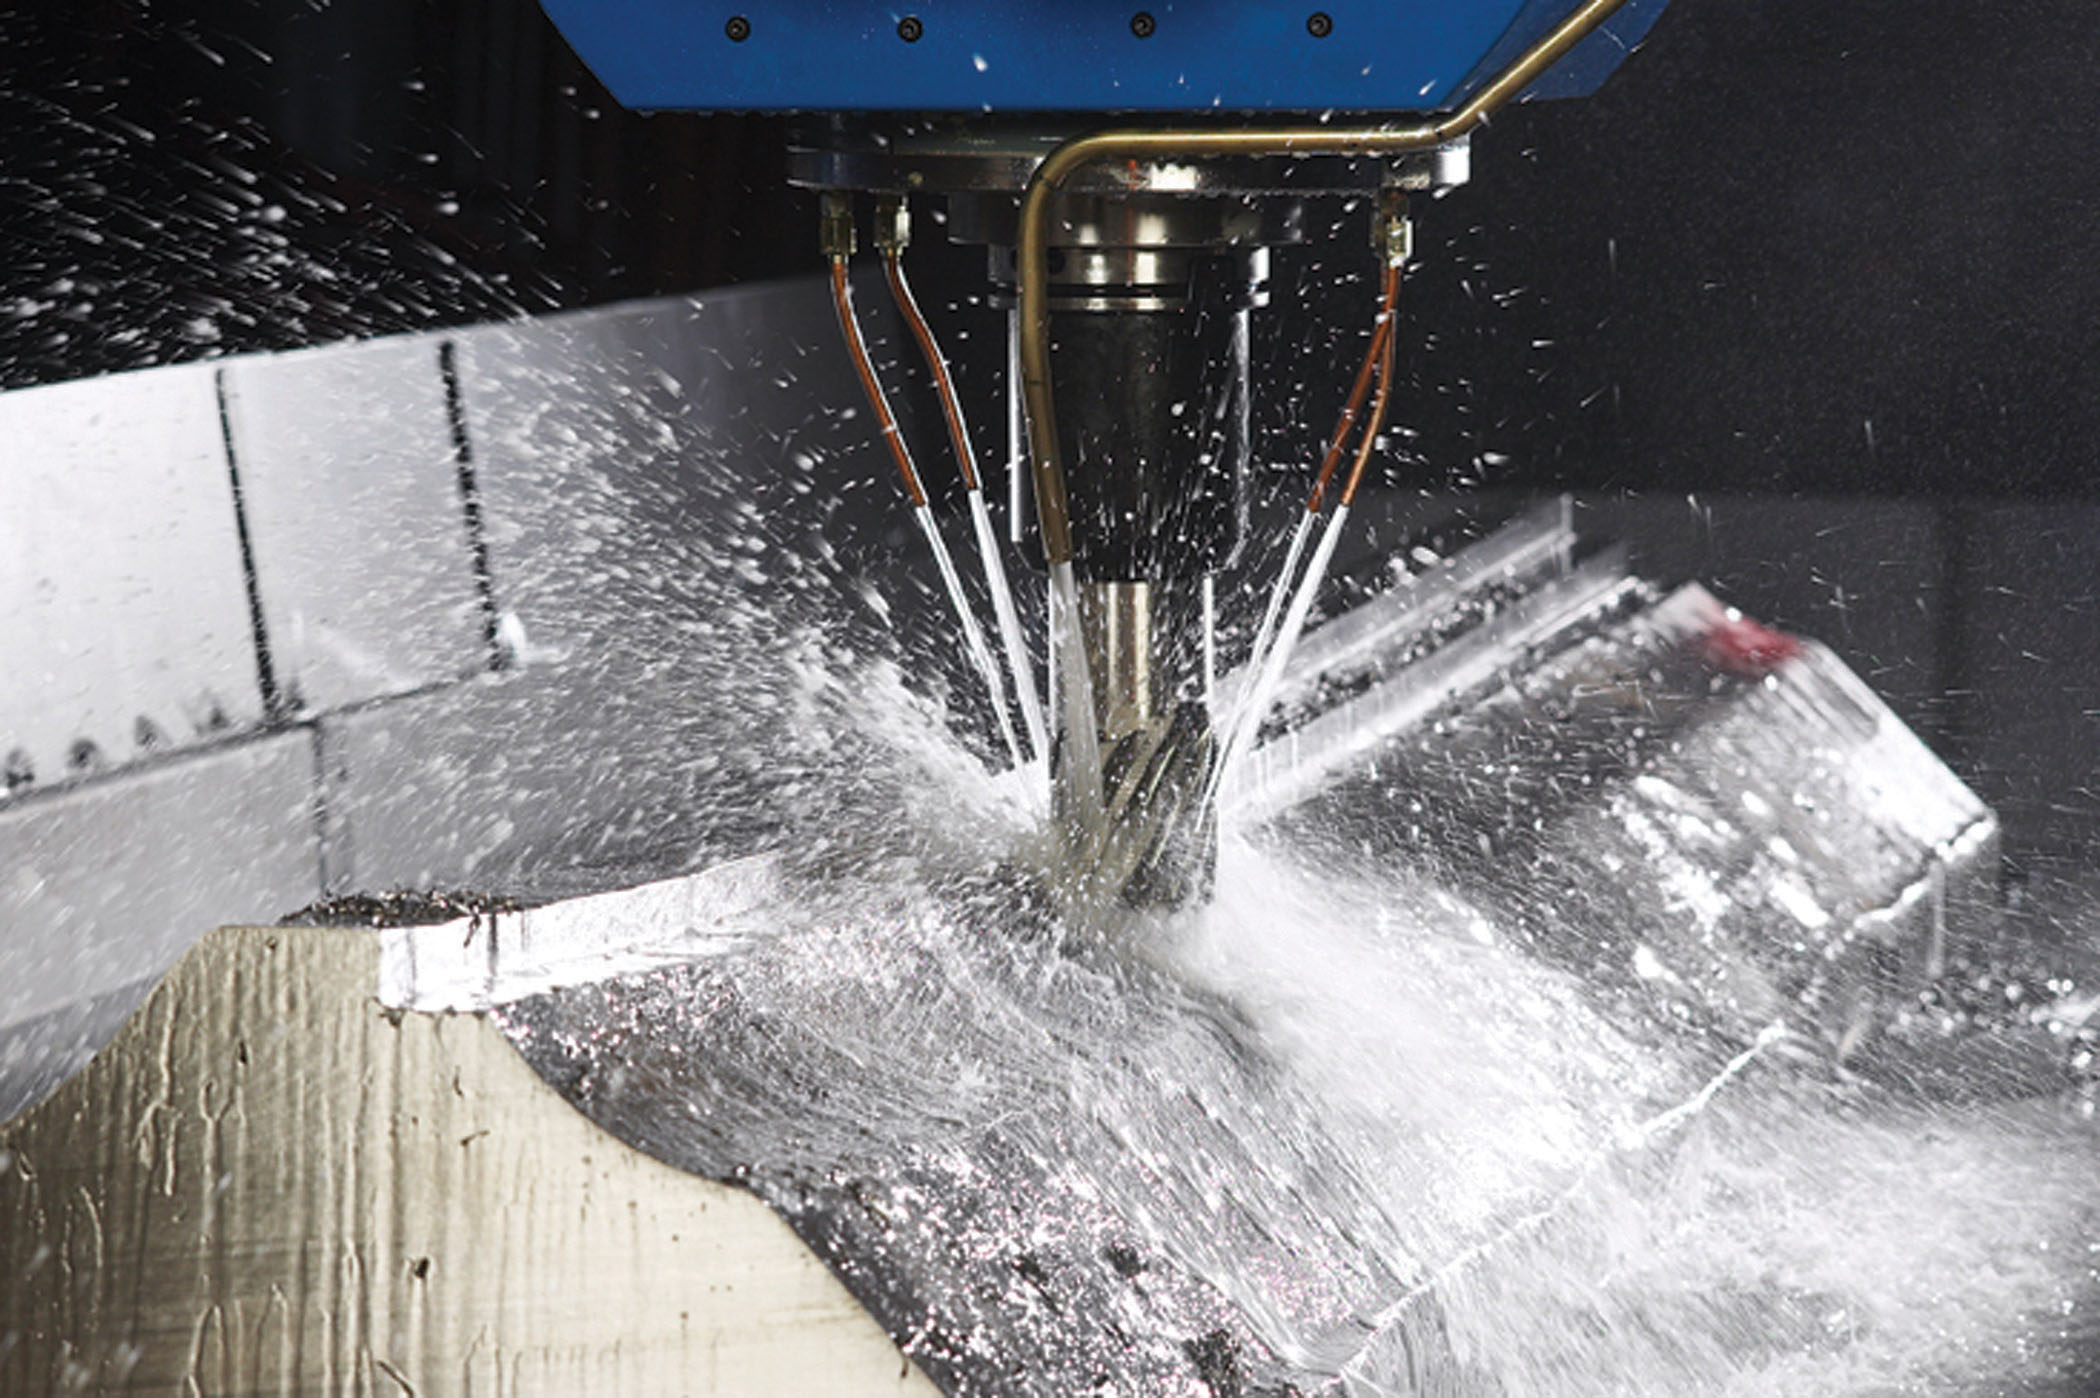
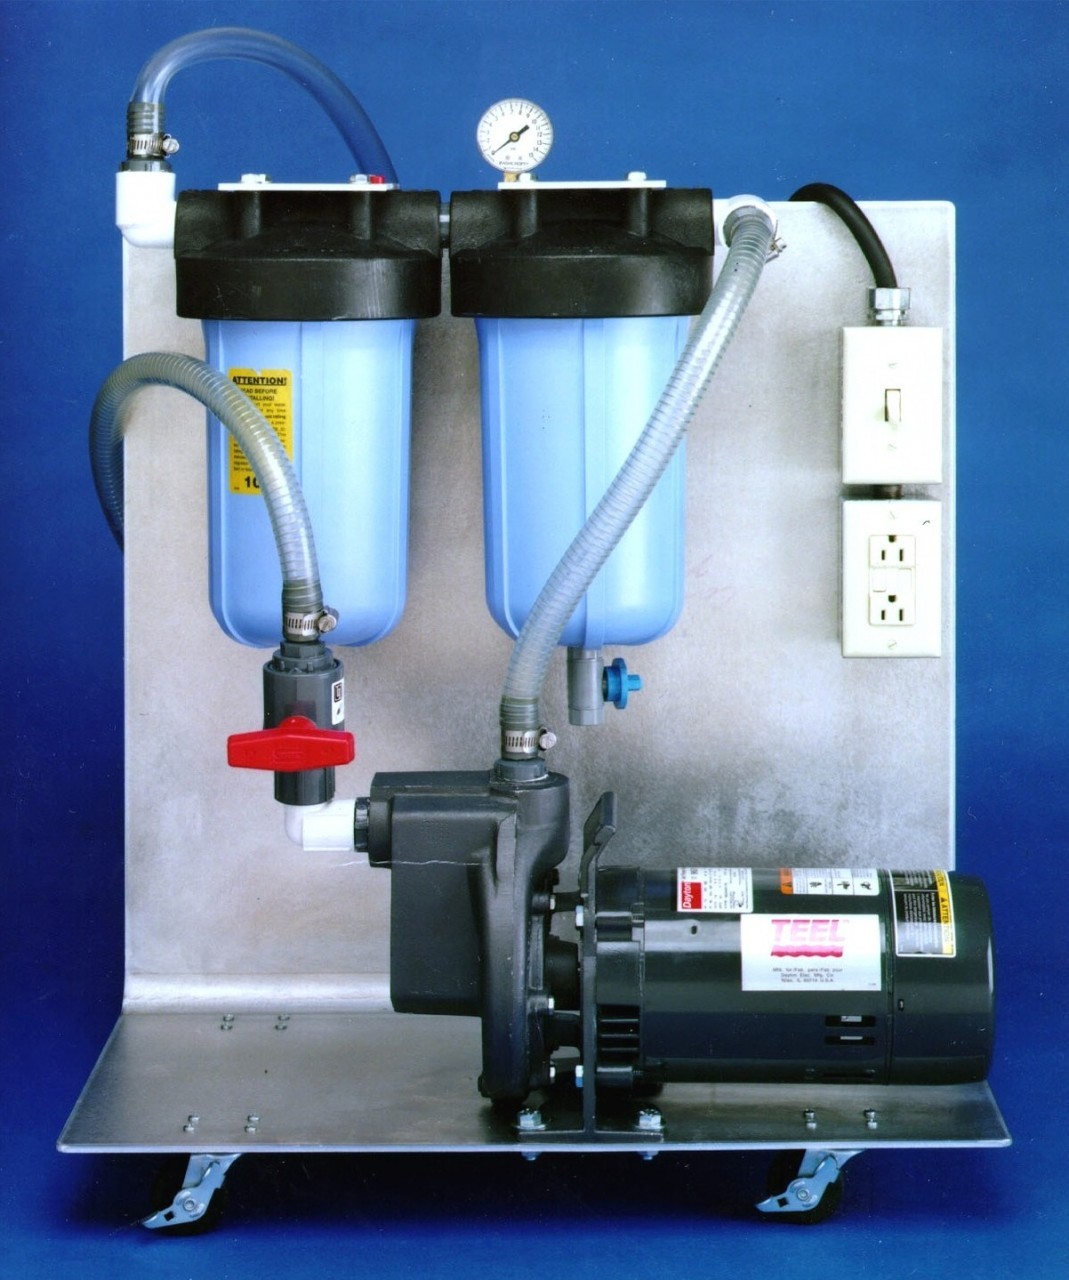
A great number of industrial processes such as grinding, milling and turning create heat and particles. Machine coolants are used to keep the work surface cool and to carry away chips and particles. Filtering Machine Coolant traps the small particles that get recirculated with the coolant and can cause damage to the tools and equipment. For more information on filtering take a look at some of our articles in the Machine Coolant Index.
Saws and other tools are commonly carbide tipped. The tungsten carbide used is man-made material and it is the closest substance to diamond available. It has much more give so it does not break as easily as diamond. Tungsten carbide saw tips are brazed onto the steel saw body and then they are ground to make them sharp.
The tungsten carbide saw tips are actually very small pieces of tungsten carbide that are held in a matrix of cobalt. The cobalt is like the caramel in a popcorn ball.
The grinders are flood cooled which means that water is flooded over the work area. This cools the work and washes particles out of the way. The liquid is typically 90 to 95% water and 5 to 10% machine coolant. The liquid runs over the work area and then down the machine where it collects in a sump at the bottom of the machine. The liquid is pumped out of the sump and constantly recirculated. As the tip is ground, the tungsten carbide and the cobalt collect in the sump.
Far and away the majority of machining is done with carbide or ceramic tools. These tools wear and micro-chip in use. Machining creates chips.
Machining creates big chips. Everyone has some sort of program to handle big chips. Even the worst shops shovel them out of the way when they start to bury the machine. Unfortunately many, many people think that all you need to do is to remove the big chips. Every big chip means lots of small chips the same way boulders are surrounded by little rocks. It is the little chips that do the most damage.
Several hundred times more damage is done by chips too little to see than is done by big chips.
There are a million to a million and a half people in the US who are exposed to grinding and machining machine coolants. These machine coolants and their contaminants cause skin rashes, allergic reactions, epidermal scarring, lung scarring, emphysema, severe emphysema and death.
The use of cutting, grinding and machining fluids results in the estimated creation of well over ten million gallons of waste annually.
Principles of Filtration
Filtration is the process in which particles are separated from a fluid by passing the fluid through a permeable material. There are also non-filtration separation methods such as gravity settling or flotation, the use of centrifugal force as in a cyclone or centrifuge, and processes such as ion exchange or reverse osmosis for the removal of dissolved solids.
There are four basic reasons why liquids are filtered:
(1) To save the solids and discard the liquid
(2) To save the liquid and discard the solids
(3) To save both
(4) To save neither.
Choosing the Correct Speed for your Router Bits
Posted on Wednesday, February 25th, 2015 at 10:05 am.
Selecting the best router bit for your application is key in getting quality results, but is not enough on it’s own. Once you have the correct tool for the job, you need to use the correct speed for optimum results. Most manufactures offer a chart or a general break down with the suggested RPM for the type of bit and sometimes for the material being used. But, what about the router bit you purchase online?
Perhaps you catch one of Carbide Processors’ sales on Whiteside Router Bits; you receive your American-made bit for your wood application and a nice note for choosing us, to serve you. You are excited and ready to use that router bit, until you start to use it. Then you are faced with what speed is needed to run it correctly for the best cut, cleanest finish and least amount of chip out.
If you are just starting out with woodworking, or maybe you don’t have a handy chart RPM nearby. There is an easy way to figure out the correct speed, or at least come really, really close, just by using your ears or by feel.
Any rotating system has speeds where transverse vibration is at a minimum (nodal point), and speeds where vibration is a lot more pronounced (resonance point), maybe more violent if you will. In some cases you can hear the difference, but in others you need to feel the difference when the bit is in use.
To improve surface finish, cut down on noise level, reduce bearing wear and improve the longevity of your router bits, it is recommended to always operate at the quiet nodal point.
When cutting wood and plastic, the less noise the better, especially when working with new material! Wood can be especially tricky because of the differences from batch-to-batch between cast and extruded products. However, in most cases the router bit you are using will let you know via high pitched squeals if you are trying to turn it too fast for the material being cut.
A nice cut and dried method for finding the best maximum speed is by doing the following:
- Load the tool and make sure the nut is properly tightened
- Set the speed to the highest nodal point
- Calculate the test feed by :
- multiplying the diameter of the bit by 0.02 to determine chip load
- multiply the chip load by the number of flutes on the cutter to get the total chip load
- multiply the total chip load by the speed (RPM) to calculate the test feed
**1/2 dia. 2 flute cutter with a speed (RPM) of 12,000 would be- 0.5 x 0.02 x 2 (flutes) x 12,000 = 120 inches per minute
*Feed rate refers to the speed that the router bit will move through the material and is measured in inches per minute.
*Speed rate refers to the speed that the router bit is moving and is measured in revolutions per minute (RPM).
*Chip load is the measurement of material in inches removed by the cutting edge during a cut.
$$Carbide Bucks$$- Save Now-Save Later!!
Posted on Wednesday, February 11th, 2015 at 12:55 pm.

The Pr0gram Period ended April 10, 2015
Watch your emails for the next Earning Period!
We have instituted a new rewards program called Carbide Bucks! This is a great way for registered customers to earn $Carbide Bucks$ towards future purchases.
How it works: During the promotional Buck Days earning period, save 5% on your orders by using coupon code bucks. You will automatically save 5% on your order and you will earn Carbide Bucks based on the $ amount of your order!
How to Redeem Your Bucks: For every $50 you spend, registered customers will earn $5 in Carbide Bucks (store credit). All participants will have 30 days to use their dollar rewards toward any purchase.
Who are Registered Customers: Customers who have registered for an account during the check-out process. Registration includes customer ship to and bill to information as well as contact and email information.
When does the Carbide Bucks rewards program start & end: Carbide Processors will notify all registered customers via email of the beginning and end of the earning period as well as the time frame for redeeming Carbide Bucks.
Register now to start saving!
What are the best CNC router bits
Posted on Tuesday, February 10th, 2015 at 3:37 pm.
I recently came across a great article in Woodshop News. The article discussed how important tool selection and feed and speed rates are to the final router bit performance when using a CNC router. So, how do you select the best CNC router bit? There are actually quite a few things to consider when choosing the best router bit.
Material being cut is a crucial factor when selecting a CNC router bit, but consideration for the router bits spindle type and horsepower, type of work-holding system, and the construction quality of the machine’s base and gantry also needs to be taken into account. In this article we will be talking mostly about tool selection and different types of CNC Router bits.
When choosing a bit for a CNC router, there is one tip that will always help to ensure you get better performance. Choose an industrial quality bit. They may cost more upfront, but you are truly getting a bargain. Router bits intended for industrial application are engineered to give you optimal performance. They are made with better materials, and high-quality carbide. They have increased clearance geometry, better design, and razor sharp cutting edges right out of the box. We recommend Vortex CNC router bits.
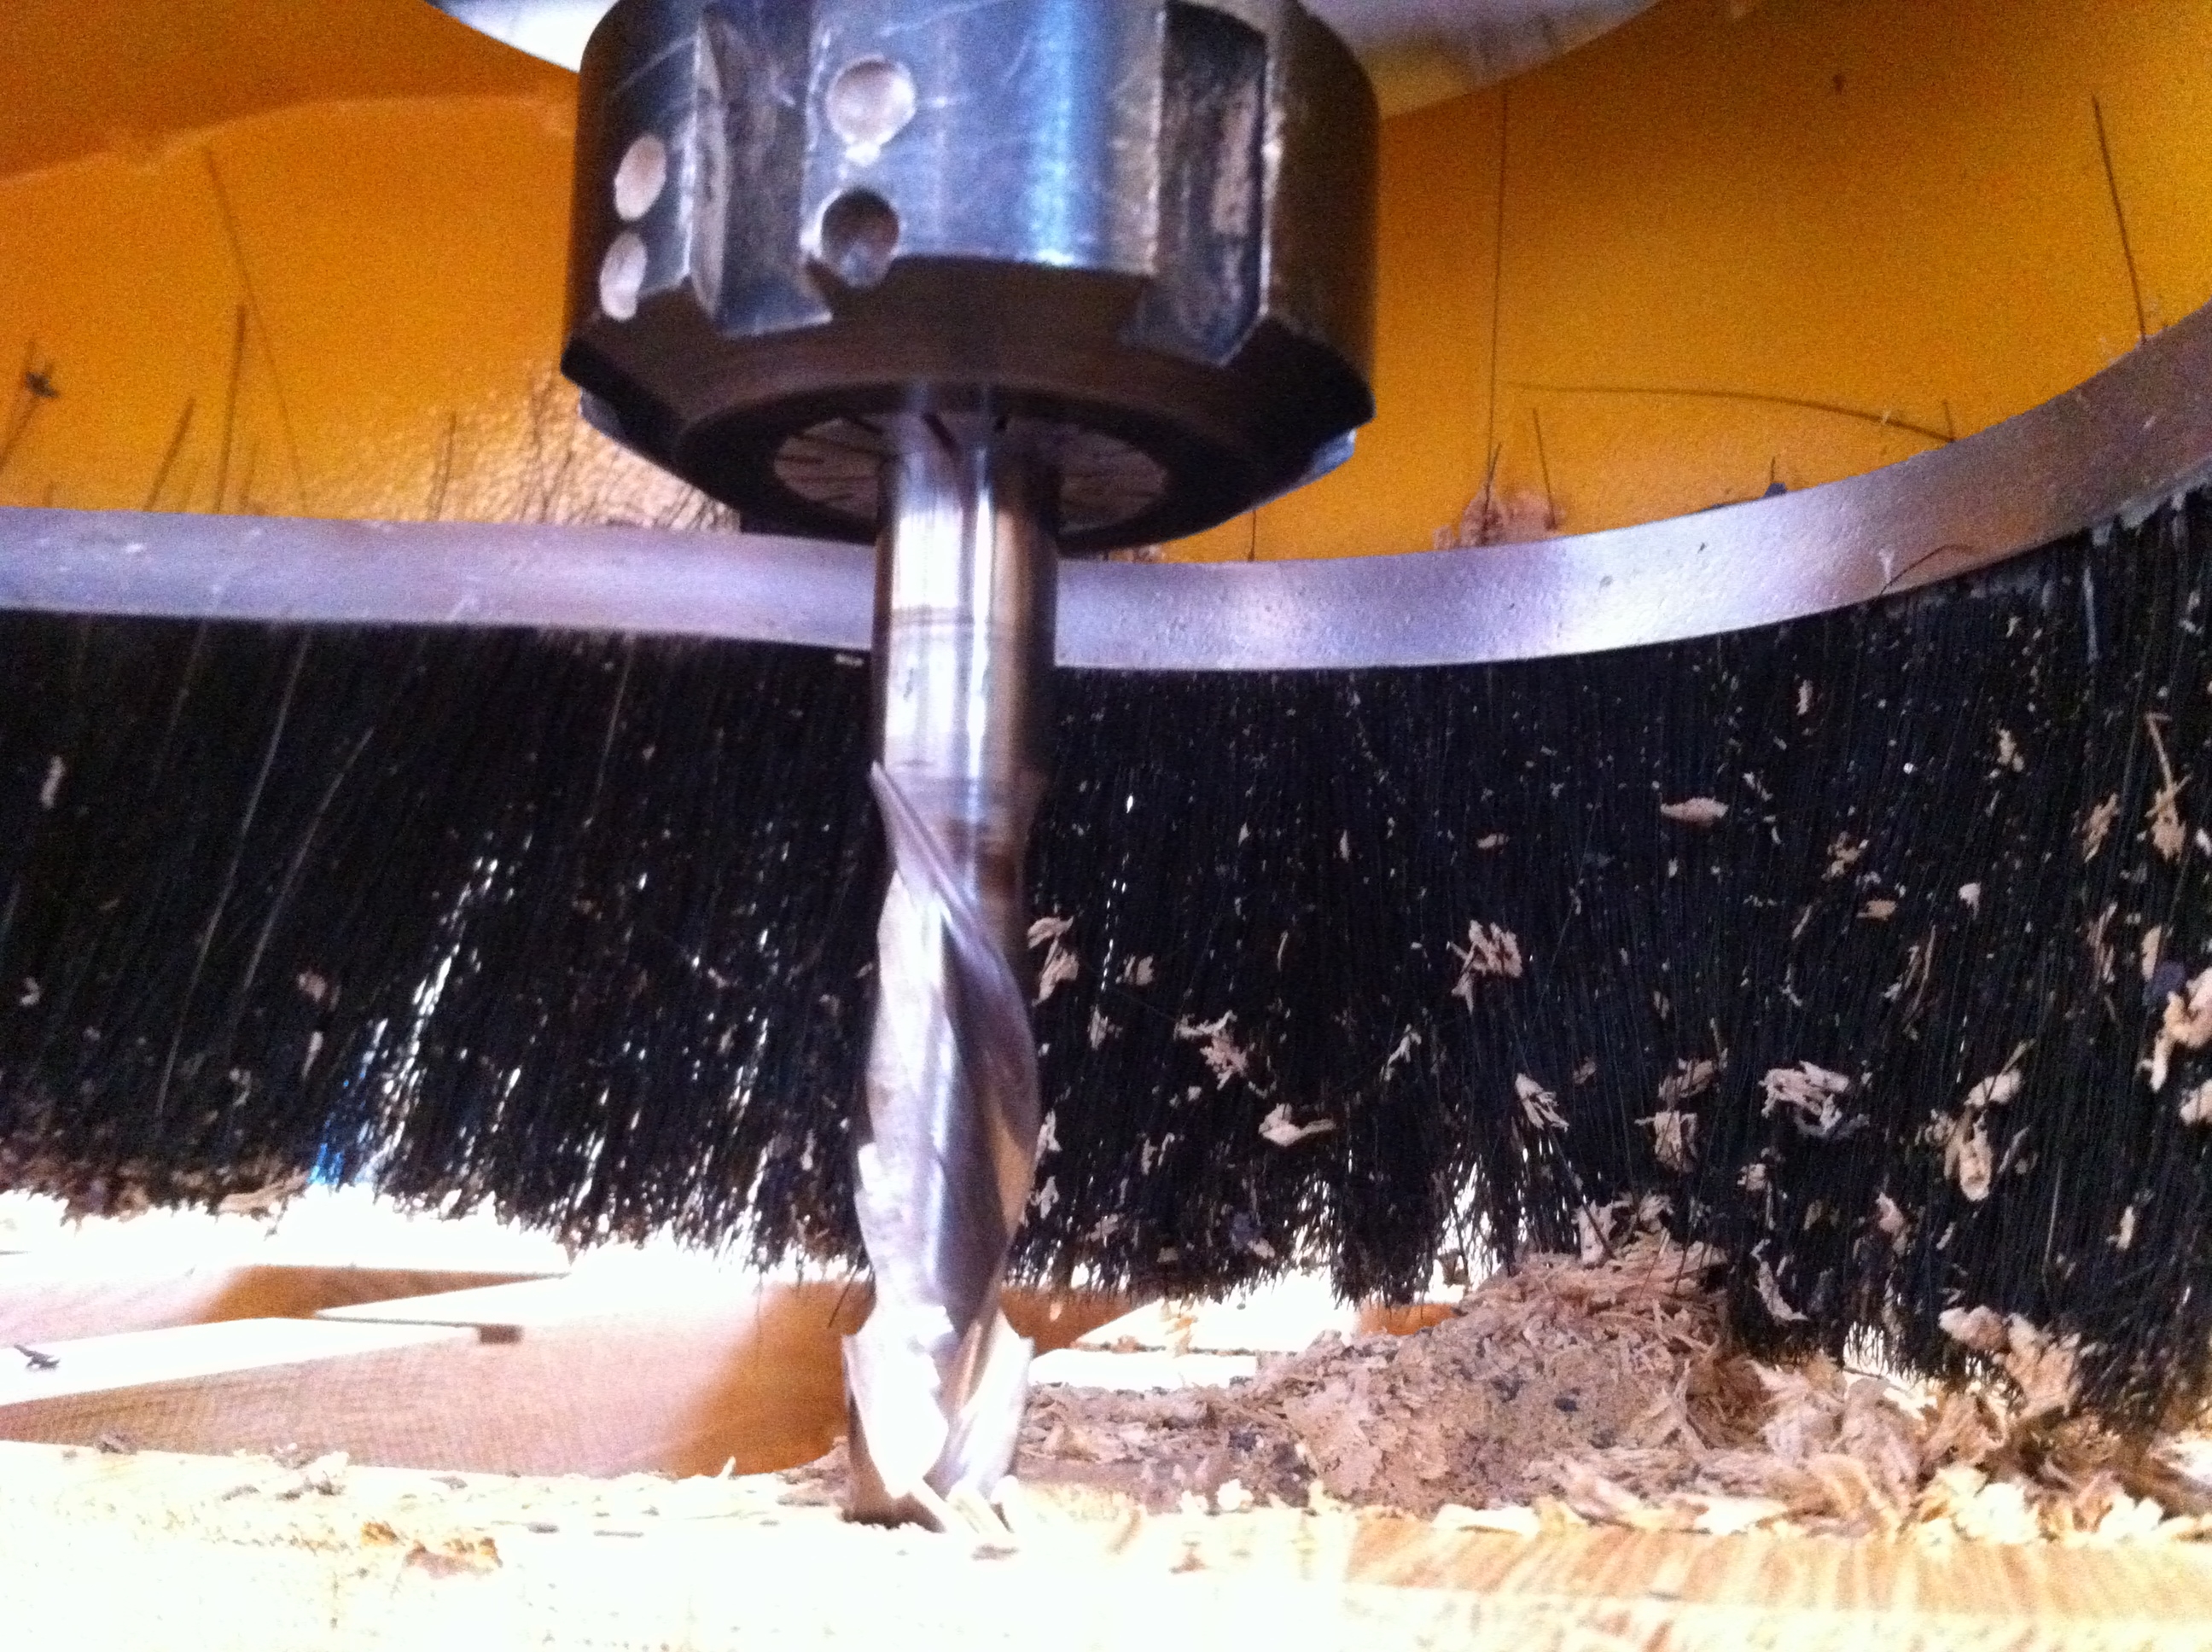
There are different types of CNC router bits with different configurations that make them an ideal router bit for cutting plywood, mdf or melamine. For cutting MDF or chipboard, Straight plunge bits are a great choice. They have either 1,2 or 3 flutes that run parallel to the shaft of the router bit that allow you to cut MDF and chipboard at higher speeds. Spiral bits are another great bit for cutting MDF, plywood, melamine and solid wood.

There are several different types of spiral router bits, including upcut spiral, downcut spiral, and compression spiral bits. Downcut spiral bits come in confiurations with varying numbers of flutes. The most common are typically 2 and 3 flute designs. Downcut spiral bits do exactly as their names states- they cut downward into the material. This allows them to leave a clean and splinter free edge, but it also wears out the bit quicker due to poor material ejection. The removed material tends to get pushed down into the cut, so that you are cutting new material as well as the removed material which can wear out and dull the bit much quicker.
Upcut spiral bits do just the opposite. They also come in configurations with varying number of flutes, but they cut up from the material. This allows for better chip and material ejection which helps reduce wear on the router bit, but leaves the edges of the material more prone to splintering. Compression spiral bits are a combination of upcut spiral bits and downcut spiral bits. The cutting flutes spiral up from the bottom and down from the top. This allows for optimal chip evacuation and cleaner cutting edges. Compression spiral bits are great bits for cutting plywood sheets, laminates ad composites.
Whiteside Router Bit Review- #1376B
Posted on Wednesday, February 4th, 2015 at 2:37 pm.
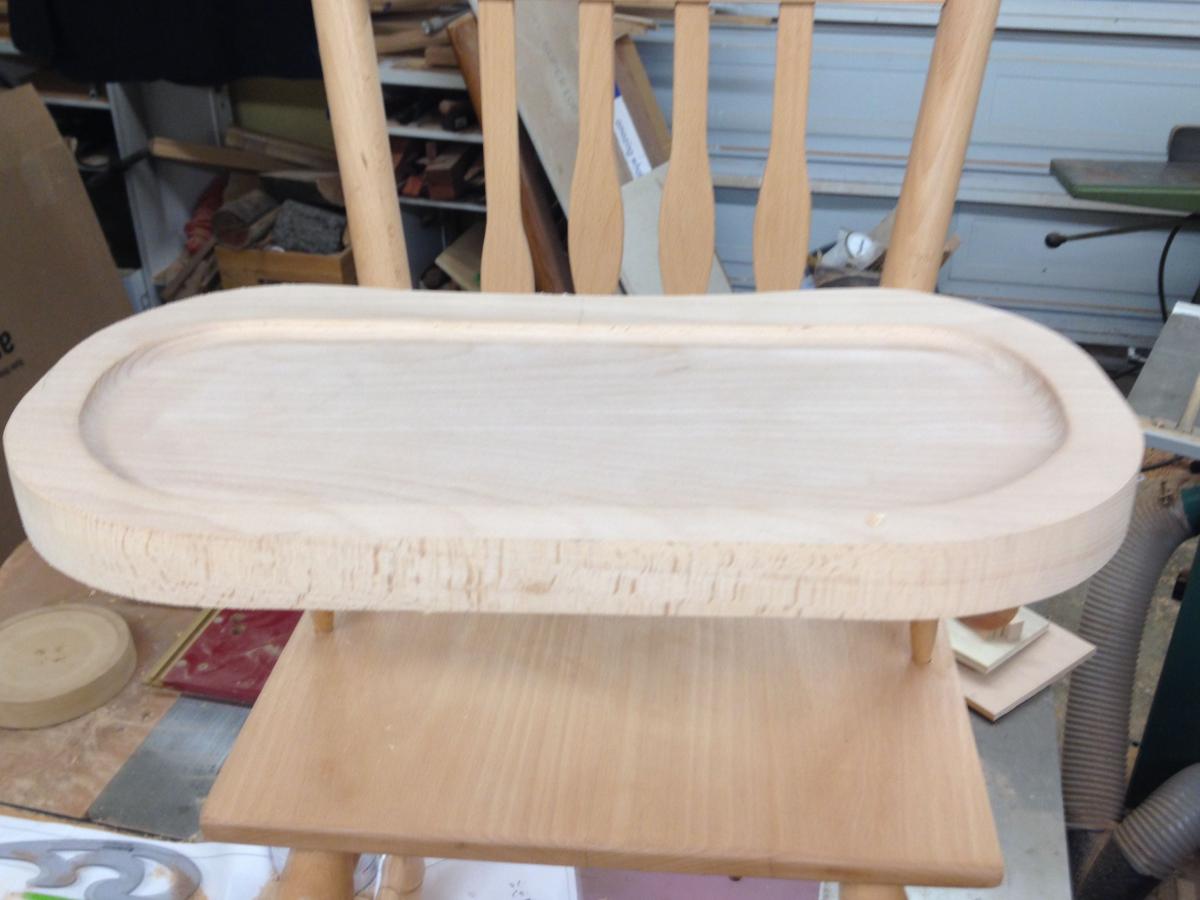
Brian Kent, a grandfather posted to sawmill creek asking for recommendations on Whiteside router bits to build a custom high-chair for his grandson. He couldn’t decide if he should buy a bowl and tray bit or a round nose core box bit.
Tom saw this as a wonderful opportunity for a Tool-Review! We spoke with the head technician at Whiteside for his expert opinion for the selection of bits needed. Chris recommended the Whiteside 1376B and Whiteside 1411.
We contacted Brian and offered both Whiteside bits free of charge in exchange for an honest and un-biased review. He accepted our offer graciously and got to work! This is an excerpt from the review published on sawmill creek of the Whiteside 1376B used for his grandson’s high chair!
—————————————–
“First of all, many thanks to Tom Waltz, who sent me 2 Whiteside router bits to test:
1376B Bowl and Tray Bit (reviewing now)
1411 Round Nose Core Box (trying and reviewing later)
First of all, I am very grateful for Tom’s kindness. I started using Whiteside bits after the 2007 Fine Woodworking comparison. The Fine Woodworking test named Whiteside Best Overall and Best Value. I buy them whenever I have a choice. As a hobbyist, I have not worn any out or seen any degradation in performance in any of my Whiteside bits.
The 1376B Bowl and Tray Bit looks and feels substantial. It has a bearing the same width as the bit – 1-1/4″. Shank is 1/2″. Radius on the edge is 1/4″ so it has a flat cutting spot of 3/4”.
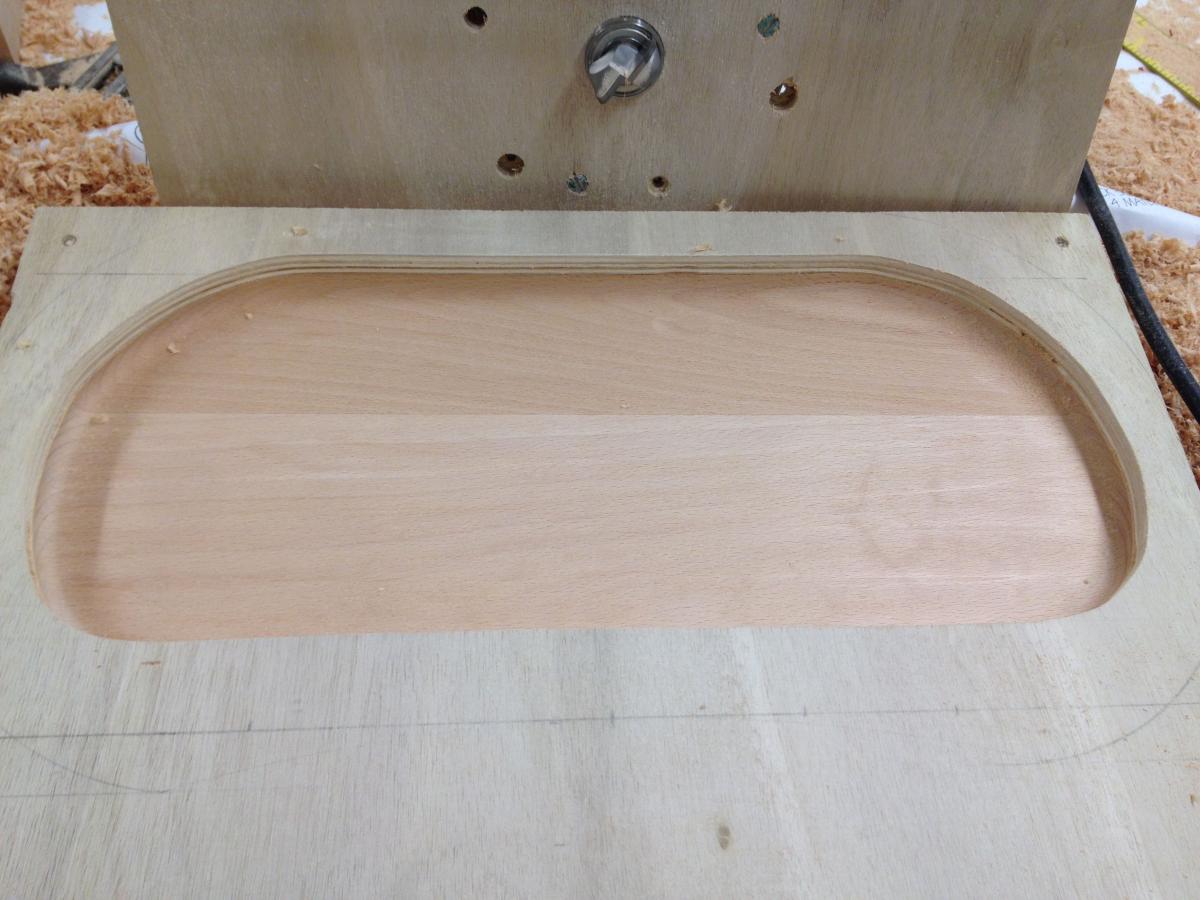
The only challenge I experienced was that the bearing starts about 5/8″ from the cutting end. My template was made from 1/4″ ply so I started with a plunge cut near the middle of the piece. The router was mounted on a 16″ x 6″ piece of ply so it could ride the edges of the highchair tray template.


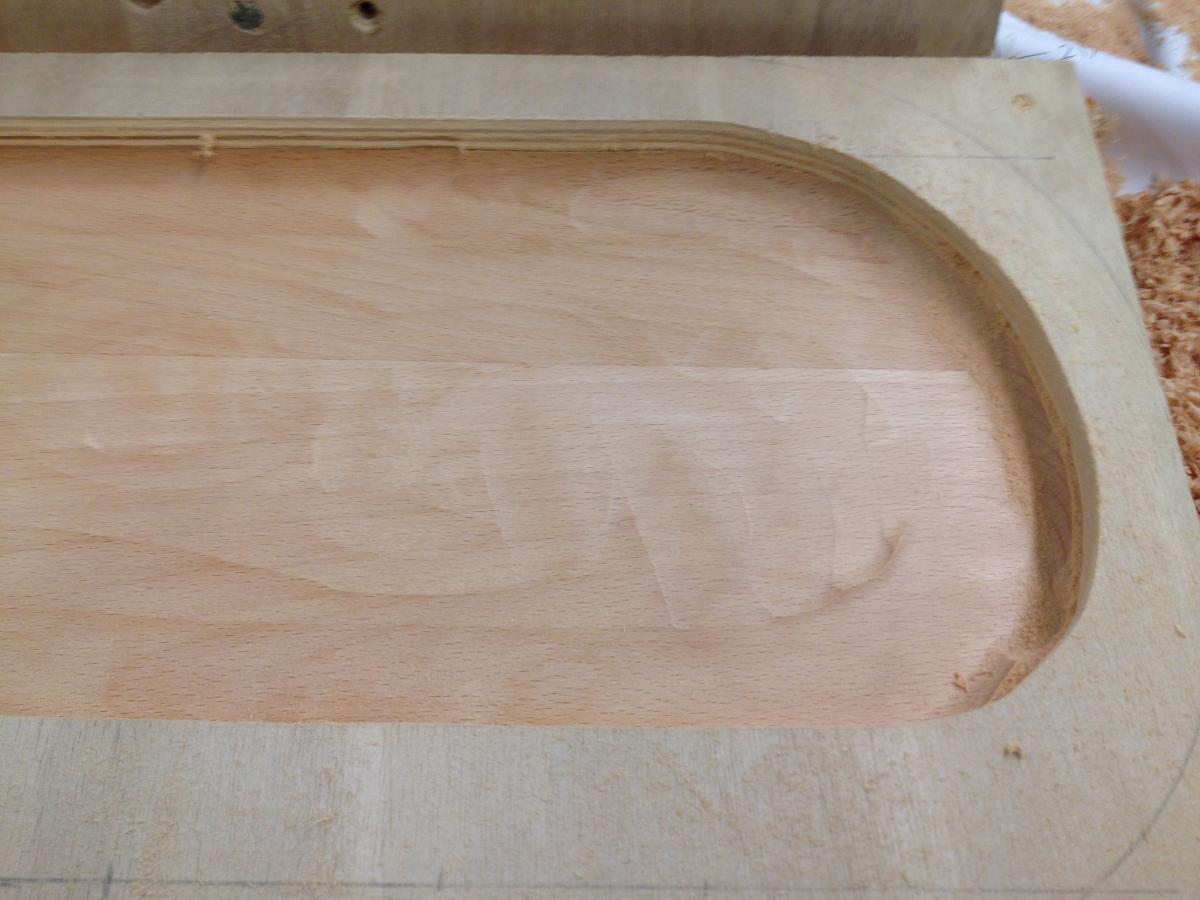
I began with a deep cut because the bearing was so high. I was very happy with the lack of tear-out. This is Beech wood, which has given a lot of tear-out with sharp lathe tools.
I did a couple more passes with a very slight increase of depth. I was very satisfied with the smooth finish. I started sanding at 150 with a ROS.
I’ll round off the outer edges after re-sawing about a half inch off the back.”
—————————————–
Stay tuned for Brian’s review on the Whiteside 1411 for his next project!
Brazing Flux- New SMART Flux
Posted on Thursday, January 8th, 2015 at 2:51 pm.

SMART Flux: new, advanced, cleaner and a great price.
The new SMART Flux an environmentally conscious flux that has color changing technology. SMART Flux is boric acid free which complies with the new EU Community REACH regulations on hazardous chemicals. The absence of boric acid reduces the amount of water absorption from the air resulting in less clumping.
This green colored flux alerts the user that the brazing process has reached active temperature at about 800°F when it changes to a light blue or clear. SMART Flux has an extremely wide active range, 800°F – 1600°F.
Extremely fluid, SMART Flux will penetrate the tightest joints. Consistency remains smooth with very little separation when stored. It can be heated using torch, induction, furnace, resistance, dip and other methods.
**Availiable in powder or paste!
SMART Flux will get the job done right the first time, while being kind to the environment.
- Boric Acid Free
- Complies with AWS and International Standards
- Color Changing Technology
- Remains Smooth when Stored for Long Periods of Time
- Wide Activation Range
For additional information on our standard Black, White, MEGA and Purified Flux please visit our website. If you are unsure if SMART Flux is right for you or your application, we would be happy to send you a sample. Just comment below your information and we will send it out to you.
