


Welcome to the Carbide Processors Blog
Chapman MFG- American Made Handtools & Sets
Posted on Tuesday, September 8th, 2015 at 10:58 am.

We are happy to announce our new partnership with Chapman Manufacturing (Chapman Tools) located in Durham, Connecticut. John Chapman started the business in his garage during the Great Depression in 1936. Probably not the most ideal time for a new business venture, but through hard work, superior hand tools and outstanding customer service Chapman Tools has become the leader of American Made tools using American Made materials.
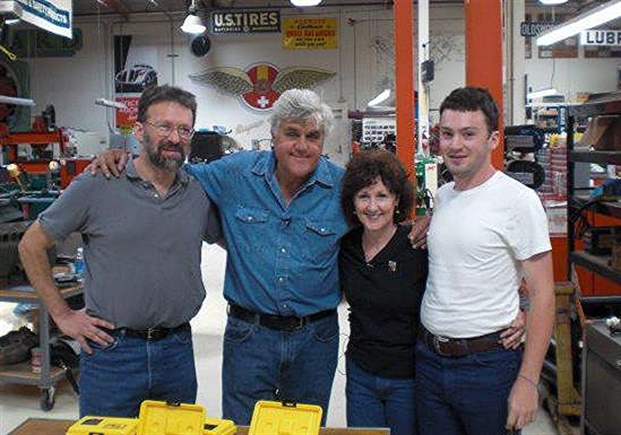

Jay Leno endorse 2014 Employees
Chapman has perfected the manufacturing process of precision small screwdriver and bit kits since its conception in 1963. With innovative features such as utilizing micro- manufacturing, tighter working tolerances and non-magnetic materials, Chapman’s tools are highly sought after. Customers appreciate these superior Made in the U.S.A. tools as well as knowing that the dollars they spend go right back into the pockets of the American people. As new technology brings more computerization, mico-manufacturing and tighter working tolerances, Chapman tools are highly sought after. All Chapman tools are non-magnetic, hand assembled- inspected and available in different combinations in their tool kits.

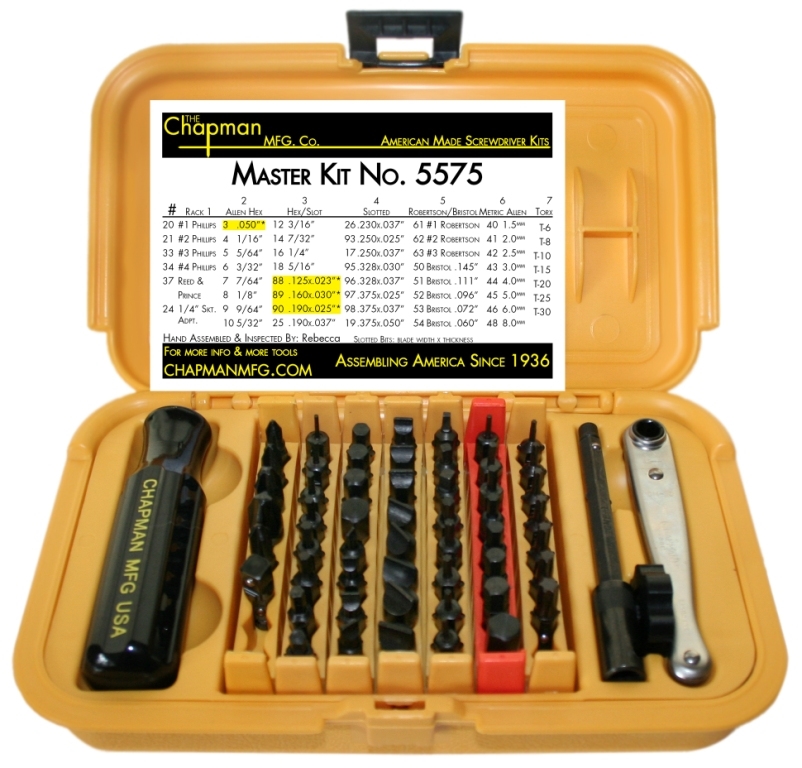
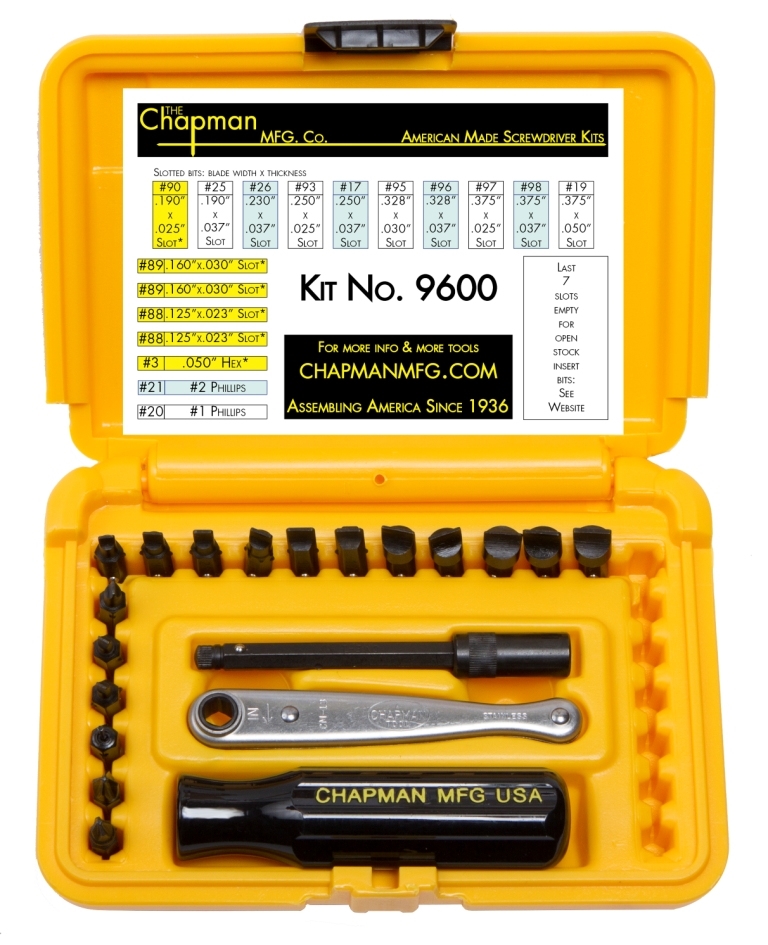
Chapman ¼” drive screwdriver bits, are available in 53 types and sizes including Standard & Metric Allen Hex, Phillips, hollow ground straight sided Slotted, Bristol 6-flute, Reed & Prince/Frearson, Robertson square head and Torx. All are milled from USA tool steel, heat treated with a black oxide finish and are interchangeable with their screwdriver handle and famous offset midget ratchet. Two available extensions add length to the screwdriver handle and ratchet. All Chapman tools are non-magnetic, hand assembled and inspected and available in different combinations in their tool kits.
The beauty of Chapman tools lies in their versatility. The offset midget ratchet provides up to 200 inch pounds of torque (four times the leverage of a large screwdriver) in a tiny space. There’s also a screwdriver handle and a spinner top, both of which can be used independently or combined with their 2” or 3 5/8” extension. You can even use the ratchet, screwdriver handle and extension together as a ratcheting screwdriver.
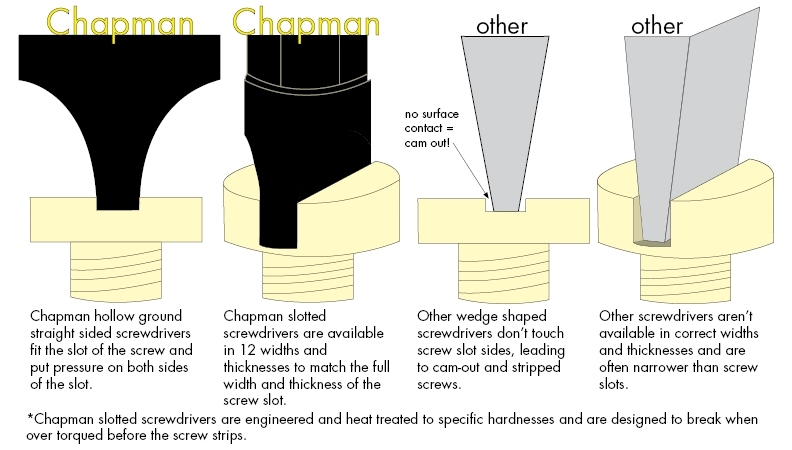
While there are many types of insert bits on the market, Chapman’s are reasonably priced and offer exclusive quality features competitors don’t. All the bits are stamped with a part number and have a ball-detent, which is a tiny spring and ball bearing that locks the bits into the tools without the use of magnets. The bits have ear stops or oversized working ends depending on size, and all but the Torx bits have knurled ends for finger tightening. Lastly, the bits are heat treated to a specific hardness for each size and are meant to break before damaging a fastener. For example, many gunsmiths rely on Chapman Slotted bits for working on antique firearms with irreplaceable soft, hand cut screws. Chapman tools are engineered and are hardened to specific tolerances to prevent damage when the fastener is more valuable than the bit.
Chapman Sets-

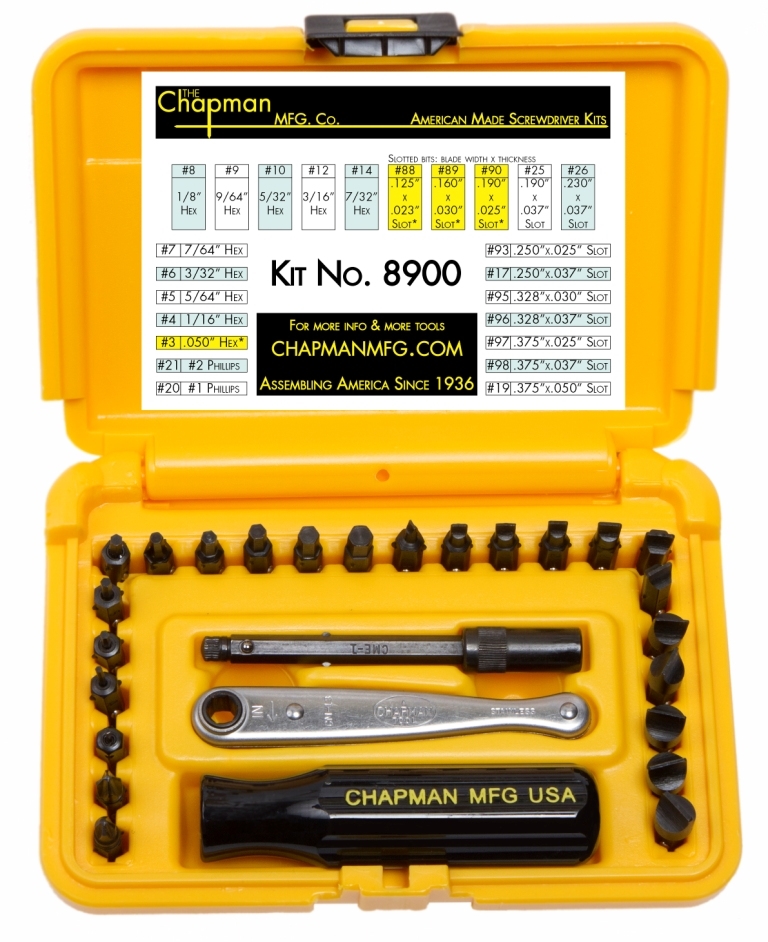
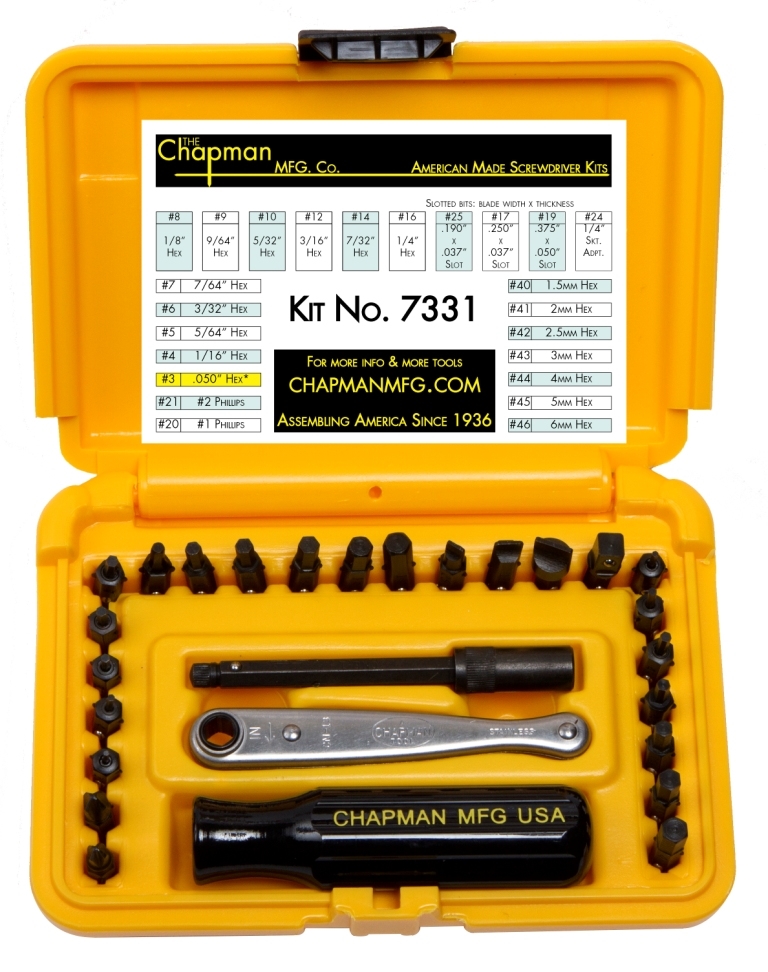
Product Descriptions-
Famous Midget Rachet
*1/4 drive 20 tooth steel gear
*18 degree working arc
*exceeds Military standards for torque specifications
Screwdrivers and Accompanying Bits
*economical screwdrivers with adjustable set screws
*¼” drive screwdriver bits available in 53 types and sizes
*bits are heat-treated for hardness & designed to break before damaging the fastener (gunsmiths)
*made using USA tool steel, heat treated with a black oxide finish
Other Important Information
*all tools are non-magnetic
*interchangeable tooling
*hand assembled and inspected not once but twice
*many combinations offered in tool sets
Chapman manufactures these for:
*assembly
*calibrating & servicing of aerospace
*medical & dental professionals
*imaging
*gauging
*sewing
*sound & robotic equipment
*knives & firearms
***Jay Leno has been a long time user of Chapman tools for his antique cars and motorcycles. About five years ago Jay invited Tracy, the owner of Chapman out to his garage in Burbank, California to film a short video promoting Chapman tools***
Top 23 Reasons to Filter Coolant
Posted on Wednesday, August 12th, 2015 at 12:47 pm.
Does Filtering Machine Coolant Really Matter?

Coolant Filtering Works
It Saves You Money
Filtering grinding coolant is just like filtering the oil in your car. Dirty oil and dirty coolants wear out the equipment.
Increase Machine Life – save $2,000 to $8,000 per year
The big advantage in clean coolant is that it protects the machine. Dirty coolant can shorten machine life by 5% to 7% a year. Saw and tool grinding generates a huge amount of very small, very abrasive particles. These particles get into the coolant and then are sprayed all over. These particles get into controls, cylinders, rods and bearings where they increase wear and reduce quality. The CP 2002 removes particle down to one micron and removes them with incredible efficiency.
Particles per cubic centimeter: Unused coolant Dirty coolant Filtered coolant
11,885 76,299,682 40,000 to 100,000
96% to 99.9% particle removal
Longer Coolant Life – save $1,000 a year per machine + the saving in labor
If you filter your coolant you will get much longer life. In actual tests we see coolant last six months and it is still doing an excellent job. This saves you on coolant costs and the maintenance of sump cleaning and coolant changing.
Reduce Diamond Wheel Costs – save $3,000 to $10,000 per year
A good grinding operation will still dump huge amounts of oil and grease into the sump. We ran a test on a high production machine. In twenty-two days of double shift we pulled out about ten pounds of oil and grease. This oil and grease clogs the wheel. Clogged wheels mean slower grinds, worse quality and shorter wheel life. Clean coolant increases diamond wheel life by at least 30% overall and as much as 50% depending on the wheel and the application. This is saving of 25% to 35% in annual diamond wheel cost. (Tests run in Feb. & March of 1998. Six dry filters weighed 5.45#. Six dirty filters drained of water weighed 15.21#. The difference was 9.76 pounds.)
Removes oils and greases
Very Low Filter Cost
The CP 2002 comes with replaceable or cleanable filters. This is a low cost unit that is very effective. If you are concerned about the true cost of the unit then the CP 2002 is a better buy. The CP2002 runs a month without filter changes because it ran over a month of double shifts in repeated tests in an actual saw shop. We ran tests for two weeks and they worked. Then we ran tests for a month and they worked. Finally we wanted to run tests until the filters clogged up. It took 22 days of double shifts before the filter clogged up. The filters worked well all month. (We tested dozens and dozens of filters to find the right combination. If you use the wrong filters your performance can drop from weeks to days or hours.)
Filter Cost $24 a month and only one filter change
Our Units Do Not Harm Coolant
Building a filter system right is very difficult. It must take out tramp oils and greases without taking out the lubrication and anti-rust from the coolants. In addition to particle count we also tested for turbidity, pH, viscosity and conductivity. In all four areas the filtered coolant measured the same as brand new coolant.
| Unfiltered | New | 1/2 Hour | 11 Days | 22 days | |
| pH | 8.08 | 8.02 | 8.15 | 8.14 | 8.05 |
| Viscosity | 0.73 | 0.76 | 0.8 | 0.79 | 0.76 |
| Turbidity | 45,000 | 7.02 | 68.5 | 57.3 | 50.3 |
| Conductivity | 2,210 | 1,683 | 2,680 | 2,630 | 2,380 |
| Particle count | 76,000,000 | 12,000 | 2,600 | 2,600 | 2,400 |
Our 23 Top Reasons to Filter Coolant
1. Longer Machine Life
2. Longer time between rebuilds
3. Less down-time
4. Less equipment replacement
5. Faster operation
6. Faster cycle times
7. Fewer wheel replacements
8. Smoother grinds
9. No burning
10. Cooler grinding
11. Longer coolant life
12. Longer grinding wheel life
13. Less machine maintenance
14. Less dressing required
15. Perhaps increased operator safety
16. Retards bacteria growth
17. Eliminate smells
18. Less OSHA exposure
19. Less EPA exposure
20. Less waste
21. Cleaner waste
22. Lower coolant recycling costs
23. Turn an expense into income
They Call Him the Wrench Man
Posted on Tuesday, July 7th, 2015 at 3:51 pm.
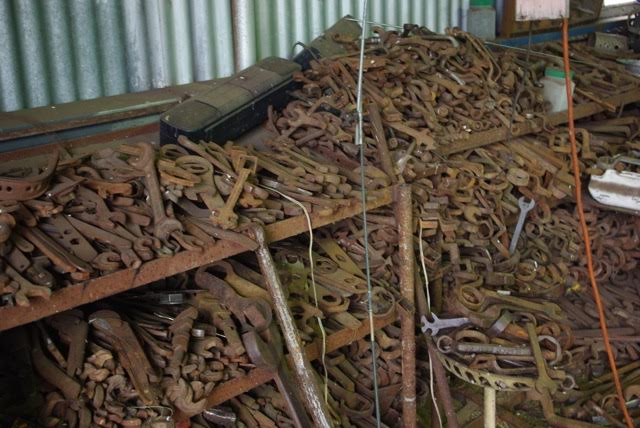
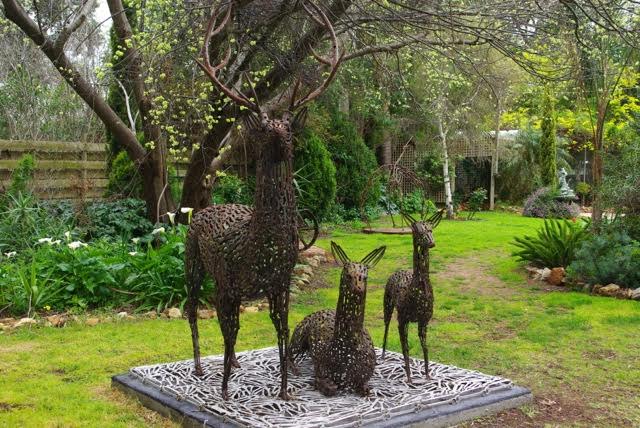
We are always looking for ways to make cool stuff with out tools. But, how about making cool stuff out of tools! A scupltor in Australia has found a new life for old, rusted wrenches that would give Michelangelo Buonarroti a run for his money. Not sure who Michelangelo Buonarroti is, you might recognize his work by the picture.

John Piccoli began creating his sculptors over 30 years ago for his small garden by using the wrenches he had collected. Fast-forward to today he is creating large statues and museum quality art pieces in Sydney and Melbourne, Australia.


Not only is John extremely talented, but he is also a Polio survivor who has been wheel-chair bound since 8 years old. You may wonder how he is able to create these sculptors that are life-like in size and shape!


John’s custom workshop is can work in 3 dimensions with the use of a cross-over gantry crane and several block and tackles at allow him to work at chair level.
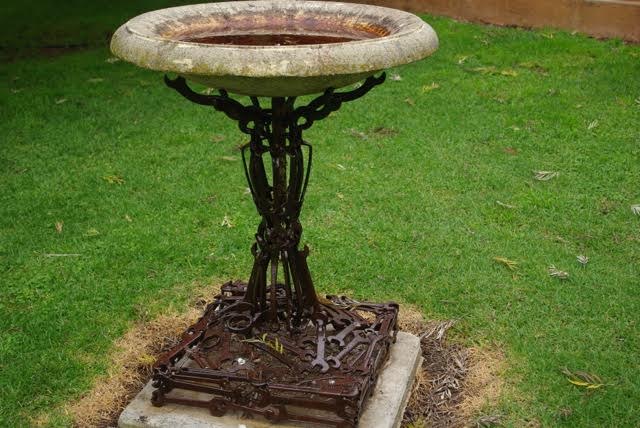

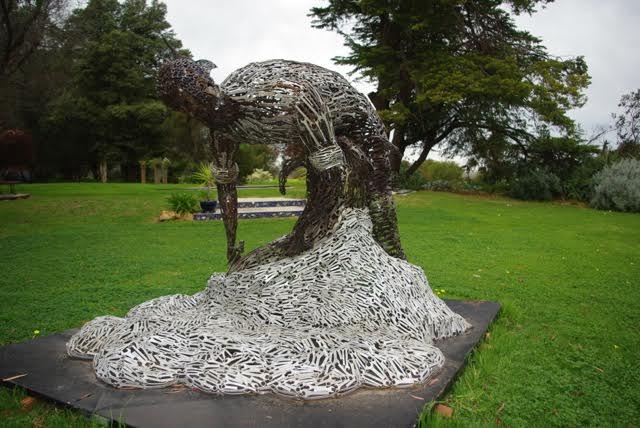
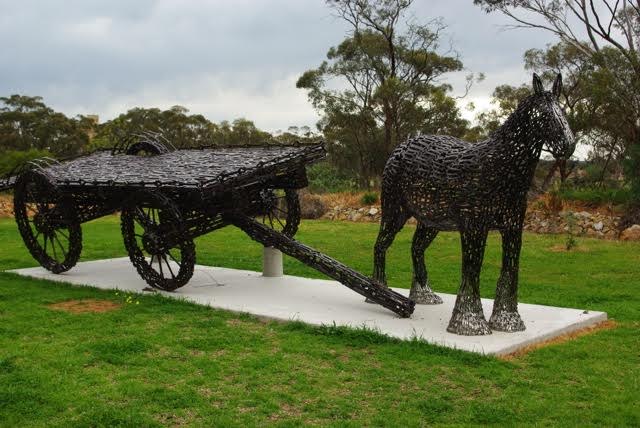
Hopefully looking at these pictures will help inspire you to create something beautiful out of un-used tools! We would love to see what you come up with.
Father’s Day Gifts that any DIY Dad Will Love
Posted on Thursday, June 4th, 2015 at 8:13 am.
It’s coming up on that time of the year again. The time of year that we rack our brains trying to figure out what dad really wants and then finally settle on a “Best Dad” coffee mug or another blue tie. Why not really surprise dad this year with a gift that he can really use and will actually love. We’re not saying he didn’t love the “Best Dad” coffee mug, we’re just saying it may be time to change things up and really surprise him with a gift that will have him thinking of you every time he uses it.
We have some great gift ideas for the DIY Dad’s out there. Whether it’s woodworking tools for the shop or hand tools for around the house, we have some great gifts that will make Dad’s day special without breaking the bank.
1. I have too many clamps… Said no DIY Dad EVER!
We have great deals on Clamps from Bessey Tools or Woodpecker. These clamps are sure to make working on his next project a breeze. Everyone knows when working on bigger projects, 4 hands are better than two. Clamps will help Dad finish his projects faster and with ease. Give Dad some Bessey clamps to help free up his hands and his time. We recommend our most popular selling Bessey clamps- The Bessey K Body Revo Jr, starting at just $63.11* for a pair.
*These are current prices as of June 2015. prices may vary over time.
2. Give your Dad a hand, or protect the ones he has…
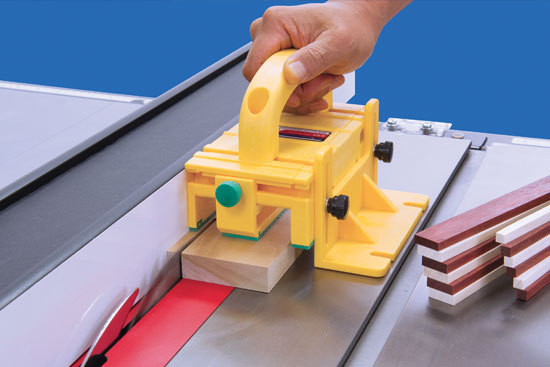
Give Dad a cutting edge on all his woodworking projects while keeping him safe with Micro Jig’s Push blocks. Micro Jig makes the most innovative products that give more precise cuts while keeping the user’s hands safe from sharp and dangerous woodworking equipment like table saws and routers. If the Dad in your life is an avid woodworker, then Micro Jig’s push blocks are sure to be on his wish list. Micro Jig GRR-Ripper push blocks are starting at $24.95* or upgrade to the 3-D Push Block system with advanced features for only $59.00*.
*These are current prices as of June 2015. Prices may vary over time.
3. If there’s not enough room in the tool box, then It’s probably just time for a bigger toolbox.

If your dad would agree with the above statement then why not shop our Wiha Hand Tools. Save on all hand tools like screwdriver sets, wrenches, socket sets, pliers, cutters, and hex keys. All our hand tools are made from quality steel, are ISO certified and guaranteed to last. Give Dad tools he can count on as much as you count on him. Psst… Shop our Sale Section for great prices on great tools that will have you and Dad grinning from ear to ear.
4. “That’s not a knife, This IS a knife”

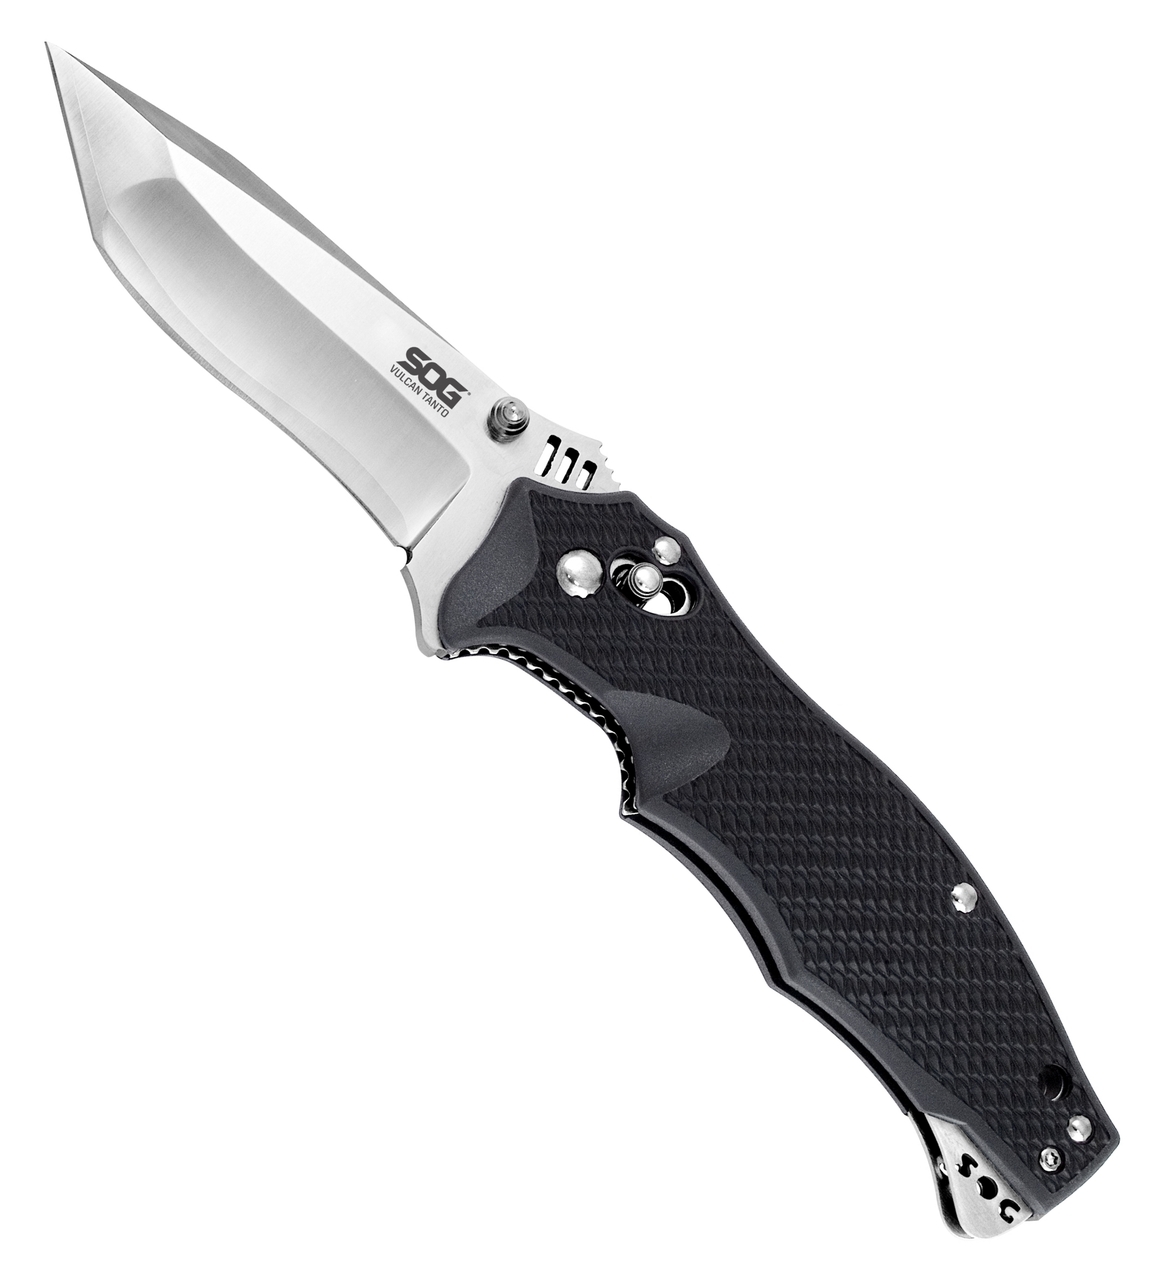
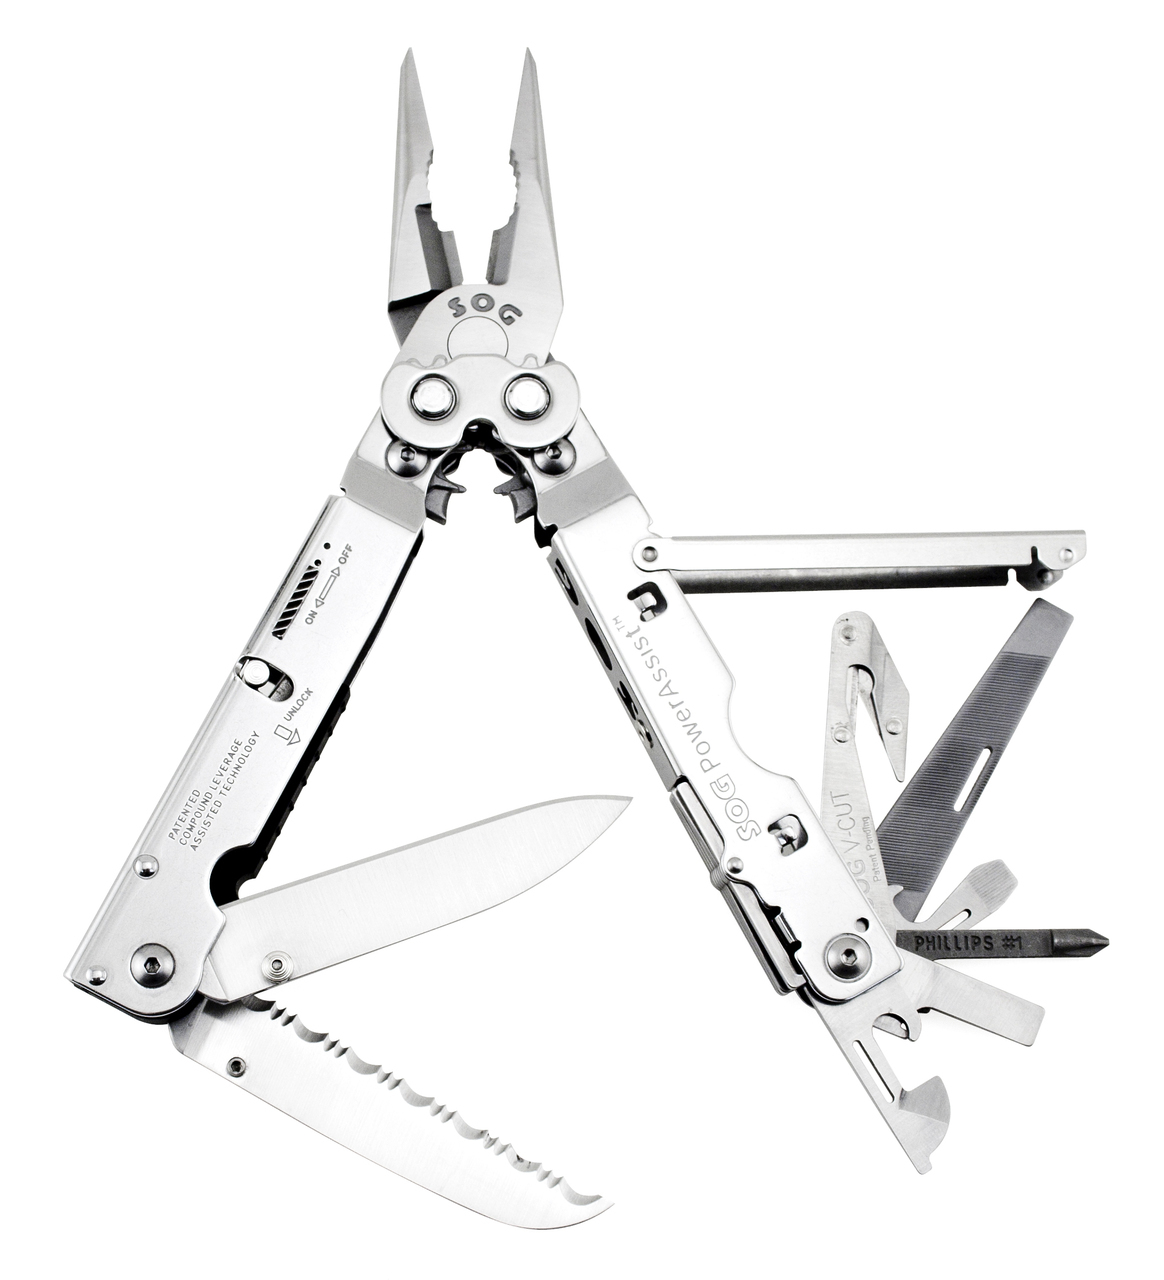
If your dad shares the same warm fuzzy feeling for sharp objects as Crocodile Dundee, then a SOG knife may be right up his alley. SOG is located in Lynwood, WA and makes absolutely incredible knives and multi tools. SOG got their start by making knives for the Navy Seals and Special Forces. They have greatly expanded their line of knives for use in hunting, tactical and outdoors. Outfit your Dad or your favorite everyday hero with a SOG Knife or multi tool. Want to make it even more special? Get your tool engraved with his name or a special message just from you.
5. Eat my dust… Saw dust that is.
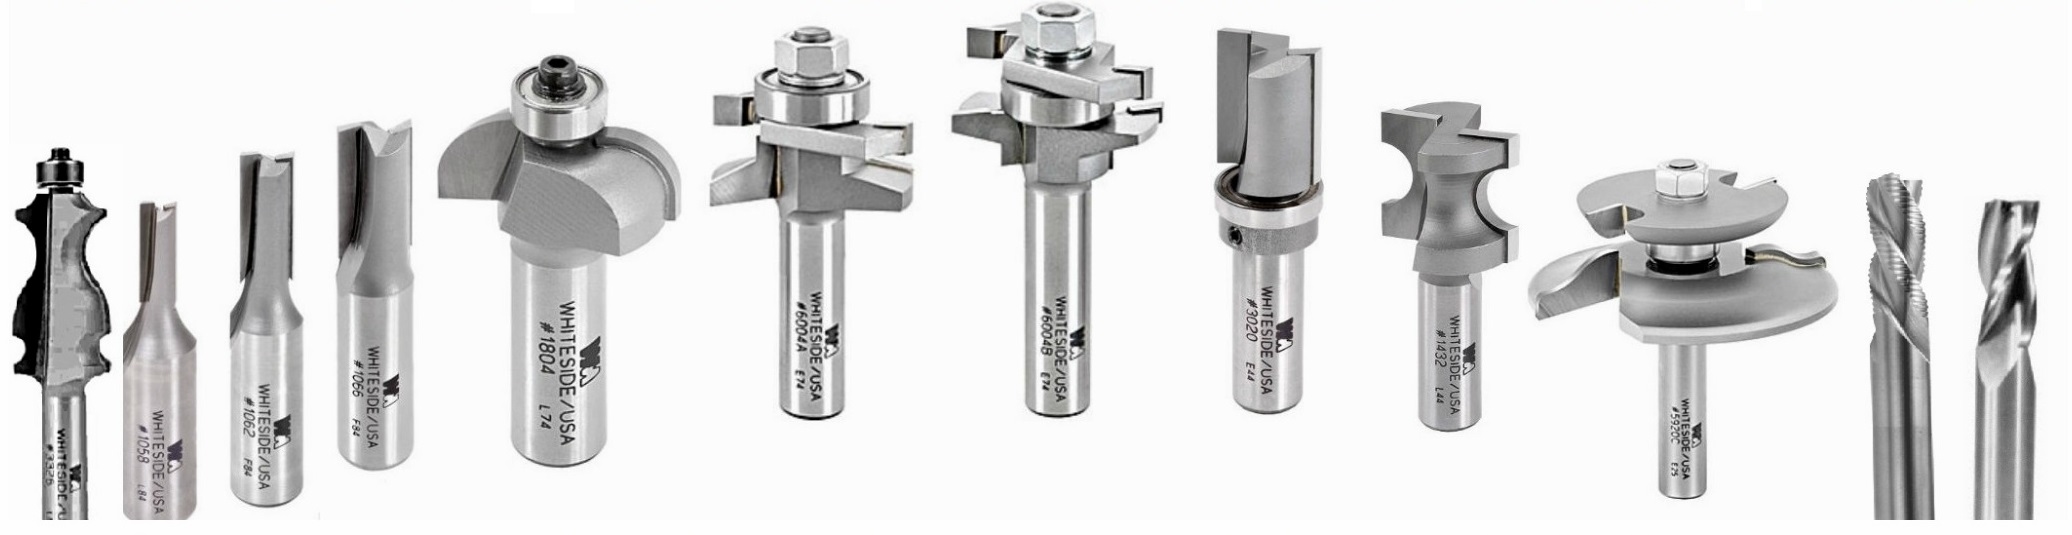
If the Dad in your life spends a great deal of time with his router or table saw, he might really enjoy a new Router Bit set or Saw Blade. Save on American made Router bits and router bit sets that will keep dad happily making his woodworking plans come to life. Or bring new life to his table saw by getting him a brand new saw blade.
6. Needs more Power…

Is your dad is a tool lover that can’t get enough power? Give Dad a Power Tool from Triton. Triton Power tools makes award winning routers, laser-guided circular saws, cordless drivers, and more. The Triton 20V Impact Driver will satisfy the Tim the Toolman Taylor inside any Dad and will complete all his DIY projects inside and out. Choose from many other great Triton Power Tools all at very competitive prices.

7. Seeing Red…

If precision and quality are at the top of Dad’s list for the tools he buys, then he’ll love the Woodpecker’s router Accessories product line. Woodpecker’s precision Squares and layout Tools are precision ground on state-of-the-art machinery using aircraft grade aluminum steel and anodized in Woodpecker’s trademark red coating for superior tool protection. Woodpecker’s can outfit Dad’s shop with every router accessory he needs, including router lifts, rules, straight edges, clamps, and many other innovative tools that make dad’s projects easier and fun.
If you are pretty crafty yourself, why not make something for Dad. Gifts made by you are always extra special. Dad will appreciate the time and thought that went into it, even if it looks like this…

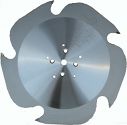
Replacement Portable Saw Mill Blade
Posted on Tuesday, June 2nd, 2015 at 11:47 am.
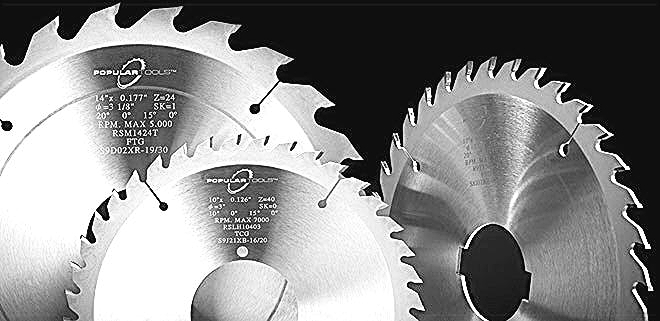
Custom Replacement Portable Saw Mill Blades are now available at Carbide Processors. We have taken into consideration your demand for superior quality as well as affordable pricing and now offer our saw blade expertise in creating your Replacement Portable Saw Mill Blade. By combining over 30 years experience in the woodworking industry as well as using the very best materials, our custom saw blades and tooling meet and beat our customer’s expectations.
Product Description
5 Tooth Replacement blades for the Portable Lucas Sawmill.
Specifications:
Teeth: 5T
Bore & Pinhole: 30mm, 5+5 pins
Kerf: 4.8mm unless otherwise specified
Plate: 3.2mm unless otherwise specified
Design: FTG
The Replacement blades can be made to your specifications for Diameter, as well as plate thickness and kerf. Please call us for pricing and lead time or fill out the Replacement Portable Saw Mill Blade form.
Special Offer :
**Buy a custom Replacement Blade for the Portable Lucas Sawmill and receive the Sawmiller’s Guide to Troubleshooting, or Miners Manual of Saw Hammering and Filing at a bundled discount!** Ask your friendly customer representative for details.

The Carbide Processors team continually strive to offer you products and services that you need at the best price without sacrificing quality. The custom tooling (manufacturing and sharpening) and saw blade services (manufacturing, re-tipping, sharpening, and repairing) are backed by a 100% satisfaction guarantee. We also specialize in brazing materials, brazing services, as well as special grades and sizes of carbide.
To create a quality tool you need the right materials. We have them. A minor difference in alloy chemistry can make a difference of 70% or more in bond strength and joint performance. We have done extensive testing to know just the right alloys to use and what applications to use them for. Our brazing services are patented with proven fracture prevention technology. We have been an industry leader in brazing for over 20 years and have pioneered new brazing techniques that are more fracture resistant and simply improve the quality of the tools. Our exclusive patented techniques prevents gaints, tool breakage, and creates stronger brazed joints. Choose from over 5,000 different grades of carbide including our Super C grade and our Cermet grades.
Brazing Steel to Steel- Wetting and Penetration Issues
Posted on Monday, May 11th, 2015 at 12:20 pm.
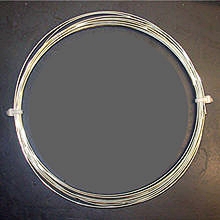
A gentleman posted on Practical Machinist looking for brazing information on his failed attempts at brazing steel-to-steel and get “away from messy stick welding”. Using 56% silver and Harris paste flux with 1100-1700 working degree temperature, he was using a propane torch to braze a steel nut to a washer.
….I will admit, that out of experimentation I have heated the part to bright RED to see if I can flow it further out….it doesn’t work well and….I found that the silver seems to….how can I say this….”peel” off the steel when struck with a hammer….HARDLY MIG weld strength (as it is supposed to be). I cannot let the base metal melt the silver, I must use the torch heat directly on the rod AND the part…sometimes the flux turns black, and I must wire wheel it to clean it off, and then start again…each time losing more and more precious silver rod.
Here is Tom’s response:
Cleanliness, cleanliness. Always start with cleanliness when there is a brazing problem. Welding is pretty much a physical joining. Brazing is much more a chemical process. A really good braze joint will have both chemical and physical joining.
People do use solvents, such as acetone and similar, to clean before brazing however there definitely are residue issues as mentioned above. The advantage with something such as a soap or detergent, oven cleaner and Comet were mentioned, and they break the oils and greases down into easily removable soaps.
![]()
These are some mild steel bars I use for brazing tests. The come with scale on them. I use a bench grinder to get them clean and bright as with the right end of the top one.
A braze alloy with 56 in the title is a 56% silver braze alloy with the rest being copper, zinc, a little nickel and maybe a little tin or manganese.
We ran Charpy impact tests at Weyerhaeuser to find the best braze alloys for sawmill saws. The best was an Ez Flo 3. However this is not considered suitable because it contains cadmium. A 50% braze alloy without cadmium was about 30% weaker. 56% braze alloy with tin flowed beautifully but had about half the strength of the Ez Flo 3. A 49% braze alloy with manganese was as strong as the Ez Flo 3 but had poor flow characteristics.

We have these little braze kits. We use 0.062″ dia. wire which should be easier to use. The 56% braze alloy you’re using is a very popular braze alloy and may work very well for you if your parts are suitably prepared.
As was mentioned several times above need a very, very clean surface. It looks as though your parts may have been zinc coated. From your description of the process it appears as though you are turning the zinc and zinc oxide which is a largely and wettable surface.
I have a cheap wheel on a cheap bench grinder I use for this sort of thing. I grind to bright, shiny metal. Then I clean with an oven cleaner.
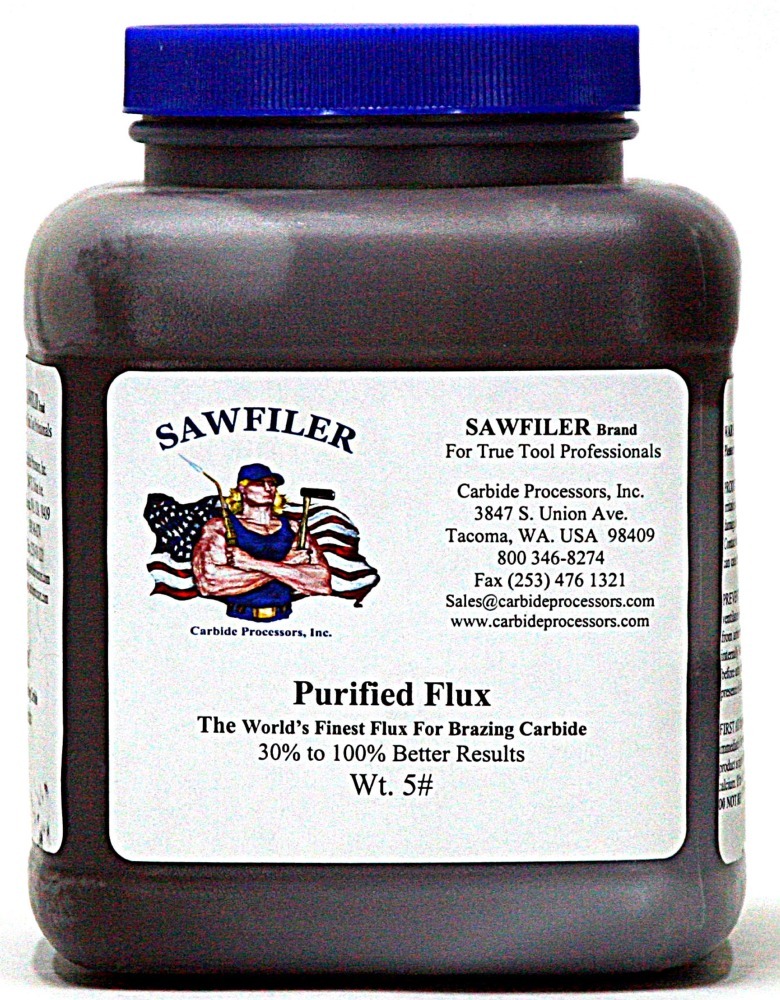
There are lots of fluxes in the world. Ideally your flux will match your braze alloy as well as the two parts being joined. This isn’t always that simple. We sell five kinds of flux for brazing tungsten carbide alone.
Were I trying to do your project I believe that I would cut a couple of short lengths of braze alloy and pound them flat. I would put a nice dollop of black flux on top of the bottom part. I would put the flat wire in the middle of the flux. I would cover the top with flux then put the bolt on top of the flux top part.
Heat the assembly until you see the flux run out.
You will need something to hold the parts in place and move the parts around. At 212 F the water will boil out of the flux and this can shift the parts. At about 1000 F the flux will liquefy and this can shift the parts. At about 1500 F the braze alloy will liquefy and this can also shift the parts.

This is a temporary brazing bench. I use fire bricks and stainless steel. I may not need two tiers but hot braze on stainless steel can set fire to the table top below the stainless steel.
You can build your own little oven. Fireplace bricks were mentioned above and they will work. We use bricks that are used to line kilns. They should be available from a ceramic supply store. We like these because they are extremely easy to work using a hacksaw, paring knife and similar. Do not use good tools on these as they will ruin the edge on a wooden saw in a few cuts.
Difference between a cordless drill and an Impact driver
Posted on Monday, May 4th, 2015 at 3:50 pm.
Both cordless drills/drivers and impact drivers can be used for similar jobs, but there are some key differences. A Cordless drill applies constant torque and tends to have a wide range of uses. Cordless drills have a keyless chuck that can accept a wide range of tools. They can be used to drill holes, drive screws and can be used with a great selection of accessories such as hole saws, rotary sanders, and wire-wheel brushes for doing a wide range of jobs. Drills or drivers are ideal for smaller jobs, as they provide great control across a range of speeds and clutch settings. They don’t have the impacting force that the impact drivers have and are better for drilling small screws or for drilling in softer surfaces.
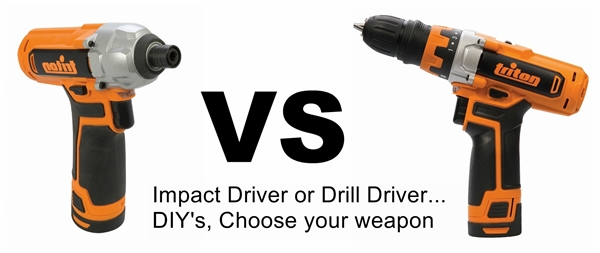
Impact drivers look very similar to drill drivers and do many of the same jobs, but use a hammering like action and brute force to get the job done. Impact drivers use both bit rotation and concussive blows to drive screws with incredible brute force. They can be easier to use for large projects or projects that require large screws or drilling into harder surfaces. The concussive action transfers much of the high-energy torque directly to the screw, taking off some of the stress to your wrist and forearm. Impact drivers use a collet to accept hex-shanked drivers and bits. Because of the high concussive force, an impact bit that can withstand the high pressures of the impact drill are typically recommended.
While Impact Drivers can do most of the jobs a drill can do, but faster and with more ease, they don’t have quite the versatility that you can get with a drill. Using a cordless drill for small jobs and pulling out the “big guns” (aka the Impact Driver) for larger jobs or more difficult jobs you can take care of all your DIY jobs in no-time.
Oshlun Saw Blade and the No-Hassle Refund
Posted on Thursday, April 23rd, 2015 at 3:21 pm.
Customer Service Done Right
It’s kinda’ funny how we as customers (I include myself because I buy things too) get used to having to explain and apologize for merchandise that we want to return or get a refund on. Some of the scenarios include the product breaks, fails, doesn’t fit right, not the right size, he/she doesn’t like it or maybe just due to old fashioned buyers remorse. I think you would agree with me that most retailers seem to have adopted the attitude that they are doing you a service by selling you x, y & z. So how could we, as consumers possibly want to waste their time returning a defective item for an exchange, or perhaps, get a full refund without being charged a service fee?
Carbide Processors, Inc., is not perfect, but, we always do our best to provide our customers with quality products at the best price possible. Along with superior products we also offer a 100% satisfaction guarantee! Here is a recent example of our commitment to honor our promises:
One of our Canadian customers bought a Oshlun SBF-100080, 10″CD, 80T saw blade for mild steel and ferrous metals. The customer placed his order via our e-commerce website in mid December. I would guess that he felt confident that the Oshlun blade would work for his application due to a  review posted on our website by another buyer. I’m sure he also appreciated that our Oshlun Saw Blade line consists of industrial quality blades for the professional and serious hobbyist. Oshlun Circular Saw Blades feature a fully hardened, surface ground, and hand tensioned steel alloy plate, as well as application specific carbide grade tips to ensure the longest cutting life. All-in-all the best quality for the cost in the industry for a ferrous cutting saw blade.
It’s not often that a product we sell does not meet our customers expectations; after-all every product that is offered on our website has to meet our own, very high standards first. In this case, that is exactly what happened. I received an email from this particular customer on 4/22/15
“I don’t like it when I pay money for it and use it only 2 times!!I used the blade 2 times now it barely cuts through the metal, so can I return it and get a full refund?”
In this situation the customer was very clear, he did not want the blade and he wanted his money back. So that is exactly what I did! I apologized for the Oshlun blade not performing properly and promptly refunded him in full the cost of the blade and the Canadian shipping/handling charges. It was the right thing to do, ethically, morally and it makes good business sense.
Carbide Processors begins each morning with “the customer is first”, and as we leave for the evening we end our day with ” the customer is first”. Tom has been doing business this way since 1981 and seems to have worked pretty well thus far.


**Returns**
General Return Policy
You may return items at any time for a full refund, there are no time restrictions on anything in our online store. We’ll also pay the return shipping costs if the return is a result of our error (you received an incorrect or defective item, etc.).
Bandsaw Blade Brazing
Posted on Wednesday, April 15th, 2015 at 11:16 am.

Bandsaw (Band Saw) Blade Brazing
Six Easy Steps
- Clean and bevel the blade ends
- Clamp blade ends to the fixture
- Spread the flux
- Braze
- Anneal
- Remove excess alloy
With a very small, narrow blade it may be possible to join the two ends by soldering. Soldering occurs below 800 F. (Other temperatures are sometimes given but they are all in this range.) Soldering is low temperature and typically makes a soft, weak joint.
With larger blade and with blades where a strong joint is needed you will braze.
Selecting a Solder or Braze Alloy
You will need a “silver solder” or “silver based braze alloy”.
Typically solders have something like 3 to 5% Silver in them. Braze alloys have a silver content somewhere around 50%.
There are typically four alloys that work well. They are sold under various names. I have included the BAg numbers as these are the official AWS (American Welding Society) designations. You can typically identify the alloy from a supplier based on the number sued. E.g. Easy Flo 3 is a Bag-3 alloy. 50Ni2 is a 50% silver with 2% Nickel.
These alloys melt over a range. The solidus is the highest temperature where they could be considered a solid. The liquidus is where they are officially a liquid. It is typicvally good practice to melt the braze alloy to a point about 50 F over the liquidus.
- BAg-3; 50% Silver with Cadmium 1170 solidus to 1270 liquidus. Strongest braze joints. The historic favorite. Easy to use and strong joints. Not used as much in the past decade due to the health risks with Cadmium.
- BAg-22; 49% Silver with Manganese. 1260 solidus to 1290 liquidus. Strongest braze joints. As strong as Bag-3 and Cadmium free. A bit harder to use. Brazes pretty much like the other alloys but it does have a tendency to form little nodules or lumps.
- BAg-24; 50% Silver and Cadmium free. 1220 solidus to 1305 liquidus. About 30 to 40% weaker than the above alloys. Takes a little more heat. When it does get to temperature it wants to run faster and farther.
- Bag-8; 56% with Tin. 1145 solidus to 1205 liquidus. Very easy to use but a comparatively weak alloy.
These alloys come as a paste, a ribbon or wire.
- Paste is easiest to use and most expensive. It is flux and alloy mixed together with a binder to prevent the heavier alloy particles from separating to the bottom. You squeeze a little paste between the two parts and heat them.
- Ribbon is a thin strip. If you use ribbon it should be no more than 0.005” thick and 0.003” is preferable. You dip the ribbon in flux; put it between the two parts and heat.
- Rod or wire. Comes in various diameters and is generally least expensive. You flux both halves by dipping or painting. You can put a bit of wire between the two halves and apply heat. You can also apply heat until it is read then touch the assembly with wire or rod. If it is hot enough the alloy will flow into the joint.
You will need flux with ribbon or wire and extra fluxing with paste is a good idea. Black flux is more forgiving than white flux. Flux has some cleaning and oxide removal properties but best not to count on it. Start with clean parts instead. Flux is primarily an oxygen interceptor so that the parts and braze alloy do not oxidize.
Grind the Blade
Each broken end of the blade should be ground to an angle of about 45 degrees to provide a scarf joint. This process also cleans the damaged ends. Quickly running it across the bench grinder is enough to do this. A Dremel tool fitted with a small drum sander works well and is easier to control.
Grinding the ends with the teeth opposite to each other and grind both at once. Allow about a half inch for the lap joint.
![]()
You want to end up with the two ends looking something like this. A lap joint will be much stronger than a butt joint and you can do all your brazing from one side.
Once ground, keep the steel free of any oil and dirt.
Fixturing
The blade ends should be clamped onto a steel jig using toolmakers clamps, or something that will not overheat and burn or melt. Make sure this joint is aligned the way you want it.
These pictures will give you an idea. You can just use a flat piece of steel and see how that works for you. You want to hold the two halves in place without crushing any teeth. The steel will want to move a little as it gets hot. Be ready for it.
 |
.jpg") |
.jpg") |
Heating
If using wire coat each end of the blade with paste flux and heat the whole of the joint to bright cherry red before applying the solder. With the blade still bright cherry red gently pinch the joint together with a pair of pliers. This provides for a flat, even joint. Gently, gently, gently. Do not squeeze all the braze alloy out. If you have 0.001” to 0.002” braze alloy between the two parts it should be right. Less is o.k. as long as there is still some braze alloy.
Brazing the blade should be quick and easy. The blade is thin so it won’t a lot of heat to get it to temperature. If you use a paste flux the water will boil out. Then nothing. Then the flux will bubble up and look pretty bad. Then the flux clears up and braze alloy melts.
Remember the difference between heat and temperature. Flux gets used up by a combination of heat and time. Too much heat, taking too long to get silver braze to melt will cause flux to get used up dissolving oxides and go black and no longer work and also more time for blade to expand and the overlap joint to slip over it self getting a thicker joint with possible thin spots on both sides after grinding back.
Alternate Heating Method
You can also heat a pair of brazing tongs bright red and clamp the two parts together. The red-hot tongs wiIl heat the blade and melt the solder. Keep the tongs clamped on the joint until they turn black.
Inspection
Check to see that you have a nice even line of braze alloy all the way around the joint. If you have to you can reflux, reheat and apply more braze alloy. It should be the color of the original alloy without too many holes in it. Holes mean you boiled the zinc out of it.
Annealing
After you have heated the joint enough to get the braze alloy to flow, back off the heat and let it cool a bit. A short annealing carbon steel is necessary for high speed steel. The high speed steel blade joint is re-heated to slightly below the melting point of the solder and the torch’s flame backed away allowing the joint to slowly cool. The process is repeated two or three more times taking the temperature to a lower point each time and allowing the blade to cool slowly. File a piece of un-annealed steel and the file will slide. On the annealed steel it should bite.
Cleaning Flux
After the blade has cooled to room temperature, remove the excess flux by brushing under warm water. If you used enough flux it will be very dark and easy to remove once it has cooled. If the flux is clear and hard to remove you burnt it all up. Use more next time.
Grind or File Flat and Smooth
File or grind the blob of solder off flush with the surface of the blade and flat off the blade edges to allow smooth running of the blade through the saw guides.
**Notes**
- Do not use wood for a fixture for brazing. Brazing typically takes place above 800 F. Wood burns around 1200 – 1400 F. The most common braze alloys for this work (49, 50 or 56% Silver) melt around 1300F. An oxy -acetylene torch runs at 4,000 F +. Can’t see where using wood for a fixture is a good idea.
- Do not cut the blade near the original weld unless you cut the weld out entirely. Stay far enough away so that the weld from the factory does not get too hot to touch. Remember that the clamps will serve as a thermal barrier to some extent.
Cutting MDF and Plywood
Posted on Thursday, March 19th, 2015 at 1:32 pm.
Cutting MDF Compared to Plywood
Both MDF and Plywood can be very tough on the cutting tools. This is why it is important to use saw blades that are specifically designed for cutting MDF and Plywood. Below is a link to some tools specially designed for cutting MDF and Plywood along with some helpful tips on how to choose a saw blade for cutting MDF and Plywood. The rest of this article explains why MDF and Plywood have such a high wear on cutting tools and the differences bewteen the two materials.
Saw Blades for cutting MDF and Plywood
MDF is much harder on tools than plywood is for a variety of reasons.
- The density – especially the varying density (see below)
- The mechanism of separation. Plywood shears while MDF ruptures.
- The amount and kinds of fiber
- The amount of glue and additives used to stretch it.
MDF is harder on cutting tools for several reasons.
- There is just more material being cut. Typically MDF is heavier than plywood because MDF uses wood fibers and then compresses them. (See below)
- Plywood uses peeled wood while MDF can use a variety of fibers some much more abrasive.
- Plywood and MDF can both use the same woods. However in plywood the cells are open or hollow. In MDF the cells have been compressed flat. Cutting hollow a straw is easier than cutting a solid piece of plastic because you can cut the straw one wall at a time.
- The binder is distributed differently in the two materials. In plywood the binder is largely in the overlapping sheets. MDF can be considered binder with particles in it.
In analysis of worn tools we see several things.
- Just the amount of material being cut.
- MDF is more abrasive because it denser. When cutting the fibers are severed but the cut material rubs on the side of the tooth causing wear similar to the effect of a stiff bush versus a soft brush.
- MDF seems to trap more heat in the cut and heat affects the saw tips. Again this is a natural property of the density and the glue distribution.
Suppositions
- It is widely believed that MDF is “grabbier” on cutting tools and tests with ammeters have seemed to confirm this. MDF draws more power than wood or plywood.
- It is widely believed that the glue in MDF is stretched with a clay like binder much as clay is used in paper. This binder is much more abrasive than wood as clay is technically fine sand.
- MDF is made of wood fibers and any source can be used. Although the fibers are broken down into cells they retain many of their base properties. Bamboo cells have different properties than fir cells.
The Materials
Particleboard
This is the generic name for a panel manufactured from lignocellulosic or plant materials. Technically, this is can mean anything from straw or Bagasse (sugarcane stalks) to wood. This material is combined with a synthetic resin or other suitable binder, and then bonded together under heat and pressure. The basic raw materials for particleboard are plant residues or low-quality logs. Some recycled material, where it is economical to use such a substance, is now part of the raw material supply.
MDF, or Medium Density Fiberboard
The same general procedure is employed to manufacture MDF, except that the panels are compressed to a density of 0.50 to 0.80 specific gravity in a hot press by a process in which the entire interfiber bond is created by the added [synthetic resin or other suitable] binder. A wide variety of raw material types can be handled in an MDF plant. These types range from pulp chips to planer shavings to plywood trim to sawdust. Other non-wood materials, such as bagasse, (sugarcane stalks) also make excellent MDF.
Plywood
These panels are made by laying up layers, or plies, of wood so that the grain direction in each ply runs at right angles to the one next to it. Cross-grain construction is what gives plywood its strength and dimensional stability. Standard veneer-core plywood 3/4 in. thick consists of seven plies: two outer veneers, plus five hardwood or softwood plies between them. The layer structure leads to more uniform properties than solid wood, since the effects of grain anisotropy are minimized. The properties of plywood vary with the quality of the constituent layers; typical values are listed below.
Physical Properties
MDF
Modulus of Elasticity of 2500 – 5000 MPa
Modulus of Rupture is from 28 to 80 MPa.
Density of 600-800 kg/m³
Particle board density 160-450 kg/m³
Hardboard (high-density fiberboard) 500-1,450 kg/m³
Color (visual) ……………… Beige
Density ………………………39 lbs./foot³
Internal Bond ……………….90 lbs/inch²
Moisture Content …………..5-8%
Hardness (Shore D)……….45-55
MDF weight 70 90- – 100
Plywood
Tensile Strength, Ultimate 31 MPa 4500 psi parallel to face;
Flexural Modulus 9.3 GPa 1350 ksi 8.2 – 10.3 GPa.
Modulus of rupture in bending is typically 0.06 GPa.
Compressive Yield Strength 31 – 41 MPa 4500 – 5950 psi parallel to face
Shear Modulus 0.17 GPa 24.7 ksi in plane (rolling shear)
Shear Modulus 0.7 GPa 102 ksi through thickness (edgewise shear)
Shear Strength 1.9 MPa 276 psi in plane (rolling shear).
Shear Strength 6.2 MPa 899 psi through thickness (edgewise shear)
Thermal Properties
CTE, linear 20°C 6.1 µm/m-°C 3.39 µin/in-°F
